What is WebMoney
WebMoney is one of the first international electronic payment systems, especially widespread in Runet and the CIS countries. It was founded in 1998, and over the entire time it has been tried by about 36 million users.
A distinctive feature of this payment system is its reliability and abundance of convenient functions. If you are a freelancer or just make money online, then WebMoney will become your constant assistant. It can be used for:
- payment of utilities;
- transfers via the Internet to other wallets or payment systems;
- receiving payments on websites;
- withdrawal of earned funds;
- borrow;
- raise funds.
As you can see, there really are a lot of functions. Now let's figure out how to create your own personal WebMoney wallet and get your first certificate.
About the payment system
The WebMoney payment system is a very convenient system for money transactions on the Internet. The main advantage is that payments are made instantly: you press a button and in a couple of seconds the money arrives to the recipient. There are many advantages to using WebMoney:
* Receive money without leaving home; * Long distances are not a problem. Even if the payer is in another city, there will be no problems and the money will go to your wallet; * Operations are performed in a matter of seconds; * Low commission (0.8%); * Multi-level protection and payment confirmation.
Registration in the system
Registration in the system is open to everyone, but to complete it you need a free phone number. It is divided into four phases, and one of the features is the requirements for email and contact information already at the first stages - it is impossible to create a wallet anonymously. But, even after entering your date of birth, you can make online payments only in a limited manner.
First you need to go to the official website and click the “Registration” button:
- At the first stage, the phone number field is filled in.
- The second stage - we are asked to fill out a short questionnaire, which includes the date of birth (a wallet can be created from the age of 12 with parental consent), a security question to restore access and an email.
- On the third, the phone is checked by sending an SMS with a code to it.
- At the fourth stage, we come up with a password for the account.
A few recommendations regarding the password: it should not be very light, but ideally complex, containing many symbols and special characters, since this is a future personal account (here it is called WMID - WebMoney ID) with access to money.
Installing Keeper Classic
So, you have downloaded the program. Run the downloaded file to install it. Carefully read the terms of the agreements and follow the installation steps by clicking the “Next”
At the end of the installation a window will appear in front of you (Figure 1)
Fig 1.
Here you can choose whether to install the additional program WebMoney Advisor . Personally, I uncheck the box because I use a firewall for security and don’t use the other functions of WebMoney Advisor.
After clicking on the “Finish” , the program is installed!
A shortcut to WebMoney Keeper Classic has appeared on the desktop. Click on it and launch the program. A window will appear (Fig. 2) in which we select “Register in WebMoney” and click the “Ok” .
Fig 2.
In the next window (Fig. 3) you need to enter the Registration Code. It is in the letter that you received when registering with WebMoney.
Fig 3.
Copy this code from the letter into the field and click the “Next” . Now the “ Preparing to generate a key file for access to WebMoney ” window will appear (Fig. 4)
Fig 4.
To generate key files, randomly press keyboard keys and move the mouse. As soon as the generation indicator bar reaches the end, you will see another window (Fig. 5).
Rice. 5
We wait for some time, after which a window appears in which you are congratulated on registering in the WebMoney Transfer system (Fig. 6).
Fig 6.
Click the “Next” and go to the next window - saving the key file (Figure 7).
Fig 7.
You can select the location where the key file will be stored and set an access code (password).
*Remember the location where you save the key files. If in the future you forget where the key files are, then try searching for them on your disks by turning on the search across all disks and entering in the search bar: *.kwm
**The key access code must be different from the access password for your WMID, otherwise the program will write to us about this error. Enter the password twice and click the “Next” button. The final stage of creating a wallet. The program asks us to enter an Activation Code . (Figure 8.)
Figure 8.
Check your email, the activation code should be delivered to you. The letter looks like this:
Quote:
Dear member of the WebMoney Transfer system!
To activate your WMId XXXXXXXX, you must enter the activation code in the appropriate dialog of the WebMoney Keeper Classic program. Activation code: 441978195.
Best regards, WebMoney Team.
Copy the code (in my case it is 441978195), paste it into the field and click the “Next”
* If you do not receive emails from WebMoney Team to your mailbox, then you need to use another site that provides mail services. I use mail from yandex.ru. Letters arrive there without problems.
Everything is ok, a window appears (Fig. 9), in which we click the “Finish”
Figure 9.
If you want, you can select the checkbox to begin the procedure for obtaining a personal certificate . You can find out more about the types of certificates here: https://passport.webmoney.ru/asp/WMCertify.asp
After clicking on the “ Done ” button, you will see the main window.
Creating a WebMoney wallet
After we have created an account, we get to our personal account, where... it’s empty. The fact is that, unlike many other payment systems (QIWI, Skrill), it is not equal to a wallet. Those. the latter must be created separately for each currency, which is a feature of WebMoney. Here is a small step-by-step instruction on how to make a WebMoney electronic wallet in rubles, dollars or any other famous currency:
- Click plus in the free area and select the currency
- Sign the user agreement
That's all. Quite simple and fast, don’t you think? And here is a list of the main currencies, the wallets of which can be created without unnecessary problems (licensing agreements are different):
- WMR (Russian ruble);
- WMU (Ukrainian hryvnia);
- WMZ (American dollar);
- WME (euro),
- WMX (BTC cryptocurrency), etc.
For specific wallets, you need to obtain a certain level of access (certificate).
There is one important point: an amount above a certain limit cannot be stored on one WebMoney wallet at a time. So, for example, for a ruble wallet (WMR) with an anonymous certificate (you receive it immediately after registration), this amount is equal to 45,000 rubles, while at the same time for a dollar wallet (WMZ) it is already $300. Limits for one-time, daily and monthly transactions are set separately. To increase them, you need to increase your access level. I’ll tell you how to do this now.
How to create a Webmoney wallet
Let's consider several options so that you choose the most convenient and easy one for yourself. I would like to note that with the help of WebMoney you can carry out various operations only with a minimum certificate. It is obtained by adding personal data, including scanned copies of documents.
Via website
Let's start with the WMZ wallet (American dollar), since this is the currency the service offers to create without obtaining a certificate.
1. Visually search for the “Wallets” category and click “+ add”.
2. Immediately in the proposed options, select the currency that we need (perhaps everything will be different for you, because the type of wallet offered may depend on the client’s country). If you need another currency, you can select from the list by clicking “More”.
3. After this, you need to read the user agreement, check the box about it, and select “Continue.”
4. That's all - now you have successfully created your first WMZ wallet on WebMoney.
On the phone
You can also create an e-wallet on your phone. For convenience, I suggest downloading the applications of this resource. This will make it much more convenient to work. The whole point of creation is simple, practically no different from the previous version. After installing the program and authorization, the process will look like this:
1. We see our Z-wallet and to the right of it there is a “+”. Click on it.
2. Next, the application prompts us to select the desired currency, click from the list and it automatically appears with us.
Creation on a computer using Keeper
You can also work with currencies using an application that is installed on your computer. In order to do this you need:
- have stable Internet;
- must have an account;
- The Keeper program must be installed on the computer.
The meaning of creating wm wallets is absolutely the same as in the previous methods.
Types of certificates and how to get a “formal” one
WebMoney is a money transfer and settlement system. This creates a kind of space for various Internet scammers who are not averse to making money at someone else’s expense. Previously, it was quite difficult to catch them - it was not possible to find out who owned this or that wallet. Now everything is different, thanks to a system of certificates that show how much you can trust a particular user. There are several levels of certificates:
- Anonymous - issued immediately after registration and receipt of WMID. Allows you to perform basic operations with the minimum possible limit.
- Formal is the second certificate. It differs from anonymous in that it allows you to carry out transactions with an increased limit and transfer money to other participants in the system without unnecessary problems. Issued after uploading a scan of your passport to the website.
- Initial - most users of the system have this certificate, as it is an indicator that it actually belongs to the person in whose name the wallet is registered.
- Personal is the best for the average user. It can only be obtained after a personal meeting with an authorized participant in the system or a registrar in the nearest large city (Moscow, St. Petersburg).
I will talk about the second type - a formal certificate, because this is what you can get without any problems by following a few simple steps immediately after registration. Well, also upload a scan of your passport. So, go to the certification center and fill out all the necessary personal data, logging in with your WMID.
Filled out? All! It’s not for nothing that this is a “formal” certificate - we formally passed the test. Of course, in order to further work with the system and increase confidence, you need to upload a scan of your passport to your profile and now it is already being verified, which takes up to two weeks of working time. But the main task has been completed - the certificate has been received!
Bottom line
As you can see, registering and creating a wallet is the easiest thing you can do on Webmoney. The payment system has been on the market for many years and is trusted by customers. Both regular freelancers and private entrepreneurs prefer to have electronic wallets. And this is not strange, because WebMoney is one of the few companies that gives loans to its clients.
I hope this article was useful and you won’t have any questions about “how to use wallets.” I look forward to your comments on this topic, see you next time.
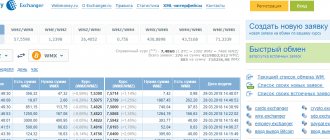
Exchangers
Please note that different deposit and withdrawal methods have different fees. In fact, Webmoney is “fed” by this commission. It is somewhat more profitable to change Webmoney money through exchangers. You can receive money immediately in cash, or you can use a money transfer, Internet banking, and so on. Let's take, for example, the most famous exchange “Best Change”.
In the column on the left we select the currency that we want to change, and in the column on the right, accordingly, the one we want to receive. There are also all kinds of filters and reviews. But the system itself generally shows the best options at the beginning.
When withdrawing money to a card, you first need to attach this card to your Webmoney account. This is very easy to do:
- Instructions for various payment systems;
- Service for attaching cards.
Since September of this year, WebMoney has changed the procedure for attaching cards for the safety of users. Namely, each card is bound for only an hour (after which the action can be repeated). Only WebMoney employees know how long this event will last (and even then, they know). But safety is safety.
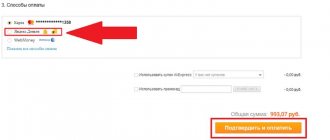
Transfer from webmoney to Sberbank
Two main conditions in order to successfully transfer money to a Sberbank card: the presence of a formal certificate and 2-3 days. When you need funds urgently, you should use numerous exchangers. If you have a passport of the required level or higher, a card and time, log in to Webmoney Banking, a Webmoney service for transactions using bank cards.
There, go to the “Withdraw” section and select a currency, and then a withdrawal method. You have the opportunity to make a bank transfer, repay a loan or make a postal transfer. Click Forward. If you have used this service before, it will be easier for you to use the saved template. If you are making a transfer for the first time, click “New details”.
Enter your Bank Identification Code (BIC). After the system will automatically fill in the “Recipient’s Bank” field, all you have to do is enter the recipient’s current or other account number. All you have to do is enter the amount you want to receive. In the “Give WMR” field, the system will automatically calculate how much money will be withdrawn along with the commission. Agree with the agreement. If you wish, save the replenishment template.
Webmoney access programs
In general, there are two services, so to speak, for convenient access to WebMoney. One is “browser”, the other is a phone application. “Browser” is the WM Keeper WebPro program:
- Link to the program;
- Instructions for installing and using the program from the Webmoney service.
To work with the “keeper” you need to confirm transactions via SMS messages or via notifications on your phone. Actually, for the second option you need to use the E-NUM application. Detailed instructions for E-NUM are also available on the WebMoney website.
How to top up your WebMoney wallet
At the moment, there are a lot of ways to replenish webmoney. The user only needs to understand whether he wants to top up his account:
- From a bank card online;
- Using payment terminals;
- Through Internet banking;
- Through other electronic money;
- From a mobile phone account;
- By handing over to the guarantor for storage;
- Through a bank branch;
- Using money transfer;
- By postal transfer;
- Prepaid cards and vouchers;
- Through an ATM;
- Bank transaction;
- Using the WebMoney exchange office.
Each of the listed options has its pros and cons. The main disadvantage is the commission charged for replenishment. It can range from 0% to 12.5% . The most profitable method of replenishment, which is available for all currencies, is to transfer money from another attached electronic account, for example, Yandex.Money or Qiwi. The commission in this case is 0% , the money comes instantly. It turns out that you can top up without commission.
With zero fees, the account can also be topped up using vouchers or prepaid cards. Sometimes there is no commission at Webmoney exchange offices, but more often it reaches 4%. Transfer to an electronic account from a bank card can be free in rubles, hryvnias and tenge, but it only takes up to 24 hours. The largest commission is charged when topping up via a mobile phone. From a thousand rubles, maybe 120 can be withdrawn as a commission.
Personal profile functions
Registered users of the WebMoney system can perform the following actions through their personal account:
- open wallets for different currencies;
- make transfers;
- pay for services;
- top up your mobile phone balance;
- receive cashback;
- replenish bank cards;
- issue invoices;
- pay off fines and debts;
- save payment templates;
- use a credit service to receive loans;
- add reliable counterparties;
- receive technical support;
- view the status of the approved loan;
- change currency;
- buy cryptocurrency;
- view statistics of completed transactions;
- receive checks.
Card from WebMoney
The Webmoney service also provides the ability to create an international card. Actually, after registration you will receive the card itself by mail and will be able to withdraw your dollars or euros to it:
You can apply for a card on the Webmoney website (here is a link to this matter). In essence, you simply receive a card from a foreign bank, with which you can easily withdraw money from an ATM.
How to find out your number
Beginner users often confuse the system identifier (WMID) and the wallet number. It's not the same thing. The ID is required to log in and serves as proof of the user's identity.
The wallet number is the account number that must be specified when making a transaction.
Finding out the wallet number is easy. It consists of 12 numbers and a letter, which indicates the type of storage. For WMZ this letter will be Z.
Ways to find out the number in various storage options:
- Webmoney Keeper WinPro (Classic). After entering the program, the user must select the “Wallets” tab and look at the wallet number starting with the letter Z in the list of available storages.
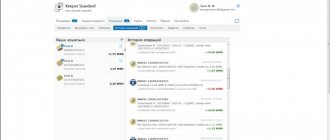
- Webmoney Standard. After logging into the site, you need to select a menu with a stylized image of a wallet. On the page that opens, the user will see not only the wallet numbers, but also all the latest transactions.
- Mobile app. To find out the WMZ wallet number, in the mobile application you need to “tap” on the rectangle depicting a wallet on which a Pentagram or an aligned pyramid is drawn. A similar design is depicted on US dollars. The picture will be enlarged to fill the entire screen, and the number will be available to the user.
pros
Withdrawal of profit
So, let me first tell you why the Webmoney wallet is so good for a binary options trader. The first is the withdrawal of profits. All traders know that you can withdraw to the card only that part of the profit that is equal to the size of the initial deposit. And everything beyond this goes either by bank transfer or to various online wallets. And, of course, there can be problems with a bank transfer. If you constantly receive a certain amount into your account from a financial trading company (from an offshore location), questions may arise. The amount may be frozen in the account, the bank has the right to demand an explanation from you, and also refuse to service your account (our beloved Sberbank is especially famous for such “delights”).
Taxes
And, of course, the issue of taxes is also relevant for traders. If banks can transfer information about the receipt of funds to your account to the tax office for further proceedings, then electronic systems like WebMoney, of course, do not transfer anything anywhere.