How to set up and use MSI Afterburner to overclock your video card
The MSI Afterburner utility is not only a tool for increasing the performance of the computer's graphics subsystem.
Its arsenal is full of additional tools for video capture and monitoring, and they are expanded through plugins. We will tell you how to use Afterburner: we will provide a general algorithm for overclocking video chips, and describe the main functions and options of the application. We'll show you monitoring capabilities, ways to personalize graphs, and control video card fan speed. We will show you how to configure Afterburner control using hot keys.
About the program
A stable and reliable assistant for gamers, overclockers, and miners, capable of taking discrete graphics performance to a new level. Gives access to monitoring the performance characteristics of the graphics accelerator in real time. Creates graphs of two dozen indicators, including temperature, frequencies, and load on video card components.
Read about video card overclocking parameters at this link.
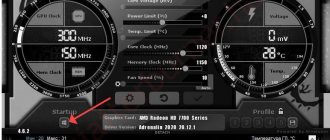
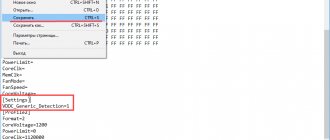
The appearance of windows changes thanks to design themes. The updated engine made it possible to reduce their size and speed up the drawing of the interface. With RivaTuner istic Server (RTSS) it will record video from the screen to a file and display the frame rate (FPS) in the game. MSI Afterburner stores up to five overclocking profiles and supports hotkey management. Can automatically start with Windows. To autostart, click on the “Startup” icon.
Button to autorun the program along with Windows.
Construction of a “curve”, which one to choose and for what tasks
Via the Shift key
By holding down the “Shift” key, you begin to drag the desired point up/down (the entire “curve” moves along with it), equivalent to increasing the frequency through the main program window, “apply”:
MINUS : you do not control the voltage, therefore consumption and temperature.
Through one point
Press LMB on the selected frequency/voltage and pull up; the easiest and most convenient way to find stable matches is “apply”:
PLUS : you can find the minimum voltage for the required frequency. MINUS : sometimes takes a lot of time.
Via Ctrl
Hold down the “Ctrl” key and begin to drag any point up/down, thereby decreasing/increasing the aggressiveness of the behavior of the curve, usually used during extreme overclocking, “apply”:
MINUS : you do not control voltage, consumption and temperature.
steps
You build a semblance of steps at several selected frequencies/voltages, my favorite method for maximum overclocking under LSS, which allows you to control temperature drops and more, “apply”:
PLUS : maximum performance levels can be achieved. MINUS : you need to know the exact correspondence of each frequency/voltage.
Practice (thanks for the tip - Ascom)
To build a straight line after a given point, just do the following:
Using Shift+LMB, select the required area starting from the initial point and all the way to the right:
Select the very first point in the selection:
Press the Shift+Enter combination simultaneously to switch to frequency editing mode:
Change the initial frequency to the required one:
Press the Shift+Enter combination at the same time to exit the frequency editing mode, the straight line will be built automatically, “apply”:
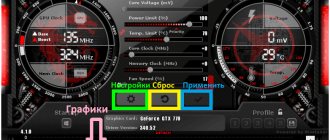
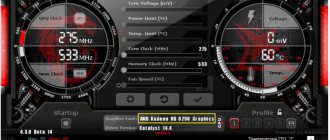
Dashboard
It is presented by two information elements with useful information about the operating modes of the hardware components of the graphics accelerator: core and video memory frequencies, voltage, thermal parameters, video core voltage.
Information elements of the utility.
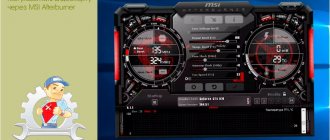
Below is the “Monitoring Window” - a panel with time graphs of the characteristics of the video card: frame rate, computing elements, RAM and video memory load, central and graphics processors, etc. (26 variables).
Panel with time graphs of video card characteristics
You can turn off unnecessary graphs, change the color of the curve and name (label), font, size for quick orientation. To expand the number of active monitoring graphs, third-party plugins are connected (with AIDA64, HW). Afterburner allows you to install end-to-end markers (left click while holding down the Alt button) in the monitoring window.
Monitoring window.
Why is the "curve editor" better than moving the slider?
When adjusting the frequency of a video card chip using the sliders, you cannot control the voltage, which is set automatically for the current frequency, which always leads to limits being reached and a constant “saw”:
MINUS : high consumption, high temperatures, drop in fps. PLUS : some synthetics “digest” this behavior and produce greater results.
When adjusting the editor, you can always find a voltage at which the chip frequency will remain at one value and decrease only when certain temperature levels are exceeded:
MINUS : you need to spend some time finding the required voltage for the required frequency. PLUS : reduced consumption, lower temperatures, stable fps.
Practice
When working with a “curve,” there are cases when some of the frequencies after the fixed one remain at the top and, as a result, the voltage you fixed “does not work.” This can be leveled in two ways.
In most videos, this is done by initially lowering the entire “curve” and after setting the desired frequency/voltage:
The method I use (habit) is through “selection + Shift”: the entire area that is above the desired point is selected with Shift + LMB held down, then the Shift key is released and any point in the selection moves down, then click “apply” and everything goes back to normal into place:
Main settings
The purpose of MSI Afterburner is to overclock the graphics subsystem by increasing the base frequencies and voltage of its components. This is done in the main window by dragging the sliders. Here are the options available:
| Core Voltage | The amount of supply voltage supplied to the card core |
| Power Limit | Limiting the maximum power consumption |
| Temp. Limit | Peak temperature, upon reaching which the program resets settings |
| Core | GPU frequency |
| Memory | Graphics memory frequency |
| Fan Speed | Graphics card cooler speed |
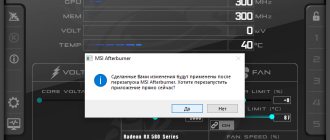
Some parameters may be inactive. To find out how to unlock controls in MSI Afterburner, such as Core Voltage, go to Settings, enable "Unlock Voltage Control" in Afterburner, apply the settings and restart the application.
Unlocking Voltage Control" in Afterburner.
Important. For more information on how to unlock sliders, read the publication.
MSI Afterburner Settings
To open the settings, click on the gear icon or use the combination Ctrl + S.
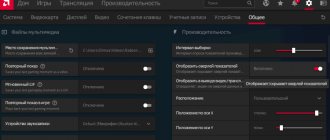
Basic
A tab with general settings for the interface, Afterburner behavior and compatibility.
General interface settings.
Cooler settings
Parameters for automatically adjusting fan speed by changing the curve. The temperature of the graphics core is set horizontally, and the cooler frequency as a percentage of peak is set vertically. The rotation speed update period is specified here (default is 5 seconds).
Cooler rotation settings.
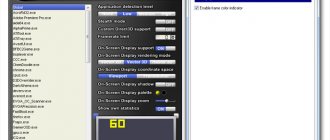
Configuring Monitoring Options in MSI Afterburner
Enabling/disabling graphs on the monitoring panel by clicking on the checkbox next to their name, customizing their appearance, and setting limit values. Limits are set here: minimum and maximum values (for example, temperatures). If the parameters that trigger an alarm are exceeded, a warning window will appear.
Setting up monitoring parameters/
Read more about working with the monitoring tool in the publication at the link.
OED - overlay screen display
Information panel with information about frame rates in games. These are frequencies, temperature, load (RAM and graphics memory, central and video core).
Important. Overlay doesn't work without RTSS.
Overlay Screen Display
The “Advanced” button will open the RivaTuner istic Server settings - a window with overlay parameters. Only if RTSS is installed.
RivaTuner istic Server settings.
Benchmark settings
Programming keys to start and stop the built-in benchmark, view test results, transfer the directory for storing them.
Programming keys to start and stop the built-in benchmark/
Capture screenshots, record videos
The first tab contains parameters for creating screenshots in 2D and 3D applications: save path, format, quality, hotkeys for triggering the shutter.
Capture screenshots.
In the next tab, configure the video capture parameters. It changes the keys to start and stop recording, indicates the characteristics of the video file: resolution, method (desktop, 3D), video format, container used to store it, frame rate. Below you select the audio source - Afterburner writes only one audio track.
Video capture settings.
Overclocking saving profiles
Adjusting the contents of cells with templates - overclocking settings, of which there are five in Afterburner. To activate each preset, you can set a global key combination and assign a profile slot to the video card operating mode: 2D or 3D.
Interface settings
In the section, pop-up tips are disabled, the localization language, temperature unit, and time display format are changed. Below you can change the themes (skins) themselves and the transparency level of the Afterburner window.
The program interface can also be customized.
Usage example
In the example, for a general understanding of the principle of operation of the curve, the so-called downvolt (not to be confused with mining) for the default boost frequency with a limit of 370W will be demonstrated, in order to clearly show what is happening “from the start”.
Settings
Test stand: — stand: open bench 'Open Benchtable 1.1' without additional cooling; — processor: Intel i9-9900K 5000/4700MHz + Noctua NH-U12A; - memory: Ballistix AES 4100MHz 16-21-39-2T; - mat. board: ASRock Z390 Phantom Gaming-ITX/ac + Samsung 970 Pro NVMe 512Gb; — video card: ASUS ROG Strix GeForce RTX 3080 OC Edition; — power supply: Corsair AX850 Titanium.
Fan operation: 630-1620 rpm (45-68%), which during testing did not exceed 1410 rpm.
Setting up Metro Exodus
Setting up Shadow of the Tomb Raider
First of all, we will find the maximum boost frequency, which is shown by the following tests: 3DMark TimeSpy/FireStrike/PortRoyal/SkyDiver, Metro Exodus, Shadow of the Tomb Raider (SOTR), Bright Memory (BMI). To obtain more “correct” values, the tests were run 5 times; the screenshots below show the best results:
In all tests there is an emphasis on VL/PL limits, including “corn”, and the final maximum frequency was 1980MHz, which we will continue to work with.
To find the minimum voltage for the desired frequency, the BMI test was initially used, as it was the most “corn” test, but later it turned out that it was not the most demanding and Metro and 3DMark TimeSpy went into battle. The rest of the tests turned out to be “dummy”, and subsequently the BMI test left a very strange impression (the reaction to any changes in chip/memory frequencies is minimal).
The maximum voltage that was observed and is usually seen in default is 1.081V, there is always a stop on it in PL, we take the point earlier, or even better, the starting point of the “step” and raise it to the required frequency - 1980MHz:
If the emphasis in PL continues, “take” the voltage to the left and so on until PerfCap in GPU-Z becomes “gray”:
As a result, the operating voltage was found - 0.962V, but as I wrote above, in difficult tests it still rested on PL and was subsequently obtained - 0.918V for a frequency of 1980MHz, at which all initial tests were passed:
The final (averaged) results can be seen in the table:
| Test | Value, points, fps before / after | Consumption, W before / after | Reduced consumption by, W | Temperature decrease by, °C |
| 3DMark TimeSpy | 18037 18298 | 382 358 | 24 | 1 |
| 3DMark FireStrike | 40488 40414 | 363 303 | 60 | 3 |
| 3DMark PortRoyal | 11616 11756 | 380 328 | 52 | 5 |
| 3DMark SkyDiver | 123866 123425 | 349 290 | 59 | 2 |
| MTR (min, avg) | 42 / 62 52 / 79 | 381 360 | 21 | 3 |
| SOTR (fr's, min, avg) | 14448 / 69 / 96 14534 / 69 / 95 | 364 303 | 61 | 4 |
| BMI DLSS off | 39 38 | 376 340 | 36 | 5 |
| BMI DLSS on | 100 99 | 366 303 | 63 | 6 |
As you can see, in most cases the reduction in consumption reached a decent 60W and, as a result, temperatures.
Also, the consumption reserve makes it possible to get even better results when overclocking at the current consumption limit.
Saving Afterburner settings by profile
The application can store up to five profiles with different overclocking settings and fan parameters (from the “Basic parameters” section):
Attention. To allow editing of profiles, click on the button with a lock icon above the cells.
- Overclock your video card - unlock and drag the sliders to the desired positions.
- Apply the new configuration.
- Right-click on the icon to save the settings to the cell. Saving overclocking settings.
- It will be highlighted in red and a corresponding notification will appear in the monitoring panel.
- Activate real-time settings with a left click, clear cells with a right click.
How to remove fps limit
FPS limiting can be disabled in the NVIDIA Control Panel.
You need to go to the section 3D Settings - Manage 3D Settings .
Set the vertical sync pulse to - Off .
Disabling Vsync in Nvidia Control Panel
Sometimes there is a limitation of the FPS of a game in full screen, when there are no restrictions in windowed mode. Therefore, you need to disable full screen game optimization.
To do this, right-click on the game launch icon and select properties.
Go to GTAVLauncher properties
In properties, open the tab - Compatibility . Check the box - disable full screen optimization .
Disable full screen optimization
How to enable fan control
- If the Fan Speed slider is not active, click on the gear icon or press Ctrl + S in the “Cooler” tab, check the box next to the only option and save the changes. Enabling software user auto mode.
- As a result, a graph will appear where you can set the fan speed depending on the performance of the graphics core thermal sensor. The cooling efficiency and noise of the video card depend on the shape of the curve.
- To make the curve rectangular, double-click on the graph with the left mouse button.
Reset button to default settings
By default, core voltage adjustment is locked and inactive, and the sliders do not move.
Saving video card overclocking results
Attention, if you get the error “The application could not start because its parallel configuration is incorrect,” try reinstalling C++ Redistributable.
MINUS : high consumption, high temperatures, drop in fps. PLUS : some synthetics “digest” this behavior and produce greater results.
Hotkeys
By default, most actions are not assigned to keyboard shortcuts. Bind hotkeys to actions in settings:
- Click on the empty “No” cell.
- Press and hold a free combination of buttons on the keyboard (not system ones, not used in other programs to avoid conflicts).
- Apply the changes.
Among the system hotkeys:
| Ctrl+S | Opens settings |
| Ctrl+M | Calling the dashboard |
| Ctrl+L | Prohibiting and enabling profile modification |
| Ctrl + I | Displaying system information |