You can use MSI Afterburner to adjust fan speed depending on temperature and to overclock your Radeon video card. The program can work with any video cards, but only in branded NVIDIA and AMD Radeon cards all sliders work, and with other video cards problems may arise and sometimes the voltage sliders do not move in MSI Afterburner.
The created overclocking of the MSI Afterburner video card will run at system startup
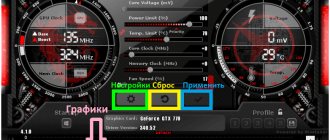
To properly configure MSI Afterburner, you must first make sure that the overclocking and cooling settings you make are applied to subsequent Windows startups. To do this, in the main program window you need to click on the inscription Apply overclocking at system startup and the green circle in front of the inscription should light up.
How to set up and use MSI Afterburner to overclock your video card
The MSI Afterburner utility is not only a tool for increasing the performance of the computer's graphics subsystem.
Its arsenal is full of additional tools for video capture and monitoring, and they are expanded through plugins. We will tell you how to use Afterburner: we will provide a general algorithm for overclocking video chips, and describe the main functions and options of the application. We'll show you monitoring capabilities, ways to personalize graphs, and control video card fan speed. We will show you how to configure Afterburner control using hot keys.
How to use MSI Afterbarner
MSI Afterbarner has a direct impact on the performance of the video card. Therefore, if the settings are incorrect, there is a possibility of damage to the video card. It is recommended to follow the instructions and not take risks.
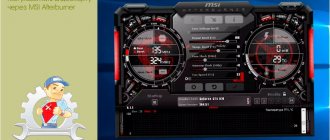
MSI Afterbarner supports video cards from NVIDIA or AMD. If you have a different video card, the program will not work correctly. You can find out information about your video card yourself through the “task manager” or in MSI Afterbarner (Figure 1).
Figure 1 – Installed video card (highlighted in yellow).
About the program
A stable and reliable assistant for gamers, overclockers, and miners, capable of taking discrete graphics performance to a new level. Gives access to monitoring the performance characteristics of the graphics accelerator in real time. Creates graphs of two dozen indicators, including temperature, frequencies, and load on video card components.
Read about video card overclocking parameters at this link.
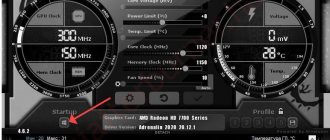
The appearance of windows changes thanks to design themes. The updated engine made it possible to reduce their size and speed up the drawing of the interface. With RivaTuner istic Server (RTSS) it will record video from the screen to a file and display the frame rate (FPS) in the game. MSI Afterburner stores up to five overclocking profiles and supports hotkey management. Can automatically start with Windows. To autostart, click on the “Startup” icon.
Button to autorun the program along with Windows.
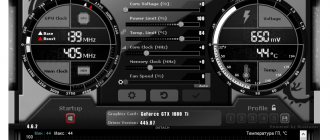
Dashboard
It is presented by two information elements with useful information about the operating modes of the hardware components of the graphics accelerator: core and video memory frequencies, voltage, thermal parameters, video core voltage.
Information elements of the utility.
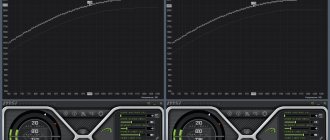
Below is the “Monitoring Window” - a panel with time graphs of the characteristics of the video card: frame rate, computing elements, RAM and video memory load, central and graphics processors, etc. (26 variables).
Panel with time graphs of video card characteristics
You can turn off unnecessary graphs, change the color of the curve and name (label), font, size for quick orientation. To expand the number of active monitoring graphs, third-party plugins are connected (with AIDA64, HW). Afterburner allows you to install end-to-end markers (left click while holding down the Alt button) in the monitoring window.
Monitoring window.
Main settings
The purpose of MSI Afterburner is to overclock the graphics subsystem by increasing the base frequencies and voltage of its components. This is done in the main window by dragging the sliders. Here are the options available:
| Core Voltage | The amount of supply voltage supplied to the card core |
| Power Limit | Limiting the maximum power consumption |
| Temp. Limit | Peak temperature, upon reaching which the program resets settings |
| Core | GPU frequency |
| Memory | Graphics memory frequency |
| Fan Speed | Graphics card cooler speed |
Some parameters may be inactive. To find out how to unlock controls in MSI Afterburner, such as Core Voltage, go to Settings, enable "Unlock Voltage Control" in Afterburner, apply the settings and restart the application.
Unlocking Voltage Control" in Afterburner.
Important. For more information on how to unlock sliders, read the publication.
Memory overclocking
The next step is to overclock the memory, and the same method is applied with slightly different steps. We recommend increasing the memory clock speed by 50-100 MHz per step.
- Again, once you encounter regular errors and crashes in Kombustor, reduce the memory clock speed in small 10 MHz increments until you find a stable setting.
At this point, you should test the new settings over an extended period of time to ensure that the card is stable.
I would recommend running Kombustor for at least 10 minutes and watching the map as it does so. Just make sure there are no glitches, crashes, etc. If so, reduce the clock speed by 10 and repeat the test.
- Once you are satisfied with the settings, everything will work stably. Save your settings as a profile by clicking the floppy disk icon and selecting one of the profile options.
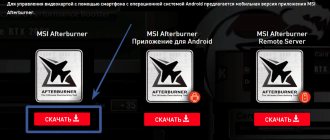
Watch a detailed video on how to install and download MSI Afterburner
subscribe
MSI Afterburner Settings
To open the settings, click on the gear icon or use the combination Ctrl + S.
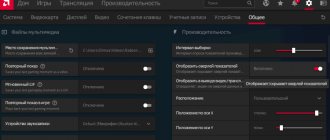
Basic
A tab with general settings for the interface, Afterburner behavior and compatibility.
General interface settings.
Cooler settings
Parameters for automatically adjusting fan speed by changing the curve. The temperature of the graphics core is set horizontally, and the cooler frequency as a percentage of peak is set vertically. The rotation speed update period is specified here (default is 5 seconds).
Cooler rotation settings.
Configuring Monitoring Options in MSI Afterburner
Enabling/disabling graphs on the monitoring panel by clicking on the checkbox next to their name, customizing their appearance, and setting limit values. Limits are set here: minimum and maximum values (for example, temperatures). If the parameters that trigger an alarm are exceeded, a warning window will appear.
Setting up monitoring parameters/
Read more about working with the monitoring tool in the publication at the link.
OED - overlay screen display
Information panel with information about frame rates in games. These are frequencies, temperature, load (RAM and graphics memory, central and video core).
Important. Overlay doesn't work without RTSS.
Overlay Screen Display
The “Advanced” button will open the RivaTuner istic Server settings - a window with overlay parameters. Only if RTSS is installed.
RivaTuner istic Server settings.
Benchmark settings
Programming keys to start and stop the built-in benchmark, view test results, transfer the directory for storing them.
Programming keys to start and stop the built-in benchmark/
Capture screenshots, record videos
The first tab contains parameters for creating screenshots in 2D and 3D applications: save path, format, quality, hotkeys for triggering the shutter.
Capture screenshots.
In the next tab, configure the video capture parameters. It changes the keys to start and stop recording, indicates the characteristics of the video file: resolution, method (desktop, 3D), video format, container used to store it, frame rate. Below you select the audio source - Afterburner writes only one audio track.
Video capture settings.
Overclocking saving profiles
Adjusting the contents of cells with templates - overclocking settings, of which there are five in Afterburner. To activate each preset, you can set a global key combination and assign a profile slot to the video card operating mode: 2D or 3D.
Interface settings
In the section, pop-up tips are disabled, the localization language, temperature unit, and time display format are changed. Below you can change the themes (skins) themselves and the transparency level of the Afterburner window.
The program interface can also be customized.
Managing consumption of Nvidia video cards using Nvidia Inspector and NVIDIA Profile Inspector programs
The main advantage of NvidiaInspector is the ability to set the GPU Core voltage to less than 800 mV, which significantly reduces the power consumption of video cards.
The NVIDIA Profile Inspector utility can be downloaded here: https://www.guru3d.com/files-details/nvidia-profile-inspector-download.html.
Both of these programs require NET Framework 2 or higher installed on the operating system.
In order to control the core voltage of Nvidia video cards using the Nvidia Inspector and Nvidia Profile Inspector utilities, it is advisable to disable other video card management utilities on the desired GPUs, including MSI Afterburner.
If CUDA - Force P2 State (maximum performance) mode is enabled on video cards, it can be turned off using the NVIDIA Profile Inspector program. With P2 mode always on, you need to use twice the core and video memory overclock values. If this mode has not been manually turned off, it is usually turned on by default.
Screenshot of NVIDIA Profile Inspector in the CUDA mode control section - P2 State:
Screenshot of NVIDIA Profile Inspector in the CUDA mode control section - P2 State
In addition, to increase the hashrate in the NVIDIA Profile Inspector program, you can adjust the power management mode value by setting it to Prefer Maximum Performance. To save energy, this value can be set to optimal or adaptive.
Screenshot of NVIDIA Profile Inspector in the Performance mode control section:
Screenshot of NVIDIA Profile Inspector in the Performance mode control section
The Nvidia Inspector program allows you to do the following:
- Reduce core voltage to save electricity.
- Overclock the video card core to increase hashrate.
- Set the rotation speed of video card coolers to the desired value to maintain the desired temperature (preferably up to 60 degrees, which minimizes wear on the electronic components of the video card).
This is interesting: QR code scanner online: how to scan a QR code through your phone camera
To use NvidiaInspector, you need to create an empty text file in the same folder where it is installed. In its text part you need to insert the following lines (for a rig of 5 video cards, count from 0 to 4):
@echo off
TIMEOUT /T 25
SET FAN=44
SET VOLT=660000
SET TEMP=60
SET GPU0=-setMemoryClockOffset:0,0,380 -setBaseClockOffset:0,0,190 -setFanSpeed:0,%FAN% -lockVoltagePoint:0,%VOLT% -setTempTarget:0,0,%TEMP%
SET GPU1=-setMemoryClockOffset:1,0,380 -setBaseClockOffset:1,0,130 -setFanSpeed:1,%FAN% -lockVoltagePoint:1,%VOLT% -setTempTarget:1,0,%TEMP%
SET GPU2=-setMemoryClockOffset:2,0,510 -setBaseClockOffset:2,0,100 -setFanSpeed:2,%FAN% -lockVoltagePoint:2,%VOLT% -setTempTarget:2,0,%TEMP%
SET GPU3=-setMemoryClockOffset:3,0,490 -setBaseClockOffset:3,0,-50 -setFanSpeed:3,%FAN% -lockVoltagePoint:3,800000 -setTempTarget:3,0,%TEMP%
SET GPU4=-setMemoryClockOffset:4,0,380 -setBaseClockOffset:4,0,100 -setFanSpeed:4,50 -lockVoltagePoint:4,650000 -setTempTarget:4,0,%TEMP%
"nvidiaInspector.exe" %GPU0% %GPU1% %GPU2% %GPU3% %GPU4%
Then change the extension of this file to BAT, create a shortcut to this file and place it in the rig's startup folder. Typically this is C:UsersusernameAppDataRoamingMicrosoftWindowsStart MenuProgramsStartup.
To configure a batch file for a specific mining rig, set the following parameters:
- TIMEOUT /T 25 – time in seconds to delay the launch of NvidiaInspector (in this case, 25 seconds);
- SET FAN=44 – video card fan rotation speed, in percentage (here – 44%);
- SET VOLT=660000 – voltage on the video card core, in millivolts (in this case 660 mV);
- SET TEMP=60 – target temperature of the video card (60 degrees);
- SET GPU0 – parameters for the first video card (numbering starts from zero);
- -setMemoryClockOffset:0,0,380 – GPU memory overclocking (in this case +380 MHz). Typically, Hynix memory can be overclocked to 400-550 Mhz, Micron - to 500-700 megahertz, and Samsung - to 650-850 Mhz;
- -setBaseClockOffset:0,0,190 – overclocking the core frequency (here +190 MHz). To ensure a high and stable hashrate, it is better to set the frequency of video cards to at least 1100 MHz (for some video cards, including the 1080 series, this value can be higher). The voltage can be controlled in the Nvidia Inspector window (or in the HWinfo, Aida64 programs), which is launched by double-clicking on its file.
Screenshot of the Nvidia Inspector utility window, which controls the core voltage (Voltage = 650 mV), memory frequency and fan speed (to set the required values, launch a BAT file with the required parameters):
Screenshot of the Nvidia Inspector utility window, which controls core voltage (650 mV), memory frequency and fan speed
- -setFanSpeed:0,%FAN% — fan rotation speed (in this case, for a zero video card it is equal to the value set in SET FAN=);
- -lockVoltagePoint:0,%VOLT% — core voltage (in this case, for a zero video card it is equal to the value set in SET VOLT=);
- -setTempTarget:0,0,%TEMP% - target temperature (in this case for this video card it is equal to the value set in SET TEMP=).
Screenshot of the BAT file for using NvidiaInspector for a rig with 6 video cards:
Screenshot of the BAT file for using NvidiaInspector for a rig with six video cards
By properly reducing the core voltage, you can significantly reduce the consumption of video cards while maintaining an acceptable hashrate. This is especially true now, with the low exchange rate of most cryptocurrencies and a general decrease in the profitability of mining.
If the rig is unstable, you need to look through the miner logs, find the problematic video card and either increase the voltage on its core, or reduce the overclocking of the core and video memory. Usually, when overclocking heavily on the core, the entire rig freezes, and when overclocking from memory, only the miner freezes.
Saving Afterburner settings by profile
The application can store up to five profiles with different overclocking settings and fan parameters (from the “Basic parameters” section):
Attention. To allow editing of profiles, click on the button with a lock icon above the cells.
- Overclock your video card - unlock and drag the sliders to the desired positions.
- Apply the new configuration.
- Right-click on the icon to save the settings to the cell. Saving overclocking settings.
- It will be highlighted in red and a corresponding notification will appear in the monitoring panel.
- Activate real-time settings with a left click, clear cells with a right click.
Saving configuration
The configuration can be saved to one of five profiles. To do this, click on the save button, and then select the profile number:
In order for the necessary settings to start immediately when the system starts, you need to click on the button with the Windows icon under the left circle (highlighted in blue).
Now open settings again and select the Profiles tab. There, in the “2D” line, leave everything unchanged, and in the “3D” line, select your profile, in the screenshot it’s “1”:
That's it, now the configured profile will turn on when you start games or anything else demanding.
How to enable fan control
- If the Fan Speed slider is not active, click on the gear icon or press Ctrl + S in the “Cooler” tab, check the box next to the only option and save the changes. Enabling software user auto mode.
- As a result, a graph will appear where you can set the fan speed depending on the performance of the graphics core thermal sensor. The cooling efficiency and noise of the video card depend on the shape of the curve.
- To make the curve rectangular, double-click on the graph with the left mouse button.
Hotkeys
By default, most actions are not assigned to keyboard shortcuts. Bind hotkeys to actions in settings:
- Click on the empty “No” cell.
- Press and hold a free combination of buttons on the keyboard (not system ones, not used in other programs to avoid conflicts).
- Apply the changes.
Among the system hotkeys:
| Ctrl+S | Opens settings |
| Ctrl+M | Calling the dashboard |
| Ctrl+L | Prohibiting and enabling profile modification |
| Ctrl + I | Displaying system information |