Afterburner MSI is a free utility for overclocking a video card and monitoring the temperature and load of the video card and processor. It supports Nvidia and AMD Radeon video cards.
You can download the msi afterburner program in Russian on the official website at: https://download.msi.com/uti_exe/vga/MSIAfterburnerSetup.zip.
During installation, the program will offer to install Riva Tuner Statistics Server along with it. You must agree, because without this some functions will not be available.
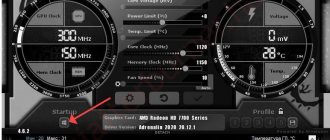
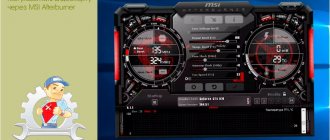
The MSI Afterburner start window looks like this:
If you are planning to overclock your video card, remember: you ALWAYS do this at your own peril and risk. Overclocking may well lead to a video card failure, and there are no guarantees that this will not happen. Although, of course, if you do everything carefully and carefully, nothing like this should happen.
First, let's consider the standard situation when the sliders above the buttons do not reach their maximum values (as in the screenshot above). If they do, some additional steps will be required, and more on them later.
Setting up Afterburner MSI
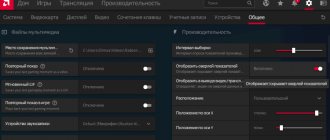
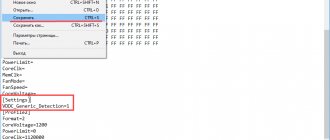
Click on the “Settings” button and check the following boxes in the “General” tab:
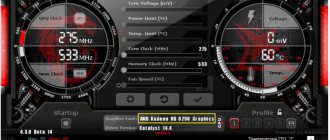
The top checkbox should be checked if you have not one, but several video cards. After clicking OK, the program will require a restart, and when it opens again, you will see that the Core Voltage slider has been unlocked:
How to work with MSI Afterburner
You already know about what MSI Afterburner does. Now there will be detailed information on how to perform basic settings that will allow you to start working comfortably with the utility.
How to choose a convenient design
The standard design is not the most convenient. Below are detailed instructions on how to configure MSI Afterburner to get a comfortable interface as a result:
- Open settings by clicking on the gear button. There is an arrow pointing to it in the image.
- Select the “Interface” tab and in the next subsection click on “Skin Properties...”.
- Please indicate the design that suits you.
Additional Information! You can also choose the format of temperature, time and design language.
- Open the "basic" tab and select the GPU that is being configured. This is necessary in case several video cards are used at once. If you have two parallel devices that work together, synchronize the settings.
Parsing the interface
To help you understand what is displayed where, here is a detailed explanation of the key components:
- On the left there is a panel that reflects the frequency at which the GPU operates, as well as the video memory.
- On the right is the current temperature indicator, as well as the voltage level.
- In the central part there is a frame containing sliders, which will be discussed later.
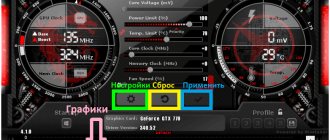
- Below the frame there is a button for calling up settings. There is an element thanks to which you can reset everything to its factory state.
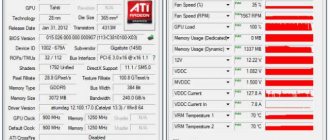
- The lower part is occupied by the monitoring window, which displays a graph of temperature and other board parameters.
- The last important element is a panel for managing overclocking profiles, as well as switching between them.
What can you customize on the home screen?
If we continue to look at the main screen, we should separately describe the frame with sliders. There you can adjust:
- Memory frequency.
- Number of cooler revolutions.
- The frequency at which the graphics core operates.
- Temperature.
- Power.
- The voltage applied to the core.
How to cool your system efficiently
For example, how can I adjust the CPU temperature using MSI Afterburner? This action can be implemented by changing the cooling parameters.
In order to make changes to the settings of MSAI Autoburner, click on the small gear, which is located next to the slider called “Fan Speed”.
Note! If you want the fan speed to automatically change depending on the temperature, click on the "Auto" button.
As for the settings, in the “Cooler” section, specify the update frequency of the parameter. Then you guarantee your PC operation, in which the system will cool efficiently and on time.
Setting up for games
One of the key parameters is the frequency of the core and video memory. The “Core Clock” slider is responsible for changing the CPU frequency. The higher you set the parameter, the more information will be processed within one clock cycle.
“Memory Clock” is a setting that programs the video memory frequency.
Note! It is important to change the indicators gradually, by just a couple of percent. After that, test the system.
Now you know how to set up MSI Afterburner for gaming. The main thing is to act thoughtfully so as not to harm the system.
Core Clock
It’s worth starting with this slider, GPU frequency. First move it to the right by about 40-50 MHz and click the "Apply" button:
Its current frequency will be marked on the left circle. Now you need to test your video card using any graphics testing program. FurMark or 3DMark are good options.
You need to ensure that, firstly, the temperature does not rise above 90 degrees, and secondly, that no graphic artifacts appear on the screen: stripes, some non-displayable areas of the screen, color glitches, in general, anything strange and unusual .
Then you can further test the resulting frequency by launching any demanding game and playing it for about an hour to be sure. The temperature can be displayed in a background transparent window using Afterburner MSI itself; these settings will be discussed at the end of the article.
Automatic overclocking of a video card is a bad idea; we will overclock it manually, which will give us greater overclocking potential. If everything works well without glitches and overheating, you need to move this slider to the right again and test it again. The further you go, the smaller the step it is better to take. For example, it’s no longer 40, but 20. And this needs to be done until the limit is found at which glitches will appear. Reduce the frequency from the found limit by 10-15 MHz and retest again, just in case. Everything should work. If so, you can move on to the next point.
msi video card overclocking
If you want to increase the performance of your video card without having to buy a new one, then overclocking your video card's graphics processing unit (GPU) is a great way to do it. On a Windows PC, this has never been easier.
msi video card overclocking
To overclock your video card you will need:
- discrete (plug-in) video card;
- desktop PCs based on the PCI-Express bus are the main platforms in modern computer games;
- a tool for testing a video card (benchmarking). When overclocking, you need to bring the video card to maximum power to check its stability. The Unigine Heaven program is well suited for this, it has various graphic settings and displays data on the memory clock speed, GPU, GPU temperature and FPS (the number of frames per second produced by the video card, characterizing its performance);
Unigine Heaven program for testing a video card - MSi Afterburner. This free software from MSi is used to overclock graphics cards on any NVIDIA or AMD GPU. Afterburner allows you to “monitor” the hardware, change the memory frequency, GPU core frequency, change their voltage and control the rotation of the video card fans.
MSi Afterburner program for overclocking video cards
Note! It is not recommended to overclock video cards on laptops, as their heat dissipation is difficult. It also doesn't make sense to overclock Intel graphics or other integrated systems.
Cooler
To change the cooler settings, you need to click on the “Settings” button, go to the “Cooler” tab and check the “Enable software user auto mode” checkbox there.
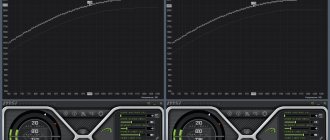
A graph of the dependence of the cooler rotation speed on the video card temperature will appear below. It can be changed manually by moving the gray squares. There is no need to set the maximum speed to any temperature, because this will quickly damage the cooler. By combining these settings with the ones above, you can achieve optimal overclocking of your video card.
How to show CPU and GPU temperature on taskbar?
There are many free programs and applications available in the Windows system tray to monitor CPU or GPU temperature.
But first you need to understand what normal temperatures should be and when high temperatures become alarming.
There is no definition of good or bad temperature for a processor.
It may vary depending on the build, brand, technology used and highest maximum temperature.
To find information about the maximum temperature of a processor, search the Internet for the product page for your specific processor and find the maximum ideal temperature.
This may also be stated as "Maximum Operating Temperature".
Regardless of the reading, always try to keep the temperature 30 degrees below the maximum limit to be on the safe side.
Now whenever you monitor your CPU or GPU temperature in the Windows 10 taskbar, you will know when to stop what you're doing.
Saving configuration
The configuration can be saved to one of five profiles. To do this, click on the save button, and then select the profile number:
In order for the necessary settings to start immediately when the system starts, you need to click on the button with the Windows icon under the left circle (highlighted in blue).
Now open settings again and select the Profiles tab. There, in the “2D” line, leave everything unchanged, and in the “3D” line, select your profile, in the screenshot it’s “1”:
That's it, now the configured profile will turn on when you start games or anything else demanding.
Troubleshooting errors in Windows 10
MSI Afterburner does not start due to the lack of the Microsoft Visual C++ package - errors appear that the msvc*.dll file is missing.
The solution is to download and install libraries from the Microsoft website:
- Download the package for Windows from the page: select your language, click Download.
- Check the box next to the assembly that corresponds to the bit level of the installed operating system, and click “Next”.
Installer type.Attention. To check the OS bitness, hold down Win + X, select “System” and look at the line “Type...”.
I'm interested in the bitness of Windows, not the CPU. - Run the executable file and wait until the archive is unpacked.
The old VC++ package will be removed, read the news for a couple of minutes, respond to messages.
- Accept the terms of use for the software and click “Install”.
What is written is worth reading. - After restarting Windows the problem will be resolved.
If the sliders are at maximum
If the Core Clock and Memory Clock sliders are at their maximum values and it is impossible to move them to the right, this may mean that overclocking of the video card is blocked or not supported. Even in this case, Afterburner MSI sometimes still allows you to overclock. Although, of course, the risk for the video card is much higher. To unlock overclocking, you need to go to the folder where the program was installed; you can find it by right-clicking on the program shortcut and selecting “File location” (faster) or “Properties”:
The “Working folder” line will show the installation path:
So, in this folder you need to find the MSIAfterburner.cfg file and open it using Notepad. Scroll to the UnofficialOverclockingEULA line and after the “=” sign, enter the following text: “I confirm that I am aware of unofficial overlocking limitations and fully understanding that MSI will not provide me any support on it.” In the UnoficcialOverlockingMode line, place the number “1” after the “=”. It should look something like this:
Now, when you restart AfterburnerMSI, the sliders should move from the maximum, allowing you to move themselves to the right.
Core Voltage slider does not move
After installing MSI Afterburner, this slider is always greyed out. This was done for security reasons. In order to fix the problem, go to “Settings-General” and check the box next to “Unlock voltage” . When you click "OK" , the program will restart with the user's consent to make changes.
Overlay display
AfterburnerMSI can display statistics with the click of a button while playing a game or any other process. To configure this function, you need to click the “Settings” button and open the “Monitoring” tab:
Having selected all the characteristics of interest in turn, you need to check the box “Show in Overlay Screen Display” for each of them.
Now we need to configure the display of this overlay screen display. To do this, you need to go to the adjacent “OED” tab and assign quick launch keys for calling and removing the EOD:
In general, all you need is the top button (F9 in the screenshot), which will both call up and remove the EOD.
How to reset Nvidia Inspector settings?
Go to the "Games" Section. Go to Profile Settings. ...For NVidia:
- NVIDIA Control Panel.
- Go to adjust the size and position of the desktop.
- Select “Zoom” and activate “Full Screen”.
- In the scaling menu, make sure it's set to "GP".
- Save, you're done.
31 Dec
2022 Interesting materials:
How to conclude a loan agreement? How to preserve autumn leaves? How to preserve roses? How to fix paint on fabric? How to close the door to the pantry? How to close an individual entrepreneur with debts in 2022? How to close an individual entrepreneur in another region? How to close the Atol cash register? How to close a window with keys? How to close a shift through the KKM driver?
Screenshots and video capture
The last feature of Afterburner MSI that will be discussed in this article is its ability to save screenshots or videos. Screenshots are configured in the Screenshots settings tab:
There you can enable this option by assigning a key to it, configure the folder where screenshots will be saved and the format in which they will be saved. The same is true with video capture.
It is configured in the “Video Capture” tab and there you can configure a large number of video capture properties. For example, you need to configure the sound, whether it will be recorded from the microphone, from the speakers, or from there and from there at once, the quality, the video format and the folder where it will be saved.
The big advantage of Afterburner MSI is that the tooltips provide detailed and complete information about each window, function and button, so it is simple and easy to use both for overclocking a video card and for recording game videos. It seems to combine several completely different programs at once, so it can probably be useful to everyone.
Description
The main function of the MSI Afterburner utility is to overclock the video card, real-time hardware monitoring and adjust the cooler speed .
In addition, it is used to test PC performance and capture screenshots and videos from the monitor.
The program works with video cards of certain brands; you can download it for free on the manufacturer’s website.
MSI Afterburner can only be applied to NVIDIA and AMD Radeon graphics chip . In addition, some application settings may be blocked, and incorrect installation will damage the video card.
A program for checking RAM and overclocking a video card is useful only if used correctly.