We looked at how to properly and safely overclock a video card for mining and gaming in the MSI Afterburner program
What is MSI Afterburner for? MSI Afterburner is a program developed by graphics card manufacturer MSI. It helps with overclocking, game monitoring, performance testing, and video capture.
The program also offers a whole bunch of interesting features and benefits, which we will discuss in more detail in this article.
Afterburner was originally designed with MSI cards in mind.
However, since its release, the software utility has been configured to work alongside all other video cards.
Currently, it is the most commonly used program for overclocking and monitoring games on the PC screen.
This article will discuss the main features of the utility, what they offer and how to use them.
Before we dive into this, let's first download and install the software.
Downloading and installing the program
Attention: You make all recommendations from this article, as well as from any other, at your own peril and risk, and therefore we are not responsible for your actions and the consequences of these actions, which, however, you have long been warned about.
We will use the most famous tool in this area, which, as already mentioned, we previously mentioned in articles. Then we were talking about the topic of how to change the fan speed of AMD Radeon video cards. As you understand from the title and subtitle, we will talk about MSI Afterburner.
The program is completely free, supports the Russian language and provides complete tools for overclocking video cards. You can get it from this link or from the developer’s website.
Note: Before installing MSIA, as well as subsequent overclocking, it is recommended to update the drivers for your video card (the latest version can be obtained from the NVIDIA or AMD website).
The installation is extremely simple and I will not dwell on it (I will only say that it is not necessary to install Riva Tuner Statistic Server, but it can be useful for advanced diagnostics and overclocking, which we will consider in the next part of the article).
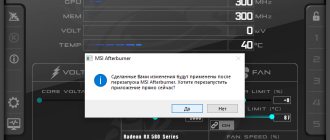
After installation, you will be prompted to launch this same MSI Afterburner, which can, in general, be done from the very beginning, having first closed everything valuable that is open and not saved, because:
You will be asked (or rather strictly recommended) to restart the computer to correctly determine the initial settings (we are talking about the frequencies of the memory and graphics processor of the video card, as well as a number of other parameters that could be changed at the driver level or third-party programs).
I recommend agreeing that the acceleration then proceeded most smoothly.
After rebooting the computer, actually launch the program using the shortcut that appears on the desktop or in the Start menu.
How to properly overclock a video card
All you need to do to successfully overclock a video card is to increase the frequency of the GPU and video memory using driver applications or other software. In this case, it is necessary to monitor the temperature and stability of the specified components.
First, you should find out the current state of things, that is, understand how stable the video card is before overclocking, what the frequencies and temperatures are. To do this, it is convenient to use stress test software, for example, you can use FurMark. It is with the help of the current program that you need to check the video card on your computer before purchasing.
In the main window we are greeted with the name of the graphic card (1) or cards (if your computer has several of them, the first one in order will be tested). It must match the model obtained in the GPU-Z utility. For the stress test, it is recommended to select a resolution (2) equal to the resolution of your monitor. After pressing the GPU stress test (3) and GO , the transition to testing mode will occur, where the video card will be fully loaded.
When a similar picture appears on the screen, you should pay attention to two sections with extremely useful information about passing the test. First of all, you need to look at the temperatures under load (2). Judging by the graph, you can see how the card gradually reached a maximum temperature of 75 C and stopped at this level. This temperature is quite acceptable and does not cause any concern.
Attention! If before overclocking, the temperature of the video card in this test is more than 80C, then there is a risk of overheating and instability after increasing the frequencies. Additionally, at elevated temperatures, the risk of GPU and memory failure increases, as does fan wear. And also if, after starting the test, the temperature graph suddenly rises above 90C, the test must be turned off (ESC key), since there are obvious problems with the cooling system.
First launch and customization of appearance
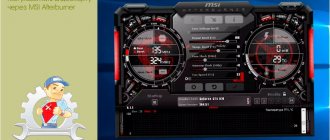
The initial appearance of the program may depend on the downloaded version and variety, for example, it may be like this:
Or more advanced and fashionable, like this beauty:
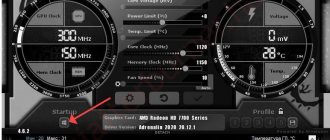
If you have the first option or a different one from any of the above two, then you need to find the settings button (in the first screenshot above it is the “Settings” button in the lower right corner, and in the second, red, it is an icon with a picture of gears), then click into it and go to the “Interface” tab:
Where to choose the last of the proposed interface formats, namely “MSI Tech Afterburner skin by Drerex Design”, and/or not to do this, but leave the one that is there, or the one you like and work with it by analogy with what is written in the article (as they say, all BSODs are different in taste and color).
Setting the video card cooler speed
Let's deal with cooling first to avoid any problems before overclocking our video card:
Before moving on to overclocking using the example of the selected (or not selected) interface, we recommended that you read the second part of the already mentioned article about managing coolers and/or open the settings again, go to the “Cooler” tab, where you enable the software custom auto mode by setting graph accordingly (an example can be seen above).
Program management, functionality
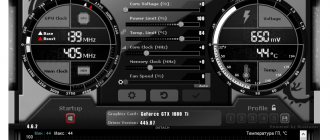
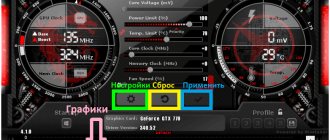
Now let's talk about what's here, in this very MSI Afterburner, why and why (the picture above is clickable):
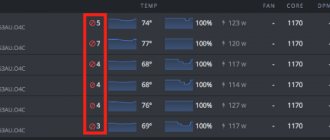
- In the left circle you can see the current (at this particular point in time) values of the core and memory frequencies (top and bottom, respectively). These values can change depending on the load, so most likely you see underestimated values that “jump” (change), if, of course, the video card supports energy saving management by lowering/increasing frequencies;
- In the right corner you can observe the current (at this particular moment in time) voltage and temperature values (top and bottom, respectively);
- At the very bottom you can see the change in the temperature mentioned above over time, i.e. in the form of a graph;
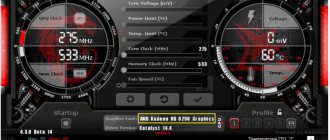
- At the very core of the interface there are sliders that will allow us to overclock our video card and control various parameters of its frequencies, as well as power consumption and cooling.
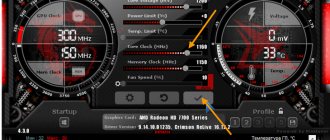
Separately about the sliders and the values on them:
- Core Voltage (mV), - is responsible for the voltage of the core of the graphics processor of the video card and, as a rule, this value is rightly blocked initially (used mainly for advanced overclocking, because it can cause harm);
- Power Limit (%) - controls the power consumption limit of the video card, helps to achieve higher overclocking with higher power consumption and/or vice versa;
- Temp.Limit (*C), - controls the critical temperature limit for the video card, if it is supported by the video adapter (touching, as a rule, is not recommended and/or is used for advanced overclocking and cooling);
- Core Clock (MHz) is one of the main parameters we need for overclocking. Responsible for the frequency of the leading GPU (graphics processing unit) of the video card;
- Memory Clock (MHz) is the second of the main parameters we need for overclocking. Responsible, as you may have guessed, for the frequency of operation of the video card memory;
- Fan Speed (%), - allows you to set (in percentage) the rotation speed of the cooling system fans (if the software custom auto mode is set and enabled, the Auto value is lit).
This is the basic basis that is worth knowing about the interface parameters in order to understand how to overclock a video card and what characteristics play a role in this.
Increase core frequency
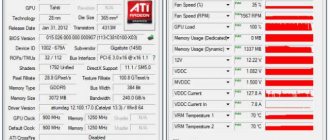
The first thing you need to do is open GPU-Z and look at the core clock (Default Clock). In our case, the GTX 1080 from Gigabyte operates at a frequency of 1633 MHz .
Next, open MSI Afterburner and first move the Power Limit to the right all the way. This will allow the video card to work at full capacity. After this we start increasing the Core Clock . We recommend starting with a step of 50 MHz . Don't forget to confirm the changes using the " Apply " button.
Minimize the program and open Furmark . Select the maximum resolution available for your screen ( Resolution ) and 8X anti-aliasing ( Anti-aliasing ). Check the box next to “ Fullscreen ”. Run the stress test ( GPU stress test ).
It is recommended to twist the donut (popular name Furmark) for at least 10 minutes. This way you will allow the video card to warm up to maximum values, and the temperature graph will level out. Additionally, you will test the GPU for stability. If you see an error like “the graphics driver has stopped responding and has been stopped,” then you can stop the stress test. This indicates that the chip does not maintain the selected frequency and needs to be lowered. Artifacts (various image distortions) may also appear on the screen. This also indicates that the selected frequency is too high. You don’t have to worry about the health of the component. Neither artifacts nor errors associated with the operation of drivers can harm it. In this case, you just need to restart the PC, and the device will work back to normal.
If no problems are observed in the operation of the video card, then you can continue to increase the frequency and run the test each time. It is required to do this until the above problems are discovered. Then we simply lower the frequency slightly by 10-20 MHz and run the test again. If everything works stably, then you can move on to the next stage - testing in games.
The benchmark itself does not reflect the overall picture; it is just a synthetic test. And although games are rarely able to load the video card at 100%, they are still more demanding on the graphics accelerator. It happens that a card passes a stress test without problems, but artifacts appear in the game. In this case, we simply reduce the frequency and look for the maximum frequency values at which the video card works flawlessly. In our case, we managed to increase the frequency by 150 MHz , which ultimately equaled 1783 MHz .
MSI Afterburner Tips and Profiles
You can also find out in more detail about any element (as well as about those that we have not described) by simply holding the mouse on it for a long time and looking at the tooltip:
By the way, just below the circle with the temperature and to the right of the card name, as well as the driver version, there is a listing of the so-called Profiles, from 1 to 5, using which you can save various achieved values and quickly switch between them (for example set the overclocking state on one profile, and on the other, on the contrary, lower frequencies and power consumption).
To save the profile, you need to set all the sliders in the order you need, then click on the “Save” button and then on the parameter from one to five.
MSI Afterburner - practical part
How to take off with this, i.e. how to overclock a video card this way? Very simple.
Initially (remember the reboot?) you have determined the operating parameters of the processor frequency and memory of your video card, which, accordingly, are indicated by the values for the Core Clock (MHz) and Memory Clock (MHz) sliders:
The simplest, basic overclocking is a gradual (this is important!) increase in these values to the limit when the card stops working stably (more on this below). That is, the sequence of overclocking a video card via MSI Afterburner is as follows.
Introduction. Program selection
Today, overclocking the graphics accelerator of a video card is a task within the capabilities of everyone and a safe way compared, for example, to overclocking a processor. The process of overclocking a video card itself does not deprive the video adapter of warranty service; operating at higher frequencies will be an incomparable advantage, as a result, performance in games and tasks will increase by an average of 10%. GPU tuning does not require technical knowledge. Today, overclocking a video card is a common task; you don’t have to fiddle with BIOS settings and don’t need to look for additional tools. This will require the help of several auxiliary utilities.
We will need to download two utilities - MSI Afterburner - to overclock the video card and a small GPU-Z utility. It is also advisable to have the game installed on your computer to measure performance; any modern game will do. For example: The Division 2 or Shadow of the Tomb Raider. Benchmarks for evaluating performance are recommended to download Furmark or 3DMARK. Both allow you to check not only the performance gain, but also whether the video card is overheating. Download the programs and start studying them.
What is important to know and understand in the process
Next, to understand how to overclock a video card to the maximum, you need to know:
- By “a little” we often mean not even tens, but units of MHz, and the peak overclocking value is achieved precisely due to these units, and the frequencies are interrelated, both in a good and in a bad sense;
- Overclocking (or rather overheating, increasing voltages and other related nuances) can damage the video card (and not only it) and/or reduce its service life;
- No image distortions should appear anywhere and, ideally, never;
- Temperatures must be within normal limits, which is regulated by the appropriate slider and/or custom auto mode, which will automatically select the cooler rotation speed, depending on the temperature during overclocking and testing;
- It may turn out that the card is overclocked only by one of the parameters (i.e. only by memory or only by the processor), and when changing another parameter problems begin - this means that overclocking is possible only by this value, i.e. Core Clock (MHz) and Memory Clock (MHz), respectively;
- It is not recommended to touch other sliders at this stage (except, perhaps, “Power Limit”, and even then with caution), as this can significantly affect the life and operation of the video card.
Well, of course, it’s worth saying the following.
Memory overclocking
It is carried out in exactly the same way as overclocking the video core. We gradually increase the frequency until signs of the video card not working correctly appear. Next, we slightly lower the frequency and test it in games. And so on until we find the exact maximum possible frequency value at which the system will operate stably. Keep in mind that, usually, video memory can be overclocked better than the core. In our case, we managed to increase the frequency by as much as 600 MHz . It is not recommended to change the memory and core frequencies at the same time. If you do this, then when errors occur, you will not know exactly what the problem is. In high frequency memory or core.
In case of problems
If something went wrong and the image disappeared altogether, became distorted to the point of being impossible to reset, hung, and/or something else:
- Try rebooting or turning off the computer using the button on the case; usually, the next time you start it, it automatically resets to standard values;
- If this does not help and faulty profiles are automatically loaded at startup (although this usually does not happen without a special checkbox in the settings), then it will boot into Windows safe mode, removing the program from startup and/or deleting it there, and then booting in reverse mode.
In a nutshell, perhaps it’s something like this. That being said, let's move on to the afterword.