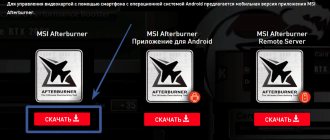
Why MSI Afterburner doesn't work
The program is designed to overclock video cards by increasing the clock frequencies of the graphics memory and core, and the voltage on the video core . Supports undervolting - reducing the supply voltage to lower the operating temperature of the video card. By the way, not always to the detriment of its performance.
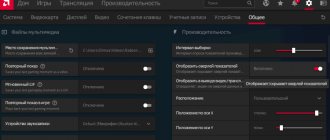
MSI Afterburner displays graphs to display the dynamic parameters of the video adapter and other components, displays over a dozen indicators (fps, frequency, temperature) in an overlay (overlay - on top of games). A program in Windows 10 may not work for a number of reasons:
- an outdated version of the application is installed - select a new version and update the program ;
- the program does not automatically overclock the video card when turned on due to its absence in autorun ;
- the current edition of Afterburner is partially compatible with a number of the latest drivers and video cards;
- the computer does not have RivaTuner Statistic Server (RTSS) or the Microsoft Visual C++ package ;
- monitoring overlays are disabled or incorrectly configured;
- The video card model does not support regulation of the selected parameter (often this is Core Voltage);
- you are running a game that does not support overclocking.
Let's look at each problem in detail.
Core Clock Options
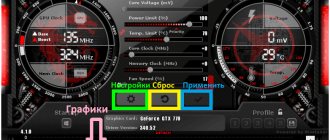
The initial setup of MSI Afterburner is complete. Now let's look at the main points with the available parameters. Let's move on to the GPU frequency section.
To begin with, you can move the slider a little to the right (about 40-50 MHz). The current frequency will be displayed in a special window. After this, it is advisable to test the video card with any utility designed for this purpose, for example 3D Mark or FurMark. In this case, you should pay attention that during the test the temperature does not rise above 90 degrees, and that side effects do not appear on the monitor (strips, flickering, disturbances in the color palette, etc.). If the test does not reveal anything critical, to be on the safe side, it is better to launch some resource-intensive game and play for at least an hour. If everything is fine here, you can move the frequency slider even further to the right, but to a lower value (say, not 40, but 20 MHz) and test again. The further to the right the slider is moved, the lower the value used.
As you progress through the game, you can display the current parameters on the screen in the form of a translucent window. As soon as incorrect operation of the card at a certain value is noticed, the slider should be returned to its previous position and stopped there.
How to enable "fixed" voltage control
Initially, update the graphics driver by downloading the installer from the official website of the video card. Do not trust the operation to the Update Center, third-party applications, or driver packs.
The normal functioning of MSI Afterburner is restored by activating the “fixed” video core voltage control.
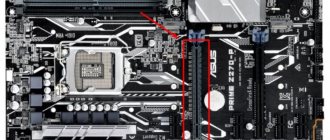
- Open the file VEN_1002&DEV*BUS_1&*0.cfg stored in the “%programfiles%/MSI Afterburner\Profiles\” directory, where * are character sets, through a text editor – Notepad or Notepad ++.
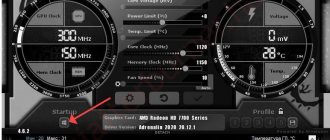
I am interested in the file with “BUS_1”, where one is the number specified in the program.If there are several documents, click on the “Information” button (with the letter “i” in the utility window) and look at the number after the word “BUS” in the “Identifier” line.
- In the [Startup] section, specify the value of the Format parameter equal to 2.
- At the bottom, add the [Settings] section, in it – the VDDC_Generic_Detection parameter equal to one, save the changes.
Application settings are changed through a standard notepad.
If the sliders don't work in MSI Afterburner on Windows 7 - 10, here you go.
What to do if the settings are not available?
Sometimes you may encounter a situation where all the sliders are shifted to the right, and it is impossible to change their position. This is a normal blocking in case the video card does not support overclocking. But there is a way out.
To begin, in the directory where the program was installed, find the file MSIAfterburner.cfg and open it using Notepad. Scroll through the contents to the line UnofficialOverclockingEULA. In it, after the equal sign, you need to write the text “I confirm that I am aware of unofficial overlocking limitations and fully understanding that MSI will not provide me any support on it””, and then in the UnoficcialOverlockingMode line after the equal sign we put one.
Program update
Use the latest version of the utility. Although new releases of the Windows 10 application are released no more than once a year, check if one of the previous versions of MSI Afterburner is installed on your computer. Click on the “Information” icon (with the letter “i”) and look at the line “About the product”.
Compare the release of the running utility with the latest version located at the link. How to properly remove and reinstall the application, read the publication.
Method 4: Fighting computer viruses
Occasionally, enabling the overlay in MSI Afterburner can be interfered with by malware that conflicts with the program for the same reasons as useful software. Of course, getting rid of malware is more difficult than getting rid of regular applications, but the procedure will not cause you much trouble if you use the instructions written by one of our authors.
Read more: Fighting computer viruses
We are glad that we were able to help you solve the problem. In addition to this article, there are 12,578 more instructions on the site. Add the Lumpics.ru website to your bookmarks (CTRL+D) and we will definitely be useful to you. Thank the author and share the article on social networks.
Describe what didn't work for you. Our specialists will try to answer as quickly as possible.
Troubleshooting errors in Windows 10
MSI Afterburner does not start due to the lack of the Microsoft Visual C++ package - errors appear that the msvc*.dll file is missing.
The solution is to download and install libraries from the Microsoft website:
- Download the package for Windows from the page: select your language, click Download.
- Check the box next to the assembly that corresponds to the bit level of the installed operating system, and click “Next”.
Installer type.Attention. To check the OS bitness, hold down Win + X, select “System” and look at the line “Type...”.
I'm interested in the bitness of Windows, not the CPU. - Run the executable file and wait until the archive is unpacked.
The old VC++ package will be removed, read the news for a couple of minutes, respond to messages.
- Accept the terms of use for the software and click “Install”.
What is written is worth reading. - After restarting Windows the problem will be resolved.
Video card is not supported by the program
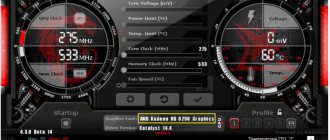
The MSI Afterburner tool is designed only for overclocking AMD and NVIDIA . There is no point in trying to overclock others; the program simply will not see them.
It happens that cards are partially supported, that is, not all functions are available. It all depends on the technology of each specific product.
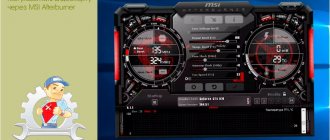
After support for Riva Tuner was discontinued, MSI Afterburner was released based on it. Its functions include: overclocking graphics processors by increasing the voltage of key elements, increasing the frequency of operation of the memory and graphics chip, regulating the speed of rotation of the cooler and monitoring the current state of the graphics card. How to use MSI Afterburner and what it is, we will consider below.
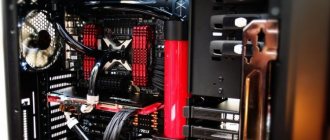
Note! When using the application, it is very important to closely monitor the temperature of the graphics processor, so as not to overheat the device and damage it. When using a powerful gaming video card, it is better to take care of a new cooling system.
The utility monitors the temperature dynamics of the device and is able to display warnings when a critical (set by the user) temperature value of the graphics chip is exceeded.
Changing the Enable ULPS setting
When using two Radeon video cards working in conjunction with AMD Crossfire, the “ULPS” option disables the second device when its power is not needed. The solution saves energy, but causes problems when overclocking and launching games. Automatic shutdown of the second graphics accelerator is deactivated in the Windows registry.
- Launch the registry editor with the “regedit” command in a Win + R window.
Opening a utility for editing a Windows database. - Through the main menu item “Edit” or with the combination Ctrl + F, open the search window.
Call up dialogue. - Find the key called “EnableULPS”.
Enter the name of the parameter and click “Find Next” or press Enter. - Double-click on the found parameter, enter the value “0” and save the changes with the “OK” button.
These actions will not cause any harm to your computer.
Questions and answers
What should I do if MSI Afterburner stops working after cleaning the registry?
If the registry cleaner app makes backups, restore it from the file. Alternatively, use a Windows restore point. Next, uninstalling and reinstalling Afterburner will help.
An application that has removed unnecessary keys from the registry should be replaced with an analogue one.
If the solutions to problems with MSI Afterburner described in the article and in the links did not help, write in the comments, we will understand the situation and suggest a solution.
Source
NVIDIA overlay
Before launching MSI Afterburner, shut down other programs for overclocking video cards, monitoring, including outputting fps and other information in an overlay - on top of games and other applications. The results of their parallel work lead to negative consequences.
- To disable overlays in GeForce Experience, visit the settings by clicking on the gear.
Calling configuration parameters. - Move the slider to the "Off" position. – to the left.
There is no need to save settings.
Saving settings and profiles
To save current settings, MSI Afterburner setup offers the user a choice of five profiles.
On the corresponding tab in the 2D section, we leave everything unchanged, and in the 3D drop-down menu we select our newly configured profile, which will contain the settings (there is also a value “Auto”, that is, this profile will be used by default when the application starts).
MSI Afterburner is not added to startup
The application is added to Windows startup in several ways:
- Visit the settings by clicking on the gear, activate the “Run with Windows” option.
Through the program settings. - Create a shortcut to the MSI Afterburner application in the "%userprofile%\AppData\Roaming\Microsoft\Windows\Start Menu\Programs\Startup" directory.
Often outdated versions of the application do not launch automatically - update Afterburner regularly. You can follow new versions on the page.
Additional ways to fix the error
To use the sxstrace program, run a command prompt as an administrator, and then follow these steps.
- Enter the command sxstrace trace -logfile:sxstrace.etl (you can specify a different path to the etl log file).
- Run the program causing the error, close (click OK) the error window.
- Enter the command sxstrace parse -logfile:sxstrace.etl -outfile:sxstrace.txt
- Open the sxstrace.txt file (it will be located in the C:WindowsSystem32 folder)
In the command execution log, you will see information about what kind of error occurred, as well as the exact version (installed versions can be viewed in “Programs and Features”) and the bitness of the Visual C++ components (if this is the case) that is needed for the operation of this application and use this information to install the desired package.
Another option that can help, or on the contrary, cause problems (i.e., use it only if you know how and are ready to solve problems with Windows) is to use the Registry Editor.
Open the following registry branches:
- HKEY_LOCAL_MACHINE SOFTWARE Microsoft Windows CurrentVersion S >Note the "Default" value and version list in the values below.
If the default value is not equal to the newest version in the list, then change it so that it is. After this, close the Registry Editor and restart your computer. Check if the problem has been fixed.