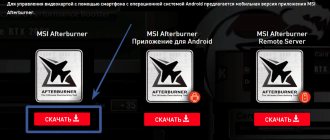
If you want to overclock your GPU or undervolt it, you've probably heard of an app called MSI Afterburner. Most guides mention this application as an easy and reliable way to overclock or undervolt your GPU. It supports Nvidia and AMD GPUs and can also be used to control the GPU fan speed as well as monitor its temperature.
If you're trying to use MSI Afterburner to change how the hardware on your system works and you can't change anything or the various controls aren't working, here's what you can do.
Core Voltage slider does not move
After installing MSI Afterburner, this slider is always greyed out. This was done for security reasons. In order to fix the problem, go to “Settings-General” and check the box next to “Unlock voltage” . When you click "OK" , the program will restart with the user's consent to make changes.
Saving settings
When the process is completed and the card is accelerated to maximum, you will need to maintain the current frequencies and cooler speed.
To do this you need:
- Click the Startup button.
- Click the save profile button. To do this, you will need to select any of the 5 slots that are highlighted. It's best to choose the first one.
- Go to the profile settings and in the 3D profile column check the display of the received parameters.
If other parameters are displayed in the tab, it is recommended to change them by entering the necessary numbers or testing again.
The sliders are at maximum and do not move
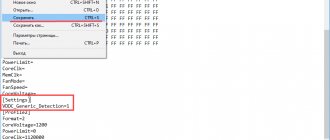
In this case, you can try to fix the problem through the configuration file. First, let's determine where our program folder is located. You can right-click on the shortcut and see the location. Then open “MSI Afterburner.cnf” using notepad. Find the entry “EnableUnofficialOverclocking = 0” , and change the value “0” to “1” . To perform this action, you must have administrator rights.
Then we restart the program and check.
Possible problems
to overclock a video card correctly using Problems may arise during the process. For example, manufacturers of some video cards pre-install a block on their devices that prevents acceleration.
To get rid of this block, you need to find the MSIAfterburner.cfg file and open it in Notepad. Next you will need:
- Find the line UnofficialOverclockingEULA.
- Write the following sentence after the “=” sign: I confirm that I am aware of unofficial overclocking limitations and fully understand that MSI will not provide me any support on it.
- In the window that appears, put one.
The sequence of actions presented above allows you to remove the blocking, but again, this does not work with all cards.
Video
Video card is not supported by the program
The MSI Afterburner tool is designed only for overclocking AMD and NVIDIA . There is no point in trying to overclock others; the program simply will not see them.
It happens that cards are partially supported, that is, not all functions are available. It all depends on the technology of each specific product.
In addition to this article, there are 12,333 more instructions on the site. Add the Lumpics.ru website to your bookmarks (CTRL+D) and we will definitely be useful to you.
Thank the author and share the article on social networks.
Source
Is it worth overclocking your video card?
Overclocking or overclocking is a free way to increase the performance of key system components - processor, video card or RAM. Of course, successful overclocking requires suitable hardware and a little knowledge. Whether it is worth overclocking a video card should be decided by the user based on the state of the system and the set of components.
For those who like to play, there is often not enough video card capacity, which is responsible for processing heavy graphics of game engines. This results in a low frame rate or FPS, a jerky picture and other unpleasant things. Proper overclocking of the video card will help partially or even completely overcome them.
Important! Overclocking is the operation of a certain component beyond its standard, factory capabilities. The manufacturer does not guarantee a stable system state under overclocking. You also need to understand and take into account: overclocking increases the temperature and power consumption of the PC. Thus, before any intervention in a slow but stable system, you need to find out whether it is worth starting at all.
Why MSI Afterburner doesn't work
The program is designed to overclock video cards by increasing the clock frequencies of the graphics memory and core, and the voltage on the video core . Supports undervolting - reducing the supply voltage to lower the operating temperature of the video card. By the way, not always to the detriment of its performance.
MSI Afterburner displays graphs to display the dynamic parameters of the video adapter and other components, displays over a dozen indicators (fps, frequency, temperature) in an overlay (overlay - on top of games). A program in Windows 10 may not work for a number of reasons:
- an outdated version of the application is installed - select a new version and update the program ;
- the program does not automatically overclock the video card when turned on due to its absence in autorun ;
- the current edition of Afterburner is partially compatible with a number of the latest drivers and video cards;
- the computer does not have RivaTuner Statistic Server (RTSS) or the Microsoft Visual C++ package ;
- monitoring overlays are disabled or incorrectly configured;
- The video card model does not support regulation of the selected parameter (often this is Core Voltage);
- you are running a game that does not support overclocking.
Let's look at each problem in detail.
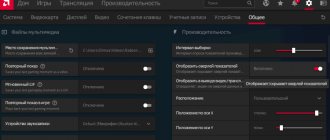
Main settings
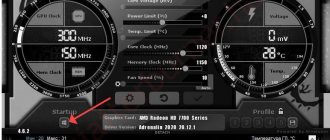
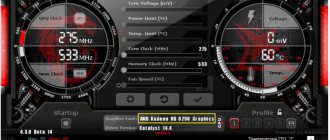
The purpose of MSI Afterburner is to overclock the graphics subsystem by increasing the base frequencies and voltage of its components. This is done in the main window by dragging the sliders. Here are the options available:
| Core Voltage | The amount of supply voltage supplied to the card core |
| Power Limit | Limiting the maximum power consumption |
| Temp. Limit | Peak temperature, upon reaching which the program resets settings |
| Core | GPU frequency |
| Memory | Graphics memory frequency |
| Fan Speed | Graphics card cooler speed |
Some parameters may be inactive. To find out how to unlock controls in MSI Afterburner, such as Core Voltage, go to Settings, enable "Unlock Voltage Control" in Afterburner, apply the settings and restart the application.
Unlocking Voltage Control" in Afterburner.
Important. For more information on how to unlock sliders, read the publication.
How to enable "fixed" voltage control
Initially, update the graphics driver by downloading the installer from the official website of the video card. Do not trust the operation to the Update Center, third-party applications, or driver packs.
The normal functioning of MSI Afterburner is restored by activating the “fixed” video core voltage control.
- Open the file VEN_1002&DEV*BUS_1&*0.cfg stored in the “%programfiles%/MSI Afterburner\Profiles\” directory, where * are character sets, through a text editor – Notepad or Notepad ++.
I am interested in the file with “BUS_1”, where one is the number specified in the program.
If there are several documents, click on the “Information” button (with the letter “i” in the utility window) and look at the number after the word “BUS” in the “Identifier” line.
Application settings are changed through a standard notepad.
Program update
Use the latest version of the utility. Although new releases of the Windows 10 application are released no more than once a year, check if one of the previous versions of MSI Afterburner is installed on your computer. Click on the “Information” icon (with the letter “i”) and look at the line “About the product”.
Compare the release of the running utility with the latest version located at the link. How to properly remove and reinstall the application, read the publication.
Troubleshooting errors in Windows 10
MSI Afterburner does not start due to the lack of the Microsoft Visual C++ package - errors appear that the msvc*.dll file is missing.
The solution is to download and install libraries from the Microsoft website:
- Download the package for Windows from the page: select your language, click Download.
- Check the box next to the assembly that corresponds to the bit level of the installed operating system, and click “Next”.
Installer type.
Attention. To check the OS bitness, hold down Win + X, select “System” and look at the line “Type...”.
I'm interested in the bitness of Windows, not the CPU.
- Run the executable file and wait until the archive is unpacked.
The old VC++ package will be removed, read the news for a couple of minutes, respond to messages.
- Accept the terms of use for the software and click “Install”.
What is written is worth reading. - After restarting Windows the problem will be resolved.
How to overclock an nVidia video card
Now that the MSI Afterburner application has been reviewed in detail, we move on to instructions for working with it.
Carefully follow what the author is doing; the slightest deviation from the given algorithm can cause the failure of your adapter.
Before we get into the manual, take a look at a number of MSI Afterburner controls.
Power limit
This slider only works if your video card supports this technology. The essence of the regulator is to set the maximum power supplied by the graphics adapter. For example, we can set it to 90%. What does this give? It's simple - this is how we insure the chip against overheating and failure during overclocking.
Temperature limit
The second regulator is responsible for adjusting the temperature limit. As in the first case, we can set a maximum heating limit, after which the temperature will be limited by reducing performance.
Don't forget that there is such a thing as temperature hysteresis. That is, heating occurs with some delay and you need to increase it gradually.
Core frequency
This is a parameter that directly affects the overclocking itself. We'll talk a bit about how to work with it below.
Attention: if the program resets frequencies, it means you are doing something wrong.
Memory Clock
The parameter sets the frequency of video memory, which, accordingly, affects its performance, leading to a systematic increase in FPS in the game.
Attention: if the program does not see your video card and no devices are accessible, try restarting the software.
Fan Speed
One of the most important parameters in MSI Afterburner. It is the intensity of the cooling system that affects high-quality acceleration. Set the slider so that the temperature on the adapter chip does not exceed the recommended values.
Incorrect use of this parameter can lead to instant damage to your video card. Be careful, we recommend using automatic mode!
Settings profiles
We can create several operating configurations for our video card and save each of them separately in its own profile. This can be useful, for example, for different applications or games.
The program settings are stored in the Windows user directory.
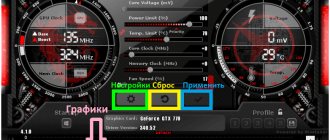
Reset button to default settings
This function will definitely be useful to every beginner in overclocking a video card. If you have configured something incorrectly and don’t know how to reset all settings to their original positions, just press the designated button and enjoy the stock settings.
Apply button
This virtual key applies any changes made using the sliders. It must be pressed every time after we have changed something.
Procedure for overclocking graphics adapter in MSI Afterburner
So, that's enough introductory information for us. Let's proceed directly to overclocking:
- Download and install the FurMark program. We will use it to test the stability of the video card and check the frame rate. Run the test on a non-overclocked adapter to see the rated performance.
Translated, the word Afterburner sounds like afterburner, so be careful!
- In our case it is 68 FPS. Let’s remember and move on to increasing productivity.
- We add the frequency of the graphics adapter by about 10 units.
- Click the “Apply changes” button.
- We run the test again and see that the number of frames per second has increased by 1. Well, we continue to “play around” with the settings.
- We add a little more chip frequency and apply the changes.
- We run a run in FurMark and see that the increase is already 4 FPS.
In exactly the same way, we gradually add the memory frequency, ultimately achieving a combination that will achieve maximum performance, stability of the graphics adapter and the absence of any overheating.
Attention: add chip and memory frequencies little by little, remembering the last stable values. Run the stress test to the end to check the stability of the video card over time.
How to enable monitoring in the game
So, you already know how to use Gigabyte Afterburner, but it has one more useful function. Right in the game, we can display a special overlay or counter that will display a number of useful parameters. This is done like this:
- Let's move on to the program settings.
- Switch to the “Monitoring” tab, then select the parameters that should be displayed and activate the function. Finally, click “OK”.
- We go into the game and see our indicators in its upper left corner.
- By configuring the application we can add many other parameters, including even frametime graphs.
Now you know how to enable in-game monitoring on MSI Afterburning.
How to unlock Core Voltage
By default, core voltage adjustment is locked and inactive, and the sliders do not move. To fix this, go to settings and in the “Basic” tab, check the box next to the marked item.
If the program does not save settings, try running it as an administrator.
Changing the Enable ULPS setting
When using two Radeon video cards working in conjunction with AMD Crossfire, the “ULPS” option disables the second device when its power is not needed. The solution saves energy, but causes problems when overclocking and launching games. Automatic shutdown of the second graphics accelerator is deactivated in the Windows registry.
- Launch the registry editor with the “regedit” command in a Win + R window.
Opening a utility for editing a Windows database.
Through the main menu item “Edit” or with the combination Ctrl + F, open the search window.
Call up dialogue.
Find the key called “EnableULPS”.
Enter the name of the parameter and click “Find Next” or press Enter.
Double-click on the found parameter, enter the value “0” and save the changes with the “OK” button.
These actions will not cause any harm to your computer.
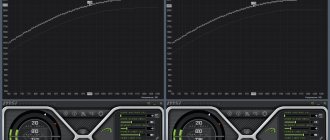
Dashboard
It is presented by two information elements with useful information about the operating modes of the hardware components of the graphics accelerator: core and video memory frequencies, voltage, thermal parameters, video core voltage.
Information elements of the utility.
Below is the “Monitoring Window” - a panel with time graphs of the characteristics of the video card: frame rate, computing elements, RAM and video memory load, central and graphics processors, etc. (26 variables).
Panel with time graphs of video card characteristics
You can turn off unnecessary graphs, change the color of the curve and name (label), font, size for quick orientation. To expand the number of active monitoring graphs, third-party plugins are connected (with AIDA64, HW). Afterburner allows you to install end-to-end markers (left click while holding down the Alt button) in the monitoring window.
Monitoring window.
NVIDIA overlay
Before launching MSI Afterburner, shut down other programs for overclocking video cards, monitoring, including outputting fps and other information in an overlay - on top of games and other applications. The results of their parallel work lead to negative consequences.
- To disable overlays in GeForce Experience, visit the settings by clicking on the gear.
Calling configuration parameters.
Move the slider to the "Off" position. – to the left.
There is no need to save settings.
Profiles
For various situations (modern games, video processing, very graphics-intensive games, working with 2D graphics), MSI Afterburner allows you to save five different overclocking options. For games, for example, the indicators responsible for the performance of the device should be increased, and for watching movies, working on the Internet and text editors, you can reduce the power consumption of the video card.
What is noteworthy is that switching between profiles is carried out “on the fly” by clicking on a single icon or using the keys assigned to it.
To add a preset, change the required overclocking settings in the central window and click on the “Save” icon.
Rice. 21 – Saving new settings in a separate profile
Then click on one of the flashing numbers to assign the current configuration to the corresponding cell.
In the “Profiles” settings tab, the activation of each of the presets can be assigned to a combination of hot keys that are not used in the system.
Rice. 22 – Assigning a hotkey combination to activate a list of settings
Previously, the application was equipped with functions for capturing screenshots and videos from 3D games and supported various profiles for working in 3D and 2D modes, which allowed saving energy, but in the latest versions the developers abandoned these functions.
This concludes the guide on the topic: “How to use MSI Afterburner”. And remember: overclocking a video card not only increases the risk of its premature failure, but also reduces its working life (accelerates wear).
MSI Afterburner is a program for overclocking AMD and NV video cards > Additional features - recording video in games and testing the video card with a separate MSI Combustor tool, which is based on the FurMark benchmark engine.
MSI Afterburner is not added to startup
The application is added to Windows startup in several ways:
- Visit the settings by clicking on the gear, activate the “Run with Windows” option.
Through the program settings.
Often outdated versions of the application do not launch automatically - update Afterburner regularly. You can follow new versions on the page.
Additional ways to fix the error
To use the sxstrace program, run a command prompt as an administrator, and then follow these steps.
- Enter the command sxstrace trace -logfile:sxstrace.etl (you can specify a different path to the etl log file).
- Run the program causing the error, close (click OK) the error window.
- Enter the command sxstrace parse -logfile:sxstrace.etl -outfile:sxstrace.txt
- Open the sxstrace.txt file (it will be located in the C:WindowsSystem32 folder)
In the command execution log, you will see information about what kind of error occurred, as well as the exact version (installed versions can be viewed in “Programs and Features”) and the bitness of the Visual C++ components (if this is the case) that is needed for the operation of this application and use this information to install the desired package.
Another option that can help, or on the contrary, cause problems (i.e., use it only if you know how and are ready to solve problems with Windows) is to use the Registry Editor.
Open the following registry branches:
- HKEY_LOCAL_MACHINE SOFTWARE Microsoft Windows CurrentVersion S >Note the "Default" value and version list in the values below.
If the default value is not equal to the newest version in the list, then change it so that it is. After this, close the Registry Editor and restart your computer. Check if the problem has been fixed.
Questions and answers
What should I do if MSI Afterburner stops working after cleaning the registry?
If the registry cleaner app makes backups, restore it from the file. Alternatively, use a Windows restore point. Next, uninstalling and reinstalling Afterburner will help.
An application that has removed unnecessary keys from the registry should be replaced with an analogue one.
If the solutions to problems with MSI Afterburner described in the article and in the links did not help, write in the comments, we will understand the situation and suggest a solution.
Source
Video card drivers
If the problem remains, then you can experiment with the video adapter drivers. It happens that the program does not work correctly with outdated versions. In some cases, new drivers may not be suitable. You can view and change them by going to “Control Panel-Task Manager” .
Fan Speed in MSI Afterburner: What is the setting for?
Fan speed – the Fan Speed slider for controlling the speed of active cooling of the video card. By default, the option applies to the master device. If several cards are installed on a computer or mining rig, the setting can be applied to all or separately to each.
Setting the video card fan speed is carried out using three methods:
Overclocking process
Card acceleration is often done using MSI Afterburner. This is a program designed to overclock a video card, which leads to improved performance of the computer and the game as a whole.
The peculiarity of the process is that you do not need to enter the system BIOS settings and change the voltage. The program will do everything, and the most important thing is to learn how to use it.
The process consists of several steps, each of which will be discussed in more detail below. The procedure is based on monitoring the state of the video card as it is loaded and changing the device parameters accordingly.
The first step is choosing settings
The first step is to launch the program. The initial screen will appear before your eyes. The next sequence of actions is as follows:
- You need to go to the menu. The menu looks like a gear on the top panel.
- In the column called “Selecting a leading GPU”, indicate the video card for overclocking. If you have two cards installed on your computer, you will need to click the checkbox to synchronize the settings of the same GPUs.
- After this you will need to check another box. It is placed in the “unlock voltage monitor” column.
- Then you need to go to the “Cooler” tab and turn on automatic mode. Only then will the program allow you to set the relationship between speed and temperature.
- Finally, the last action of the step will be to change the points on the graph that appears. The graph will precisely display the relationship between speed and temperature.
What to do if the Fan Speed slider is greyed out (not working)
To unlock software control:
- Click on the “Auto” button (to the right of the name).
A quick way to solve the problem.
Open the settings by clicking on the gear, visit the “Cooler” tab and activate “Enable custom software...”.
Same thing through Afterburner settings.
Another way
- Quit the application.
- Open the file Profiles\MSIAfterburner.cfg in the Afterburner program directory using a text editor (Notepad, Notepad++).
- Change the value of the variable “SwAutoFanControl” (line 75) to “1” and save the changes using the combination Ctrl + S.
An advanced text editor displays line numbers.
The Fan Speed option will remain inactive if the fan is connected to the board with a plug with three wires (control signals are sent via the fourth), and the chip is not equipped with a chip for adjusting the fan frequency.
Important! If the instructions do not help, look into the case of the system unit; if there are three conductors leading to the cooling, you will not be able to interfere with the operation of the fan.
When overclocking is not recommended
- The older it is, the worse it is - no amount of overclocking will help an old video card start playing modern games. And the more time has passed since its release, the less effect you can feel. The point is many things: outdated technologies, small amount of video memory, excessive gluttony and resource consumption. Which, when trying to overclock, can easily lead to breakdown.
- Cheap video card - relatively cheap video cards are generally not designed for heavy games. Their task is to allow the user to watch videos, do office work and surf the Internet. For them, overclocking will practically not help, and will even be harmful, due to the simple design and widespread savings on board components and cooling.
- Video cards on laptops - in any laptop, even a gaming one, everything is done for the sake of size and energy efficiency - thin cases, small radiators of cooling systems, dense layout on the board. When overclocking, the system generates additional heat, which the laptop’s cooling often cannot cope with and is forced to limit its performance.
- New to computers - If you are not very PC savvy, there is a high chance of slowing down the performance of your computer. In fact, the user must understand what he is doing and why, be aware of the risks and be prepared for various consequences.
Setting the video card cooler speed in MSI Afterburner
The fan speed is adjusted in three ways:
- Automatically – based on the temperature of the video core (default). The controller itself polls the sensors and changes the voltage supplied to the fan motor.
- Manually – static speed regardless of the temperature of the video card. Afterburner reads information from the temperature sensor at a specified frequency and reacts to its changes in a user-specified manner. Drag the slider left and right or click on the number and enter the number as a percentage (up to 100). Apply the changes using the check mark button.
Setting a static Fan Speed value.
Let's look at the custom auto mode in more detail - after clicking on the gear, go to the “Cooler” tab.
Calling application configuration parameters.
You will see a graph of the dependence of the motor spindle speed. The vertical axis is the fan rotation speed (in %), the horizontal axis is the temperature (peak values for a device with a margin of
Graph drawn by MSI for the video chip.
The speed changes in steps rather than smoothly.
The program supports most video chips and can be controlled remotely via a mobile application. Some of the six adjustable parameters in the program are not available. How to activate locked Power Limit and Temp sliders. Limit, read the article at the link.
Source
Overlay monitor
These were the main points related to the question of
10 months after the release of the previous version, Alexey Nikolaychuk finished work on the final version of his famous utility for diagnosing and overclocking video cards.
The new version of MSI Afterburner 4.3 contains a lot of changes that are so multifaceted that they are difficult to describe in a few words. In our opinion, the main change in the program was the support for multiple video cards, added not only by the author of the program, but also by the community, which significantly increases the overclocking capabilities. Undoubtedly, the author himself added support for new generations of accelerators from NVIDIA and AMD, and also introduced functionality for working with new functions of Polaris and Pascal video cards. It is also possible to set a non-linear dependence of GPU frequency on voltage using graphs. The full list of innovations is given below:
- Added support for AMD Ellesmere and Baffin GPUs.
- Added Overdrive N (Overdrive 7) technology for AMD Polaris architecture video cards.
- Added voltage control for AMD Radeon RX 460, AMD RadeonRX 470 and AMD Radeon RX 480 reference cards with an integrated SMC controller.
- Added memory monitoring graph for AMD video cards, previously available only for AMD Ellesmere and Baffin families.
- Added the option “Clear saved settings at startup” in the “General” tab. In the AMD Crimson family of drivers, the driver automatically saves hardware settings (such as overclocking or fan settings) in the registry and applies them at startup, which, according to the author, is unsafe because it does not provide the ability to return to the previous overclocking state even after removing the driver. A new option allows you to reset these settings.
- Support for GPU Boost 3.0 has been added for NVIDIA Pascal video cards: a percentage increase in voltage has been added and the ability to adjust the voltage/frequency along a curve. In the new version of the utility, you will still be able to use the traditional frequency slider in NVIDIA GeForce GTX 1070 and 1080 cards for a fixed voltage/frequency setting. At the same time, a fundamentally new ability to flexibly configure overclocking modes has appeared, thanks to the new overclocking curve editor. This window is activated in the main window with the “Voltage/Frequency Curve Editor” button or the Ctrl+F combination. It provides the following functions:
- Independent frequency adjustment for each point using the mouse or Up/Down buttons.
- By holding Ctrl you can set the armature and fix the frequency at the maximum/minimum voltage value, as well as set linear interpolation of the curve between the armature and the adjustable point. Resetting points is performed using the combination Ctrl+D. Switching between graph and slider modes can be done on the fly to control the impact of different overclocking modes on the fly.
- To disable dynamic overclocking and enable a fixed voltage/frequency ratio, you need to select a point on the curve with the mouse and press L. This makes it possible to test the stability of the video card for each mode separately. The utility allows you to save each of the graphs into an overclocking profile, so switching between them is extremely simple. The author notes that the use of fixed voltage and frequency values does not allow turning off temperature and power consumption throttling.
- Increased default maximum limits for core clocks, memory, and memory usage to improve graph readability for NVIDIA Pascal series graphics cards.
- Added configuration file switching, which allows you to change the source for the power consumption graph on NVIDIA cards. According to the company's recommendation, the default graph of normalized power consumption is used (i.e., the normalized value from various sensors installed on video cards). However, MSI Afterburner only has the option to use the GPU power sensor.
- Improved appearance of NVIDIA card graphs based on the company's recommendations. Thus, the “Voltage limit” and “Maximum overvoltage limit” graphs were combined into one. The "Use Limit" graph has been renamed to "No Load Limit". The SLI Sync graph is now hidden on systems with a single NVIDIA GPU. Improved presentation of the performance limit graph in the OSD or on the Logitech LCD keyboard. Limit names are now displayed instead of the binary codes used.
- The community-contributed database included in the distribution now allows voltage control on some custom non-MSI graphics cards.
- Added support for uP1816 voltage regulator to ensure compatibility with future MSI cards.
- Improved confirmation and support for false data displayed after TDR or during NVIDIA driver installation.
- Improved frequency monitoring on NVIDIA cards with GPU Boost 2.0 after dynamic driver installation/reinstallation while MSI Afterburner is running.
- Added control over the installation of the NVIDIA video card driver. MSI Afterburner now periodically checks for the presence of the NVIDIA driver and displays a notification if the GPU is lost after uninstalling or dynamically installing the driver.
- Profile launch now includes a “Pin Profile” button. This means that you will not be able to modify or delete your overclock starting settings while this button is pressed. This feature can be useful for protecting the initial overclocking settings from modifications during temporary use and testing other overclocking scenarios.
- Added support for overclocking with PowerPlay disabled on AMD cards with PowerPlay7 (AMD Tonga and newer).
- Added unofficial overclocking support for AMD Polaris architecture cards.
- Added the ability to use the low-level hardware access interface on AMD video cards, provided that the legacy VGA BIOS is not mapped in memory (as in UEFI).
- Improved compatibility with AMD cards supporting Overdrive 5 and Overdrive 6 APIs.
- Added driver registry key definition for secondary video adapters on systems with SLI/Crossfire. With this change, it is no longer necessary to temporarily disable Crossfire when changing settings in the AMD Compatibility Properties section (for example, expanding the official overclocking limit or enabling ULPS).
- Improved hardware detection and application launch time on Crossfire systems with ULPS enabled on AMD Fiji and newer adapters.
- Primary GPU usage is no longer cloned to all secondary GPU graphics on systems running Crossfire when "Unified GPU Usage Monitoring" is enabled under AMD Compatibility Properties. When this option is enabled, only the main GPU can be monitored.
- The I/O driver has been updated to provide more secure access to the MMIO interface.
- Fixed a bug that caused the maximum value to be invisible on some monitoring graphs under certain conditions (such as the “Frame Rate” or “Frame Time” graphs after closing the 3D application).
- Added the ability to define the numeric keypad as a hotkey when Num Lock is pressed.
- RivaTuner Statistics Server has been updated to version 6.5.0.
List of changes in RTSS 6.5.0:
- OSD support for Direct3D12, image and video capture. Currently, RivaTuner Statistics Server is the only application that provides OSD output in Single and Multi-GPU Direct3D12 applications running in LDA mode on both AMD Crossfire and NVIDIA SLI systems.
- In the “Home” tab, the “Hide preliminary profiles” option has been added. The new option allows you to see only your profiles and hide the built-in pre-created profiles that come with the app.
- Removed a 15 second delay when starting the Steam 64-bit engine. Now OSD appears immediately after launching the application.
- Fixed a bug in the encoder server that caused audio capture to continue and a memory leak after starting recording and closing the 3D application without stopping the video recording session.
- Updated list of profiles.
When overclocking a video card using MSI Afterburner, it requires periodic testing. In order to track its parameters, the program provides a monitoring mode. If something goes wrong, you can always correct the operation of the card to prevent it from breaking. Let's see how to set this up.
Monitoring tab
After starting the program, go to the “Settings-Monitoring”
.
In the “Active monitor graphs”
, we need to decide which parameters will be displayed.
Having marked the required graph, move to the bottom of the window and check the box “Show in Overlay Screen Display”
. If we are going to monitor several parameters, then we add the rest one by one.
After the completed actions, on the right side of the window with graphs, in the “Properties”
, additional inscriptions
“in the OED”
.