Published: 26.01.2021
To date, this miner has the highest speed with the Ethash algorithm. At the same time, it supports video cards from both major manufacturers, can run under Windows and Linux, and has several other advantages. Phoenix miner is a worthy competitor to the outdated Claymore Dual and at some point already surpasses it. Let's take a closer look at how it works, what it offers and what advantages it has...
Content
- A short history of the latest version of Phoenix miner
- How Phoenix miner for Nvidia and AMD gained popularity
- How to set up Phoenix miner for the first time
- Setting up bat for Phoenix miner
- Regular mining on Phoenix miner
- Dual mining on Phoenix miner
- Cryptocurrency mining using Phoenix miner
- Individual settings for each GPU
- Overclocking and undervolting
- Pulling settings from MSI AfterBurner
A short history of the latest version of Phoenix miner
The program was released back in 2022 and at first did not attract much attention from those who use video cards for mining on a large scale. But the situation quickly changed, as the creators actively worked to improve the algorithms and simplify the use of the application. And already in 2022, the real heyday of Phoenix miner for Windows and Linux began, and this continues to this day.
Currently, you can download Phoenix miner 5.5c, which already supports many types of cryptocurrencies based on the Ethash algorithm, including:
How Phoenix miner for Nvidia and AMD gained popularity
Firstly, it is worth highlighting the openness of the developers, who do not hide anything about their program. They not only make it possible to download Phoenix miner for free from the official website, but also publish there all the change logs of different versions. In addition, simple miners are offered several positive aspects:
- Full support for both Nvidia and AMD devices.
- Ability to run not only using LINUX, but also from the Windows operating system (in both cases, the command line or configuration files are used).
- In addition to Ethash, Ubqhash – Ubiq UBQ is supported.
- Low commission - 0.65%. Out of an hour of full mining on Phoenix miner for AMD or Nvidia, only 39 seconds will it work for developers.
- Compared to direct competitor Claymore, it provides up to 1.3% increase in mining speed.
- Supports legacy GPUs while providing them with good stability.
- You can enable connection to the pool via secure SSL.
- It is possible to mine 2 cryptocurrencies simultaneously (only from version 4.0b).
It is impossible not to note the ease of setup of Phoenix miner and its versatility. All the necessary information is on the official website, and many miners share their bat-nicks on specialized forums, which is very convenient.
You can manage your farm via the Internet using TeamViewer. The configuration files themselves are updated over the network and will always be up to date.
Drivers
For Windows: The latest Windows driver (20.11.3) is NOT supported by the current version of PhoenixMiner, so it has probably switched to generic kernels, which are a bit slower.
The following drivers are currently supported:
- Radeon™ Software Adrenalin Edition 18.2.1
- Radeon™ Software Adrenalin Edition 18.3.4
- Radeon™ Software Adrenalin 2022 Edition 19.5.2
- Radeon™ Software Adrenalin 2022 Edition 20.4.2
- Radeon™ Software Adrenalin 2022 Edition 20.8.1
- Radeon™ Software Adrenalin 2022 Edition 20.8.3
For AMD LINUX install AMDGPU-Pro 17.40
Do not update NVIDIA drivers to GeForce 460.79!
We urge you not to update your GPU drivers if you mine with NVIDIA graphics cards. It seems that the latest GeForce 460.79 drivers are causing problems and are not recognizing the video cards in the system.
If you've already updated to the latest version, reverting back to the previous version should resolve the issues.
How to set up Phoenix miner for the first time
If you have used Claymore before, then it will be enough to transfer the .bat file to the folder with the new program. It automatically recognizes the settings and uses them the next time you start them. For those who are using miners for the first time, you should pay attention to the instructions below. In any case, you will first need to download the latest Phoenix miner from the developer's website.
It will be an archive with the password set to “phoenix”. It must be unpacked, preferably into the root folder of the disk. Inside there will be a whole list of files with different extensions, like this:
Please note that you should not search the Internet for where to download Phoenix miner, since it is completely free and is always available on the creators’ website. There is a high probability that the archive received from other resources will contain something potentially dangerous to your computer or mining rig.
PhoenixMiner is blocked by chrome
Sometimes PhoenixMiner is blocked by chrome. If you updated your Google Chrome browser to version 91, you may have noticed that downloading some files in the browser no longer works.
But first, here's a quick explanation of why this happens if you know the file you're trying to download is safe. Google Chrome and other web browsers will attempt to identify potentially malicious files. One minor downside to this concept is that most web browsers often flag unknown files as malicious. This is commonly known as a heuristic, which is a fancy word for guessing.
But there is a problem: files that Chrome considers unsafe may be “clean”. It can be frustrating when Chrome keeps blocking downloads from a trusted source.
See: How to stop Chrome from blocking downloads
Setting up bat for Phoenix miner
Next you need to create the configuration file itself. We recommend using prepared .bat files rather than the command line, as this is much simpler and minimizes the likelihood of errors.
Another recommendation is to use MSI Afterburner. With its help, you can configure power consumption, fan speed and other parameters of each GPU. This is necessary in order to protect yourself from overheating and possible negative consequences when there is an active load on the video card.
What's new in version 5.9d
AMD graphics cards with more than 4GB of RAM will now run smoothly up to the DAG 500 era.
Added new option -mcdag to reset memory overclocking on Nvidia cards during DAG generation.
Use -daglim 1 for automatic operation or specify a specific value for the maximum DAG file size (example: -daglim 4000 will set the maximum DAG size to 4000 MB)
Added -rxboost
(also available via -vmr command) to improve performance of GDDR5 based AMD cards (Polaris or earlier)
Added support for memory timings for AMD Vega cards. Use the -straps command line option to activate (example: -straps 1 activates the lowest timing speed)
The Nvidia memory synchronization (timing) option has been improved and is now disabled during DAG generation to avoid any potential instability issues.
Many other minor improvements and fixes
Regular mining on Phoenix miner
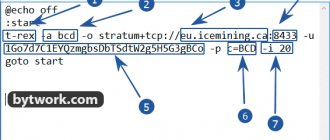
For example, let’s take the first file “5_Ethereum-ethermine.bat”, which will already be in the folder after downloading Phoenix miner from Bitcointalk. It looks like this:
Let's figure out what each of the settings is responsible for:
- PhoenixMiner.exe – which program will be used for further cryptocurrency mining. You don’t need to touch it if you plan to use this particular program.
- -pool euethermine.org:4444 – a specific pool and its port from which phoenixminer exe will download the crypt.
- -wal 0xBB942274AB3C8285400519e7F0c343Fca2394908 – your cryptocurrency wallet address.
- -worker asus – the name of a separate worker in the farm, if several are used.
- -epsw x – password used on the specified field. It is practically not used anywhere, so the values “X” remain – without a password.
- -mode 1 – mining 1 or 2 cryptocurrencies: “0” – double mining;
- “1” – single mining.
- “0” – the miner will turn off and that’s it.
- “0” – no log;
- “0” – no control;
- pause – if errors are detected, before closing Phoenix miner, an error message with its code will be displayed on the screen.
Fast start
Step 1: Download the miner
Once the download is complete, extract the contents of the .zip archive. In the folder containing the program, you must create or edit a file with a .bat extension. This can be done in any text editor (for example, Notepad). When saving a file, it is important to select "All Files" as the file type rather than .txt. Otherwise you will have .bat.txt at the end of the filename and the miner will not be able to open this file. Your .bat file (let's say it's called 1_Ehereum-nanopool.bat) should contain the following text (step 2):
Attention! For security reasons, Windows may prevent you from opening the bat file. In this case, you must allow it to open in a pop-up window.
Step 2: Enter or edit the following command:
setx GPU_FORCE_64BIT_PTR 0 setx GPU_MAX_HEAP_SIZE 100 setx GPU_USE_SYNC_OBJECTS 1 setx GPU_MAX_ALLOC_PERCENT 100 setx GPU_SINGLE_ALLOC_PERCENT 100 PhoenixMiner.exe -epool eth-eu2.nanopool.org:9999 -worker YOUR_RIG_NAME -wal YOUR _WALLET ADDRESS -pass x
Step 3: Enter your wallet addresses
WALLET_ADDRESS - enter YOUR Ethereum wallet address (this is how PhoenixMiner Miner knows where to mine your ETH) ARM_NAME - you can choose any name (for example, test), but do not exaggerate: it should be a maximum of 32 characters, contain only letters and numbers (no special characters such as $%"*;@). Be sure to replace the pool and wallet address with what you are using in all files.
Step 4: Start Mining
Double click on your Bat file to launch the program. The miner will start, run setx commands to set environment variables, initialize each of your graphics cards, create a DAG file on each of your GPUs, and begin hashing. Let it run for about 20 seconds and then press “s” to display the hash rate. If you followed the steps above, you should see this screen.
How to check how much you have mined?
Now that your miner is set up, you can sit back and watch your graphics cards earn you passive income in the form of Ethereum every day. It is important to consider any variable costs you may incur while mining to determine your profitability. Variable costs can be electricity costs, maintenance costs, pool fees, program usage fees, withdrawal fees, etc.
Each pool has its own interface, but the principle remains the same. You will need to go to your pool website and enter your public wallet address. Let's take Nanopool as an example.
Enter your public wallet address in the search bar and you will be able to see all the information about your Ethereum mining efforts. In the case of Nanopool pool, when your balance reaches 0.01 ETH, it will be sent to your wallet address that you entered earlier in the start.bat file.
Dual mining on Phoenix miner
If you download the latest versions of Phoenix miner, you can mine 2 coins at the same time. This will increase the profitability of the farm, but at the same time will increase the load on the video cards and their heat dissipation. Therefore, you need to think about this point when setting up MSI AfterBurner, or add additional items to the .bat file of the miner.
Remember that the prerequisite today is to use ethash as the first algorithm, and Blake2s as the second. For now, this is the only opportunity to work in 2 directions at once.
Let's take 1 of the ready-made batch files that are in the park with the downloaded Phoenix miner for Windows or Linux.
- -pool eth-eunanopool.org:9999 – the first pool.
- -wal 0xBB942274AB3C8285400519e7F0c343Fca2394908 – wallet for him.
- -worker Phoenix – the name of the worker.
- -epsw x – password.
- -dpool xvg.eu1.unimining.net:5770 – second pool.
- -dwal DPNSdySRg8zFmU6Zcqyo9XKJKDhMm87Xn7.Phoenix – second wallet.
- -dpsw c=XVG – second password.
- -dcoin blake2s – algorithm type.
Descriptions of other parameters can be seen above.
Cryptocurrency mining using Phoenix miner
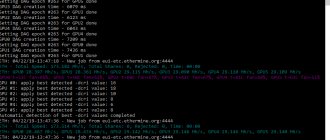
When the batch file is completely ready, you can run it. A window with the program will open, where all the settings that have been applied will first be displayed:
After some time, all available GPUs and the mining pool itself will be checked:
And finally, the cryptocurrency mining process itself will start:
This is all a description of the basic capabilities of the Phoenix miner crypto mining program. Next, we suggest familiarizing yourself with more fine-grained parameter adjustments.
Overclocking and undervolting
These parameters can also be changed directly in the program, and for each individual device. If you have experience in increasing frequencies and reducing power consumption, then the process will not be difficult. Everything is done through the following parameters:
- -mclock 1200 – video memory frequency. MHz.
- -cclock 1000 – video core frequency. MHz.
- -powlim -10 – limiting energy consumption. %.
- -cvddc 1030 – voltage on the video card cores. MV.
If the value is left “0”, then Phoenix will not make any adjustments to the standard parameters.
General Pool Settings
-fret Switch to the next pool after N failed connection attempts (default: 3) -ftimeout -ptimeout Return to the main pool after n minutes. By default, this setting is 30 minutes; set to 0 to disable automatic switchback to the main pool. -retrydelay Seconds to wait before reconnecting (default: 20) -gwtime Recheck period for Solo/GetWork mining (default: 200 ms) -rate Report hashrate to pool: 1 – yes, 0 – no (1 by default), 2 – (for solo mining only) use the alternative report method name “eth_submitHashRate” instead of “eth_submitHashrate”
Is it worth downloading Phoenix miner for ether and what will it give?
The program primarily pleases with its speed. The developers were able to achieve a high rate of ether production, which increases the income of farm owners. In addition, the application is constantly updated, opening up new features and much more. You can control your video cards directly from it, there is support for remote control, and automatic reboot in case of errors.
In addition, there is a minimum commission, which competitive products cannot boast of. You can download Phoenix miner for Windows or Linux, and in any case, stable operation without crashes is guaranteed. It accepts AMD and Nvidia cards, separately controlling each device on the farm.
All this allows us to say that Phoenix miner in 2021 is an excellent solution for mining Ethereum cryptocurrency. The creator shows himself to be active on his own forum, so you can be sure that the miner will not disappear for a long time.
0 0 vote
Article Rating
reboot command
“-r 1” - closes the miner and calls the file “reboot.bat” (for Linux - “reboot.bash” or “reboot.sh”) from the miner directory (if it is there) if something is wrong with some then from video cards. Thus, you can create a file “reboot.bat” and take some action, for example, reboot the computer, placing the line there: “shutdown /r /t 5 /f”, where:
- r - reboot;
- t 5 — shutdown timeout 5 seconds;
- f - forcefully terminate programs without warning.
Example reboot.bat file
shutdown /r /t 10 /f
rem Here: rem - r - restart the computer; rem - t 10 - shutdown timeout 10 seconds; rem - f - forcefully terminate programs without warning.