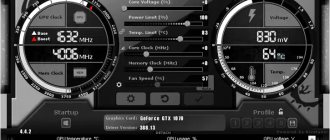
What is AMD Memory Tweak?
AMD Memory Tweak is a new open source tool introduced by Eliovp and A. Solodovnikov. This is a tool that allows you to change graphics card memory timings on the fly like ETHlargementPill, but for AMD. This tool is also Vega compatible. Works only from the command line.
AMDMemoryTweakXL
- this version has a graphical shell. Works similarly to overclocking software for your typical graphics card, such as MSI Afterburner, EVGA Precision XOC, or Asus GPU Tweak II. However, Eliovp and Solodovnikov's program primarily focuses on the memory aspect, so it has more advanced features, one of which is the ability to adjust memory timings on the fly.
System requirements
- OS: Windows 10/Windows 8/Windows 7/Windows Vista/XP and Linux.
- Driver: at least Radeon Software Adrenalin 19.4.1 (and AMDGPU-Pro for Linux).
- Driver: at least Radeon Software Adrenalin 19.4.1 (and AMDGPU-Pro for Linux).
Supported video cards
The authors haven't provided a compatibility list, but the program should work with a wide range of AMD Radeon graphics cards, ranging from older models with GDDR5 memory to the latest offerings with HBM (High Bandwidth Memory) and HBM2 memory.
AMD Radeon RX 6800/6800XT
AMD Radeon RX 6800/6800XT are not yet supported with the new cores, so the miner falls back to generic cores, which are slower and produce more legacy shares.
Additionally, NiceHash simply rejects all obsolete shares. You should add the -stales 0 parameter when mining on NiceHash to avoid sending known (to the miner) outdated shares (solutions to cryptographic problems) that will not be accepted anyway.
To minimize stale shares when mining with new cores, you can try to reduce the mining intensity using -mi 10, or 9 or even lower. This will reduce the speed somewhat, but with 10-12% expired balls it's worth the compromise.
How to use AMD Memory Tweak?
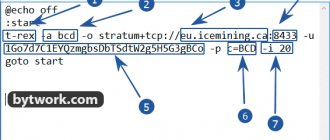
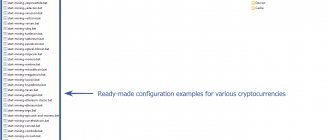
Step 1 - download the program
.
The Windows version is called WinAMDTweak.exe. However, you need to download all the files (IOMap64.sys, IOMap.sys) and place them in one folder.
Step 2 - Run AMD Memory Tweak
To work with the utility, you need to study the timings of the existing video memory and create a file with the .bat extension with their optimal values for mining.
To find out the current timing values, enter the command in the body file:
WinAMDTweak.exe –current pause
Video memory performance increases as latency decreases. We need to reduce the timing values and apply them using this software. Keep in mind that video memory from different manufacturers (Samsung, Hynix, Micron, Elpida) have individual characteristics for overclocking timings (slings).
Step 3 - Set up timings
For a Vega 56 video card with Hynix video memory, the timings will be as follows:
WinAMDTweak.exe -RAS 24 -RCDRD 19 -RCDWR 4 -RC 35 -RP 13 -RRDS 4 -RRDL 5 -RFC 148 -REF 15600
The launch is carried out using the .bat file you created.
Since timings are applied on the fly, if you reboot you will have to run the command again. To avoid having to do it every time, set up auto-loading of the batch file.
To autorun, place a shortcut to your .bat file in Windows startup. The startup folder in the Windows 10 operating system is located at the following path: C:\Users\Your username\AppData\Roaming\Microsoft\Windows\Main Menu\Programs\Startup
Example for Samsung video memory:
WinAMDTweak.exe -ras 26 -rcdrd 13 -rcdwr 12 -rc 38 -rp 12 -rrds 3 -rrdl 5 -rtp 6 -faw 12 - cwl 8 -wtrs 4 -wtrl 9 -wr 13 -ref 24000 -rfc 239
Video instruction
subscribe
Attention! PhoenixMiner and NBMiner miners already have ready-made and built-in timing settings. Read about setting up NBMiner and PhoenixMiner.
How to choose the best timings?
You can try to find the best possible settings between timing 1 and timing 2.
Here's what to do:
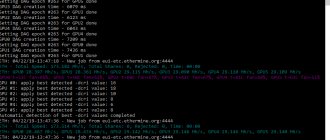
Enable logging by temporarily removing -log 0 from the .bat file
Start the miner and wait about a minute, then stop it. Look in the log file for a line similar to this: "GPU1: set VRAM strap 1 (-vmt1 25 -vmt2 20 -vmt3 0 -vmr 33)." Note that in your case the values of -vmt1, -vmt2, -vmt3 and -vmr will probably be different. Write them down.
Remove -strap 1 from the bat file and replace it with the values you wrote down in the previous step: -vmt1 25 -vmt2 20 -vmt30 -vmr 33.
Again, the values in your case will probably be different, use your own values.
Start the miner again and wait a few minutes to see the speed - it should be the same as with -straps 1 if you have everything configured correctly.
From this point you can start experimenting by stopping the miner, increasing some values a little (for example, replacing -vmt1 25 with -vmt1 26), and then start the miner and check if it is stable and what the speed is.
Finally, if you want to use your computer while mining and without slowing down, you should reduce the mining intensity by setting the command to -mi 8 or even a lower value (-mi 0 should keep your PC running smoothly, but will reduce mining speed).
Do not decrease -mi when adjusting the memory timing values as shown in the previous steps - do so when you are satisfied with the other settings.
AMD Memory Tweak XL
As already mentioned, the XL version, unlike the regular one (CLI), has a graphical interface (GUI):
It allows you to make settings directly in the program window:
It is better to run the software as an administrator.
For Polaris family GPUs you need to add the following parameter:
—REF 30
Setting up amd mem tweak using the example of RX Vega 56 Memory only Samsung!!! Vega 64 (sewn from 56).
subscribe
Team:
WinAMDTweak.exe -CL 16 -RAS 30 -RCDRD 14 -RCDWR 14 -RC 43 -RP 14s -RRDS 3 -RRDL 5 -RTP 5 -FAW 19 -CWL 7 -WTRS 4 -WTRL 9 -WR 16 -WRRD 1 -RDWR 19 —REF 19500 —MRD 8 —MOD 15 —PD 8 —CKSRE 10 —CKSRX 10 —RFC 236 pause WinAMDTweak.exe —CL 19 —RAS 28 —RCDRD 12 —RCDWR 5 —RC 44 —RP 12 —RRDS 3 —RRDL 3 —RFC 248 —REF 15600 pause
Timings for various video cards
Vega 56 Samsung
WinAMDTweak.exe -i 1 -cl 16 -ras 27 -rcdrd 12 -rcdwr 7 -rfc 180 -pd 5 -cksre 7 -cksrx 7 -mrd 7 -mod 11 -ref 2700 -rdwr 16 -wr 12 -cwl 5 -wtrs 2 —wtrl 6 —rrds 3 —rrdl 4 —rtp 4 —i 1 — card number
Vega 64
WinAMDTweak.exe -i 0,1,2,3,4,5,6,7 -CL 22 -RAS 35 -RCDRD 16 -RCDWR 12 -RCAB 44 -RCPB 44 -RPAB 14 -RPPB 14 -RRDS 3 -RRDL 5 —RTP 5 —FAW 20 —CWL 7 —WTRS 4 —WTRL 9 —WR 16 —RREFD 8 —RDRDDD 3 —RDRDSD 2 —RDRDSC 1 —RDRDSCL 3 —WRWRDD 3 —WRWRSD 2 —WRWRSC 1 —WRWRSCL 3 —WRRD 1 —RDWR 19 —REF 17550 —MRD 8 —MOD 15 —XS 270 —XSMRS 8 —PD 8 —CKSRE 10 —CKSRX 10 —RFCPB 160 —STAG 7 —XP 8 —CPDED 2 —CKE 8 —RDDATA 19 —WRLAT 5 —RDLAT 14 — WRDATA 1 —CKESTAG 2 —RFC 247 —TIMING 0 —ZERORPM False —TDPLIMIT 0 —MAXTEMP 85 pause
This will set all settings on all 8 Vega 64 cards (just change the -i option in the above script to include the number of cards you have) - with one exception, it does not set the core clock speed, core voltage, memory frequency, and memory voltage.
RX 5700
This tool does not work for RX 5700. The developer of this tool opened his own production of 5700-based rigs with his own operating system.
NAVI and GDDR6 video memory
On GDDR6, the -REF 30 parameter is written into the timings when editing the BIOS. It is important to set from 9000 to 16000. Changing timings on the fly for GDDR6 is blocked.
In any case, NAVI will work exactly the same as Vega 56/64. Memory bandwidth is the same. GDDR6 will perform slightly better due to tighter timings compared to HBM. The main result will be energy savings compared to Vega.
Note! RBE has fully decoded GDDR6 timings. More than 100 different timings in the line. Stability of 60+ MH should be easily achievable.
RX 470/480/570/570X/580/580X/590
For these video cards, use PhoenixMiner timings.
Because with Polaris cards you can use a bios mod or a miner that itself changes the timings.
Teams
Available options for GDDR5 memory:
—CKSRE|—cksre [value] —CKSRX|—cksrx [value] —CKE_PULSE|—cke_pulse [value] —CKE|—cke [value] —SEQ_IDLE|—seq_idle [value] —CL|—cl [value] —W2R |—w2r [value] —R2R|—r2r [value] —CCDL|—ccdl [value] —R2W|—r2w [value] —NOPR|—nopr [value] —NOPW|—nopw [value] —RCDW|— rcdw [value] —RCDWA|—rcdwa [value] —RCDR|—rcdr [value] —RCDRA|—rcdra [value] —RRD|—rrd [value] —RC|—rc [value] —RFC|—rfc [ value] —TRP|—trp [value] —RP_WRA|—rp_wra [value] —RP_RDA|—rp_rda [value] —WDATATR|—wdatatr [value] —T32AW|—t32aw [value] —CRCWL|—crcwl [value] —CRCRL|—crcrl [value] —FAW|—faw [value] —PA2WDATA|—pa2wdata [value] —PA2RDATA|—pa2rdata [value] —RAS|—ras [value] —ACTRD|—actrd [value] —ACTWR |—actwr [value] —RASMACTRD|—rasmactrd [value] —RASMACWTR|—rasmacwtr [value] —RAS2RAS|—ras2ras [value] —RP|—rp [value] —WRPLUSRP|—wrplusrp [value] —BUS_TURN|— bus_turn [value] —REF|—ref [value]
Using Red BIOS Editor to Change AMD Radeon Memory Timings
Changing your graphics card BIOS and in particular memory timings to increase the hashrate you get when mining Ethereum is something that most people should do, especially when we're talking about AMD Radeon GPUs, although many miners now also come with the option optimizing timings without modifying the BIOS. One very easy way to change video BIOS is to use the Red BIOS Editor (RBE) program, which supports BIOS modifications for AMD Radeon GPUs with Polaris, Navi, and Big Navi architectures.
There are other ways to modify the BIOS for Polaris GPUs that have been available for a while, but for newer Navi and Big Navi, the solution is RBE software, but here we are going to modify the Radeon RX 5700/Radeon RX ADM. 5700 XT GPUs as an example. The goal is to be able to optimize the memory timings of these graphics cards so that they can give you about 10% more Ethereum (ETH) mining hashrate or in other words from about 50-52 MH/s you could get up to about 55-58 MH/s or even a little more.
Before you start modding, make sure you back up the original video BIOS of the GPU you're going to mod, you'll need it in case you mess up and want to go back to the original settings. A good way to easily back up your original BIOS video is to use the free GPU-Z Tool, although you can also find the original BIOS video in TechPowerUp's VGA BIOS Collection if someone has already posted it (if not, you can download it directly from GPU- Z).
So, launch the RBE software, load the BIOS video you saved on your computer and click on the VRAM Timings tab. You should see something similar to the image above with the RAW memory timing data and the corresponding frequency for which it is valid next to each video memory timing line.
Since you probably don't know what those numbers actually mean, you'll just need to copy the timing string from the lower frequency to the higher one, and then save the modified BIOS file (use a different name, don't overwrite the original backup). For the RX 5700 XT you can copy the timing line from 1550MHz and paste it at higher frequency settings and see if the graphics card is stable using those more aggressive timings at higher frequencies, if it's not stable you can repeat the procedure with timings from 1800 MHz and so on.
You can try even less, but the chances of it still running at 1250MHz are slim, and you may need a spare GPU to flash a working video BIOS back to the graphics card you're modding.
To flash a modified or stock video BIOS on a GPU you will need the amdvbflash tool, there are different versions available and you will need a special one that will work with modified video BIOS as it usually does not allow you to flash a modified BIOS.
The required flashing tools can be downloaded below as part of the RBE package with ATI Flash Tool 2.93+ for RX 5700 and RX 5700XT only, ATI Flash Tool 3.04 for all AMD GPUs on Windows, as well as a Linux version if you need one. Flashing for Windows should be done in the command line running as administrator and enter the following commands:
To save the original BIOS video before flashing:
amdvbflash.exe -s 0 original-bios.rom
To unlock the ROM for flashing:
amdvbflash -unlockrom 0
To flash a modified BIOS:
amdvbflash -p -f 0 biosmod.rom
*The number 0 represents the GPU ID of the first video card, 1 represents the second GPU, and so on for multiple cards on the same system. You can flash multiple GPUs by listing their numbers separated by commas, such as 1,2,3,4,5,6, instead of a single GPU ID.
Remember that after flashing the new video BIOS, you need to restart your computer to see the effect and be able to test the performance of the video card with the new settings. If you flash but don't reboot, the video card will still use the old BIOS data and nothing will change!
— To download the latest Red BIOS Editor (RBE) 1.0.7 and flashing tools...
REF 30
Using the -REF parameter, you can achieve gains of up to 5% on algorithms that depend on memory performance. A good place to start for the REF parameter is 30. The command line would look like this:
amdmemtweak.exe –REF 30
The -RC and -RFC parameters may also be of interest.
Vega 56 hynix which runs poorly. Part 1. Beginning. RRDL may not allow you to adjust some timings lower, set it to 3 to be sure, otherwise errors and freezes are possible. This is timing for an increase and not a decrease like the others. I also got 48 Mh/s from unsuccessful HiNixes.
subscribe
Vega 56 hynix which runs poorly. Part 2. Continued. If you don’t cut the core so much, but leave it at least at 1150-1200, then with the right timings this can give you another +2 megahash. Consumption will not increase very much. 49 megahash on Hynix is not such a miracle.
Timings for video cards of the AMD Radeon RX 470/480/570/580 Polaris series and firmware in MinerOS
It is no secret that in order to obtain the maximum hashrate and minimum power consumption of AMD Radeon RX polaris10 video cards, it is necessary to modify the VBIOS, and then competently overclock and downvolt each card in the operating system for mining MinerOs. Straps for different types of video memory tested by our experts are posted in this article.
Disclaimer
- Straps may not have a positive effect on your card.
- Incorrect firmware can turn the card into a brick and you will need a programmer to restore the card's functionality.
- VBIOS firmware is done at your own peril and risk. The author does not bear any responsibility. If you don't understand what you're doing, don't flash the BIOS!
- The PhoenixMiner 4.9c miner was used in conjunction with the AMDMemTweak utility
———
Micron (M32 memory):
777000000000000022AA1C00AD616C41B0551016320C86080060060004061420EA8940AA030000001012292EB22E3B16 777000000000000022AA1C00AD615C3CA0 550F14308C1506006004007C041420CA8980A9020004C01712262B612B3715 777000000000000022AA1C00EF615C41B0551016BA0D96060060060004061420EA8 940AA030004C01914292E692E3B16 777000000000000022AA1C0073626C41B0551016BA0D260B0060060004061420EA8940AA030000001914292EB22E3B16 7770 00000000000022AA1C0073626C41B0591016BACDC6090060060004061420EA8940AA030000001914292EAE2E3B16
Approximate overclocking: Core 1290 | Memory 2300 | Voltage 940-960 -> Ethash 35-35.5 Mh/s
———
Samsung
000000000000000022CC1C00EF695D48E03110172ECB95090060060024001520FA8900A0030000000F10303A99262F16 777000000000000022CC1C00CEE55C46 C0590E1532CD66090060070014051420FA8900A00300000012123442C3353C19 777000000000000022CC1C00AD615C41C0590E152ECC8608006007000B031420FA 8900A00300000010122F3FBA354019
Approximate overclocking: Core 12910 | Memory 2200 | Voltage 870-920 -> Ethash 33-33.5 Mh/s
———
Elpida
777000000000000022AA1C008C595B3CA0550F142C8C1506006004007C041420CA8980A9020004C01712262B612B3715 777000000000000022AA1C00315A5B 36A0550F15B68C1506004082007C041420CA8980A9020004C01712262B612B3715
Approximate overclocking: Core 1168 | Memory 2070 | Voltage 870-920 -> Ethash 32-32.5 Mh/s
———
Hynix
999000000000000022559D0010DE5B4480551312B74C450A00400600750414206A8900A00200312010112D34A42A3816 999000000000000022C39C00AC59 5A3D90550F123A0E4609004006007E0514206A8900A0020031201E0F292F94273116
Approximate overclocking: Core 1168 | Memory 2070 | Voltage 870-920 -> Ethash 32-32.5 Mh/s
———
Instructions for flashing firmware in MinerOS:
- Download software for VBIOS modification here
- Download the BIOS on [ Rig page -> Overclocking -> VBIOS ], in the drop-down menu - Download .
- Using PolarisBiosEditor, we write a memory strap corresponding to your memory in the last 2 lines of your BIOS. Be sure to save the resulting BIOS into a NEW file.
- Upload the BIOS to the video card [ Rig page -> Overclocking -> VBIOS ], in the drop-down menu - Load . You can download it to all maps at once. Try each strap from the list to find the best one for your card.
- After receiving a notification that the BIOS has been flashed, you need to reboot MinerOS.
- After the rig has loaded again, you need to try different overclocks and run the card in different modes in order to find the optimal mode with the minimum % of incorrect balls.
- You can return to the stock BIOS by repeating the above operation with the original BIOS saved.
If you have any difficulties, visit our Telegram channel, and our friendly community will help you:
https://t.me/minerossupport