What is T Rex Miner
T Rex Miner
is a multi-algorithm mining software optimized for NVIDIA graphics cards. This mining software can mine cryptocurrencies such as Ethereum, Ethereum Classic, Ravencoin and others.
The T-Rex miner is a command line program. This means you run it either from the Windows command line or Linux console, or create shortcuts to predefined command lines using a Linux Bash script or a Windows batch file.
Supported Algorithms and DevFee
The miner supports almost all major algorithms, and the developer’s commission is standard like many and is 1%, and for Octopus and Autolykos2 algorithms it is 2%. List of all algorithms:
| autolykos2 | octopus |
| etchash | progpow |
| ethash | progpow-veil |
| kawpow | progpow-veriblock |
| mtp | progpowz |
| mtp-tcr | tensority |
| multi |
Example T Rex Miner for Binance Pool
| STRATUM: | ethproxy+tcp://ethash.poolbinance.com |
| PORT: | 8888 |
| Username: | username1 |
| Password: | x |
This is what the finished T-Rex Miner batch file will look like for ETH on the Binance Pool :
Just replace username1 with your Binace pool account name.
Example:
t-rex -a ethash -o stratum+tcp://ethash.poolbinance.com:8888 -u username1 -px -w worker_name pause
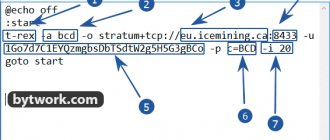
If you want to understand how to set up everything from scratch, then you need to enter 5 commands one by one:
- t-rex is the name of the program we are launching
- ethash - mining algorithm
- ethash.poolbinance.com - pool address
- 8888 - pool port
- username1 - username from the mining account on the exchange.
To set up a batch file for another coin - Firo (MTP) we need to enter other commands:
@echo off :start t-rex -a mtp -o stratum+ssl://zcoin.mintpond.com:3005 -u aMLjCeLBmBGEJP6dYtWEMdZZuPH4w6uFsK.rig0 -px goto start pause
Here we added @echo off - it is used to prevent unnecessary text of the command itself from being displayed on the screen.
Next comes the cycle
:start the command itself goto start
This construction organizes a loop of command execution. But in this case the load on the processor increases slightly.
T Rex Miner setup for NiceHash
Here is a batch file for NiceHash:
@echo off :start t-rex -a kawpow -o stratum+tcp://kawpow.eu.nicehash.com:3385 -u 3HHG3zpxP4AmbKDR9iRy1c2bqAb4WKhNwm.rig -px -i 8 —cpu-priority 1 —coin RVN —temperature-limit 78 --temperature-start 65 goto start pause
Fast start
- Download program
- Unzip
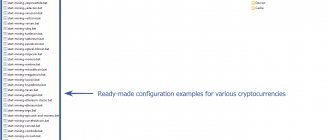
- Create new or edit ready-made .bat files by entering information about the coin pool and wallet
The contents of the program folder are as follows:
list of files
The folder contains complete instructions in Russian and .bat files with a coin and a pool. In order to set up mining on your wallet, you need to edit the .bat file or create a new one similar to the existing one.
T-rex Miner LHR Unlock in HiveOS
To enable LHR mode, you need to explicitly tell the miner which GPUs are LHR and which are not. This is done by specifying the --lhr-tune parameter, which takes values from 0 to 8:
- 0 - disabled (used for cards without LHR)
- 1 - lowest hashrate, low probability of LHR blocking
- 4 is the recommended starting value for most LHR cards
- 8 – highest hashrate, high probability of LHR blocking
Command for Hive OS: "lhr-tune": "4,0,4,8"
BIOS settings for motherboards running Rave OS
- Update your BIOS to the latest version!
- Set the boot device HDD/SSD/M2/USB depending on the OS media.
- Enable 4G encode.
- Set PCIe support to Auto.
- Enable integrated graphics.
- Set your preferred boot mode to Legacy mode.
- Disable virtualization.
How exactly to do this in the BIOS, read the article on setting up the BIOS for mining.
Teams
—algo or a short synonym for this command -a — specifies the mining algorithm (for example: 'ethash', 'mtp', 'kawpow', 'progpow')
Important! Use either the long synonym -algo or the short synonym -a. There is no need to use both together.
Further commands will be indicated separated by commas. First the short synonym, and then the long ones. Remember to only use one option.
-v, --version — Display the version and exit.
-c, --config \ - Use config in JSON format instead of a batch file (CMD file).
To start T-Rex from the configuration file config.txt, enter in the console: t-rex -c config.txt
Use the config_example file as a starting point to create your own configuration.
Using json configuration
To start T-Rex from the configuration file “config.txt” enter in the batch file: t-rex -c config.txt
Use the "config_example" file as an example to create your own configuration.
Using http api for remote control
There are several handlers available for the HTTP API.
By default, the HTTP API server contacts 0.0.0.0:4067. This means that you can access your miner through external and internal network interfaces.
A typical example of a request structure: https://your_ip:your_port/name
TREX
The "trex" handler is designed to display the miner monitoring page in your web browser. You can view miner statistics in real time, and also change miner parameters and configuration very, very quickly. You will also see updates here if they become available.
To activate the handler, go to https://127.0.0.1:4067/trex using a web browser.
CONFIG
The "config" handler is designed to change your hard drive configuration, as well as quickly change some miner parameters.
You can change multiple parameters with one request. GET and POST requests are supported.
If you use config (in a running miner, for example, like this: t-rex.exe -c config_file), then any action with the “config” handler will be saved in the selected config_file.
You can use this handler for automation purposes such as changing configuration while a job is running, shutting down the miner via the API, and then restarting it with the new parameters applied.
Examples of using GET:
https://127.0.0.1:4067/config?protocol-dump=true
Enables a protocol dump and writes it to the config_file.
https://127.0.0.1:4067/config?algo=x16r&devices=0.1&intensity=20.21
If you use this configuration, it will write the following configuration settings to it:
algo=x16r devices=0.1 intensity=20.21
https://127.0.0.1:4067/config?algo=x16r&devices=0,1&intensity=20,21&config=test.conf
Will save the settings to the “test.conf” file, which will be created in the folder where the miner is located.
algo=x16r devices=0.1 intensity=20.21
https://127.0.0.1:4067/config?config=test.conf
Will save your current miner settings in the “test.conf” file.
https://127.0.0.1:4067/config
Shows you the current configuration status
https://127.0.0.1:4067/config?hashrate_avr=10&temperature-limit=70&temperature-start=40
Sets the following parameters. Everything happens very quickly.
hashrate_avr=10 temperature-limit=70 temperature-start=40
Examples of using POST:
For POST requests you must use a valid json object with the parameters you want to change.
https://127.0.0.1:4067/config
POST payload:
{ "hashrate_avr": 10, "temperature-limit": 70, "temperature-start": 40 }
The name and type options in json are identical to the json configuration options you are using.
Summary
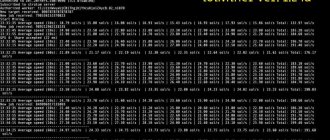
The “summary” handler is designed to display all information about the current mining process.
To activate the handler, go to https://127.0.0.1.1:4067/summary using a web browser.
Example response with comments:
{ "accepted_count": 6, —— Number of accepted shares. “active_pool”: { —— Information about the pool to which your miner is currently connected. "difficulty": 5, —— Current difficulty of the pool. "ping": 97, —— Pool delay. “retries”: 0, —— Number of connection attempts in case of connection loss. "url": "stratum+tcp://...", —— Pool connection string. "user": "..." —— Typically your wallet address. }, "algorithm": "x16r", —— The algorithm that was set in config. "api": "1.2", —— HTTP API protocol version. "cuda": "9.10", —— version of the CUDA library. "description": "T-Rex NVIDIA GPU miner", "difficulty": 31968.245093004043, —— Current network difficulty. "gpu_total": 1, —— The total number of GPUs installed on your system. "gpus": [{ —— List all currently running GPUs on your system with statistics. "device_id": 0, —— Internal device identifier, useful for developers. “fan_speed”: 66, —— Fan blade rotation speed as a % of maximum speed. "gpu_id": 0, —— User-defined device identifier in the configuration. “hashrate”: 4529054, —— Average hashrate for N seconds, defined in the configuration. “hashrate_day”: 5023728, —— Average hashrate per day. “hashrate_hour”: 0, —— Average hashrate per hour. “hashrate_minute”: 4671930, —— Average hashrate per minute. "intensity": 21.5, —— User-defined intensity. "name": "GeForce GTX 1050" —— Current device name. "temperature": 80, —— Current device temperature. "vendor": "Gigabyte" —— Current device vendor. "disabled":true, —— Device status. May appear if the device has reached the temperature limit (--temperature-limit) "disabled_at_temperature": 77 —— Device temperature when disabled. May appear if the device has reached its temperature limit. }], "hashrate": 4529054, —— The total average hashrate for all active devices for N seconds, defined in the configuration. “hashrate_day”: 5023728, —— Total average hashrate per day. “hashrate_hour”: 0, —— Total average hashrate per hour. “hashrate_minute”: 4671930, —— Total average hashrate per minute. "name": "t-rex", "os": "linux", "rejected_count": 0, —— This is the number of balls counted. "solved_count": 0, —— This is the number of blocks found. "ts": 1537095257, —— Current time in seconds since the beginning of the epoch. (ref: https://www.epochconverter.com) “uptime”: 108, —— Operating time in seconds. This shows how long the miner has been running. "version": "0.6.5" —— Miner version. }
Control
The "control" handler is required to configure the T-Rex's real-time timer.
Starting from API version 1.3, the following commands are supported.
Shutdown
To terminate your miner with a GET request type, type in the browser address bar and press Enter:
https://127.0.0.1:4067/control?command=shutdown
Hashrate-avr
To change the real-time average hashrate sample size with a GET request type, type in the browser bar and press Enter:
https://127.0.0.1:4067/control?hashrate-avr=1
It will take 1 second to install.
gpu-report-interval
To change how often GPU reports appear in the log, type the following command in your browser and press Enter:
https://127.0.0.1:4067/control?gpu-report-interval=10
You will now see GPU stats every 10th beat.
you can disable statistics (enter silent mode) by setting gpu-report-interval to 0.
no-color
To disable color output in the console, enter the following into your browser's address bar and press Enter:
https://127.0.0.1:4067/control?no-color=true
Turn on:
https://127.0.0.1:4067/control?no-color=false
protocol-dump
To include a user log dump in the console/log, type into your browser's address bar and press Enter:
https://127.0.0.1:4067/control?protocol-dump=true
Disable:
https://127.0.0.1:4067/control?protocol-dump=false
If you prefer POST, set the request body to {"protocol-dump": true}.
time-limit
To set a time limit in seconds for the miner (it will be disabled after a timeout), enter the following line in the browser and press Enter:
https://127.0.0.1:4067/control?time-limit=120
After this request, it will shut down your miner after 120 seconds.
Disable:
https://127.0.0.1:4067/control?time-limit=0
If you prefer POST, set the request body to {"time-limit": 120}.
Intensity (–mt)
Memory setting mode (default: 0 - disabled). The supported range is from 0 to 6. The general recommendation is to start with 1 and then increase only if the GPU is stable.
The effect is similar to that of ETHlargementPill. Only supported on Pascal GPUs with GDDR5 or GDDR5X memory.
You need to run the miner with administrator rights.
You can specify a comma separated list to apply different values to different cards.
Example: -mt 4 (applies setup mode 4 to all cards that support this feature).
-mt 3,3,3,0 (applies setup mode 3 to all maps except the last one).
Command Line Arguments (Advanced Settings)
Intensity:
-i, --intensity Intensity of video cards 8-25 (default value: auto).
—cpu-priority The priority of the program process (default value: 2). 0 - inactive, 2 - normal, 5 - highest.
Pool connection parameters:
-a, --algo Specify the hash algorithm to use. The list of supported algorithms is listed at the beginning of the article
-o, --url URL of the mining server.
-u, --user Username for the mining server.
-p, --pass Password for the mining server.
-r, --retries The number of connection attempts if the network stops working.
-R, --retry-pause Pauses in seconds between connection attempts.
-T, --timeout Network timeout, in seconds (default value: 180)
--time-limit Network timeout, in seconds. (default value: 0 - disabled)
--back-to-main-pool-sec Forces the miner to switch back to the main pool when working with a backup pool. The parameter is specified in seconds. (default: 600)
--reconnect-on-fail-shares Forces the miner to immediately connect to the pool when N consecutive shares fail (default: 10).
--fork-at Option to automatically switch the algorithm using this option.
Example RVN fork: --fork-at KAWPOW=2020-05-06T16:00:00
Settings for ProgPOW:
—coin Specify the name of the coin for the ProgPOW aglorythm option.
—nonce-start Specify the nonce number to search for a solution (for SOLO mining).
--nonce-range-size Specify the size of the Nonce range to search. The range will be shared between all devices (for SOLO mining).
Disable or select video card:
-d, --devices Specify Nvidia devices. You can select only certain cards for mining using a comma. For example -d 0,2,5 will mine only the first, third and sixth cards. Device ID counting starts from 0.
--ab-indexing View sorting of devices by bus ID. The first device starts with 1)
Safety:
--exit-on-cuda-error Forces the miner to exit immediately on a CUDA error.
--exit-on-connection-lost Forces the miner to exit immediately when the connection is lost.
--no-watchdog Disable watchdog (not recommended).
Power consumption, temperatures and overclocking:
--temperature-limit GPU shutdown temperature. (default value: 0 - disabled) You can find out about safe temperatures in mining here. How to cool video cards here.
--temperature-start GPU temperature to turn the card on after shutdown. (default value: 0 - disabled)
Event log and program interface:
-P, --protocol-dump User protocol log.
-l, --log-path Full path of the log file.
--no-color Disable color output in the console.
--temperature-color Set the temperature color for GPUs. Example: 55.65 - this means that temperatures above 55 will be yellow, above 65 will be red. (default: 67.77)
-N, --hashrate-avr The sample size in seconds used to calculate the average speed (default: 60).
--sharerate-avr The sample amount in seconds used to calculate the share rate (default: 600).
--gpu-report-interval frequency of GPU statistics reporting. (default: 5, that is, every fifth ball)
-q, --quiet Quiet mode. No GPU statistics will be shown.
--hide-date Hide the date in the console.
--no-nvml Disable GPU NVML statistics.
Working with the remote control API:
-b, --api-bind-telnet IP:port for miner API via telnet (default value: 0.0.0.0:4068). Enter 0 to disable.
—api-bind-http IP:port for miner API via HTTP (default value: 0.0.0.0:4067). Enter 0 to disable.
-J --json-response The telnet API server will make json responses.
Other settings:
--autoupdate Perform an automatic update whenever a newer version of the miner is available.
-B, --benchmark Run benchmark (testing and debugging).
-c, --config Load and use a configuration file in JSON format.
--version Display help.
-h, --help Display the program version.
How to set up LHR unlock
Follow these steps to enable LHR unlock:
- Open the bat file (or command line in HiveOs).
- Select the device you want to apply LHR unlock to.
- Enter --lhr-tune 68 or any other supported value in the text field.
- Save your changes.
- Close the settings window.
- Repeat the process for other devices.
Available commands to unlock LHR:
--lhr-algo - specify the second algorithm to use in LHR unlock dual mining mode.
--lhr-coin - Set coin name for --lhr-algo.
--lhr-tune [Ethash, Autolykos2] LHR tune value indicating the percentage of full miner speed that Trex is trying to achieve for LHR cards (default: -1). Range from 10 to 95. Available values: -1 — auto-mode (LHR tune is set to 74 (or 68 in low power mode) for LHR cards and 0 for non-LHR) 0 — disabled (use for non-LHR cards ) 30 — recommended starting value for most LHR cards in LHR unlock dual mining mode (see —lhr-algo) 68 — recommended starting value for most LHR cards in low power mode (see —lhr-low-power) 74 — recommended starting value for most LHR cards Can be set for each GPU separately, eg “lhr-tune”: “0,0,74.5,0” — this will set LHR tuning value to 74.5 for the third GPU.
--lhr-autotune-mode [Ethash, Autolykos2] LHR auto-tune mode (default: full). Valid values: off — auto-tune is disabled. LHR tune value is fixed during mining, and will not change no matter how often LHR lock is detected down — LHR tune value will decrease if the miner detects LHR lock full — same as “down” but additionally miner will be trying to increase LHR tune value if its stable on the current LHR tune level —lhr-autotune-step-size LHR auto-tune step size (default: 0.5). Indicates by how much LHR tune value is changed by the LHR auto-tuner. --lhr-autotune-interval LHR auto-tune time interval in minutes (default: 20). Amount of time the GPU must be mining without hitting LHR locks before the miner increases LHR tune value. Also, if the GPU has triggered an LHR lock, LHR tune value will not decrease if the previous LHR lock was detected more than “—lhr-autotune-interval” minutes ago. --lhr-low-power [Ethash, Autolykos2] Reduces power consumption in LHR mode at a cost of a slightly lower hashrate.
Install the RaveOS image on media: SSD, HDD, M.2 or flash drive
Before installing RaveOS, we need to add Worker. This is necessary in order to link the installed RaveOS system to the created worker. So, when loading RaveOS from the media, we will see the running system in the Web interface.
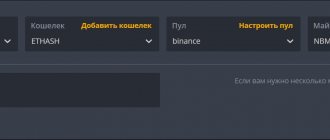
In the RaveOS web interface, go to the Dashboard or Workers tab and add a Worker by clicking Add Worker.
Adding a Worker via Dashboard
You can also add a Worker through the Workers tab.
Adding a Worker via the Workers tab
When adding a worker, fill in the following fields:
Creating worders in RaveOS
- Name — worker name.
- Description — description of the worker.
- Password — the worker’s password, in case of transferring access to other people.
- Card quantity — number of cards that will be in the worker.
After downloading the RaveOS image to your PC, you need to install it on the media. The storage medium must be at least 16Gb. We highly recommend using SSD drives, because... They work much faster than flash drives and are more stable. If possible, you can use an M.2 SSD, but this port on the motherboard can be used for an additional video card, and you can select an SSD as the storage medium.
If you decide on a flash drive, be sure to make sure that it has at least a USB 3.0 interface and is inserted into a motherboard port that supports USB 3.0, and also make sure that the flash drive has at least 16Gb of memory.
To record the image, we need the unzipped RaveOS image. Install the HDD Raw Copy Tool utility.
Using the HDD Raw Copy Tool we record the RaveOS image.
Launch the program, select the RaveOS image in the FILE field.
HDD Raw Copy Tool
In the next window, open in the ATA field and select the media on which we will write the image.
HDD Raw Copy Tool
Next, click Continue and confirm the entry.
After recording the image, we need to register the token of our rig in the configuration file, this will connect our system with the rig on which RaveOS will be launched.
Let's go to the Web interface, i.e. We log into our account in the RaveOS system and go to the Workers tab.
Select Edit, enter the worker settings and look for the SYSTEM INFO tab. We are interested in the Worker Token field.
Worker token
Copy the Worker token.
We need to insert it into the OS file (disk with the RaveOS operating system): /config/token.txt, insert the Worker's token and save it. That's it, with this action you connected your worker in RaveOS with the image, now when you launch this image in the farm, you will see this through the control panel (web interface) of RaveOS.
After recording the image, we configure the motherboard bios for mining, making our media with the image a priority for recording as well.
Troubleshooting
GPU idle
Setting Windows virtual memory to 21000 MB should resolve this “GPU idle” error. This could also be a problem with overclocking the video card.
API read only mode
To resolve this error you should use the command line:
t-rex.exe --api-generate-key < >
This will generate a key that you can paste into the configuration file entry --api-key.
You then enter <> when prompted in the web interface.
Download the RaveOS image
In the same window of the operating system Web interface, look for the Download link on the left. This link always takes you to the latest and most current version of RaveOS. I recommend not downloading the RaveOS image anywhere else except the official website.
The name of the image will be something like this - raveos-v1.0.24-8340-1698.img.zip. When you download, the version will already be newer.
The RaveOS image is downloaded in a zip archive, after downloading the archive, unzip it to write the image to an SSD, HDD, M.2 or flash drive.
RaveOS does not see the video card, especially 3060 Ti, 3070, 3080
If RaveOS does not see a 3060, 3070 or 3080 video card, make sure you have installed the latest version, no less than raveos-v1.0.24-8340-1698. Because Older versions do not support these video cards. We will discuss how to update rave os later.
If RaveOS does not see other video cards, give it a chance to initialize them. When you first boot, the system can take a very long time to initialize video cards, especially if there are many of them, 6 or more.
In this case, start the farm one card at a time, i.e. leave only one card in the motherboard, start the farm and wait until it starts. After starting and initializing the video card, turn off the farm and connect the second card, and repeat for each card in the farm. This usually helps.
If this does not help, make sure that you have set the BIOS settings correctly; how to do this, read the article on setting up the BIOS for mining.
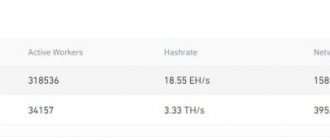
Firo rate and trading on the Binance exchange.
To see the Firo cryptocurrency rate (on Binance), you need to go to the Trading section (Classic trading).
In the USDT column we write Firo in the search.
Now you can see how the exchange rate changes in real time and sell coins if you mined them with your video cards.
Firo cryptocurrency rate.
Ether miner - recommendations for choosing
What to look for when choosing the best cryptocurrency mining software:
- Support for certain algorithms depends on what coin you plan to mine.
- Adaptability to specific equipment and power.
- Convenience of the interface, if necessary, the presence of a GUI.
- Additional functionality - wallet, automatic switching between coins, remote control, etc.
- Information and statistical component. How much information about the mining process does the program provide? It is especially important that the window displays the temperature control of the equipment. This will prevent it from overheating.
It is also necessary to take into account that almost all programs are recognized by antiviruses as viruses or Trojans. Therefore, you need to either disable anti-virus software, or add utilities to exceptions, or use a separate computer/farm for mining where the anti-virus will not be installed.
Structure of objects (clusters, workers, video cards) in the Rave OS system
To understand the correct configuration of your farms in the Rave OS system, we will explain the hierarchy of objects in the farm.
Clusters - imagine this as an object, for example a garage or a room in which your workers or rigs are located (we will get to rigs or workers later). Organize your workers into clusters that replicate the physical layout of your devices. By combining rigs into farms, you can separate them by geolocation, for example, if you have rigs in different garages, offices, apartments, rooms. This is more needed for those who have many farms and rigs.
Workers are your rig itself. Those. motherboard with processor, power supply and video cards. In ordinary life, this is called a farm. Read how the mining farm works on the website.