We are considering a specialized operating system for mining, Hive OS, and the hiveon.net pool developed for it - platform features, setting up and starting mining, coin support.
Hive OS is a specialized operating system designed for miners. With its help, you can easily and quickly set up the extraction of popular coins on one or several farms. In today's review, we will thoroughly examine all the features of this site, and also analyze the mining capabilities on the hiveon.net pool, coupled with the operating system described.
Hive OS: what is it in simple words
To put it as simply as possible, Hive OS is an operating system developed based on Ubuntu 16.04 LTS. It provides users with ample opportunities to mine cryptocurrencies using video cards or ASICs. The operating system is linked to its official website - hiveos.farm. Through it, you can configure the mining of coins of interest, as well as manage the mining process from anywhere in the world where there is Internet access. The developers have included in one platform many functions necessary for mining cryptocurrencies. Now “miners” do not need to download special programs, configure them, struggle with bat files, or think through remote access options. Just go to the website hiveos.farm, and you can regulate production at your discretion. More precisely, one single online resource will allow you to:
add new wallets for different digital assets;
- quickly configure mining programs;
- overclock video cards;
- set the desired parameters for memory used, power consumption, automatic on/off of the farm;
- flash AMD boards;
- track hashrate online;
- manage from one account several farms or ASICs that produce different coins;
- independently reboot or disable workers;
- mine different coins simultaneously on several pools.
The operating system supports the most popular card models from AMD (RX4xx and PX5xx) and NVidia (GTX 9xx and GTX 10xx). True, it is still unclear what the situation is with the newest motherboards from NVidia 20 series. Most likely, even if there is no support yet, it will appear in the near future. The most popular programs for mining coins are integrated into the Hive OS shell:
- Claymore Dual Ethereum Miner + Claymore ZCash Miner;
- CCminer;
- XMR Stak CPU;
- EWBF's CUDA Zcash miner;
- Claymore CryptoNote Miner.
The operating system supports working with more than two dozen pools. But the most important thing is that the developers have created a separate hiveon.net pool. So far, only 3 cryptocurrencies can be mined on it: Ethereum, Ethereum Classic and Monero. In the near future, it is planned to add BEAM and Grin coins. We will talk in more detail about working on this resource a little later.
Key features of Hive OS
We have highlighted a number of aspects that make this platform a real boon for miners:
- The system does not consume a lot of hardware resources. To work with it, you can use outdated AM2/774 sockets. As for RAM, 2 gigs is enough for comfortable operation.
- The operating system does not take up much space. When installed, it requires only 8 GB. Thus, the platform can be installed on any hard drive, solid-state drive, or even a flash drive. By the way, the last option is the most optimal, but more on that later.
- The platform works without problems with mixed rigs where AMD and NVidia video cards are installed together.
- You can mine coins in parallel on video cards, processors and ASICs.
- The system provides for automatic restart of the rig when the hashrate drops to the minimum level.
- It is possible to work with a large number of workers and wallets.
- The hiveos.farm website provides a convenient menu for editing rig settings.
- Access to the official website is possible from any operating system, and the functionality is not limited in any way.
- The OS has a built-in OpenVPN client.
- There is support for wireless connection via Wi-Fi.
- One rig can contain up to 19 video cards inclusive.
- The user can track detailed statistics on various parameters: hashrate, board temperature, fan speed.
- The site is compatible not only with the “native” pool, but also with other popular mining services.
Installing Hive OS and starting mining takes about half an hour. Mining starts automatically after setting up your wallet and connecting to a specific pool. If the farm suddenly reboots, production will resume automatically, and all settings will be saved. Under current conditions, the system allows you to use 3 rigs for free. You can do more, but for each subsequent one you will have to pay $5 monthly. Considering how much profit 4-6 rigs will bring, the required fee seems quite insignificant. Well, we’ve figured out the key features of this mining operating system. Now let's talk about its installation and subsequent use.
Hive OS installation rules
The operating system in question can be installed on almost any media (except, perhaps, CDs). But it is best to put the shell on a flash drive. We will describe this method further:
- Go to the website hiveos.farm.
- Scroll the page down a little and click on the phrase “simple to install” (it is highlighted in bold white font).
- On the page that appears, find the “Download zip” block and click on it.
- We are waiting for the archive to finish downloading (it weighs 2 GB).
- While the archive is being downloaded, we download another important program. Scroll down the same page a little lower and click on “HDD Raw Copy Tool” (also highlighted in bold white).
- Scroll down the next page, find the HDD Raw Copy ver.1.10 setup link and click on it. We are waiting for the installation file to download.
- Install this program on your PC.
- When the archive with the operating system is loaded, prepare the flash drive. Its minimum volume should be 8 GB, but to be on the safe side, you can take a larger drive.
- Unpack the archive with the operating system.
- Launch HDD Raw Copy.
- In the program window, click on the FILE line twice. In the window that appears, go to the folder with Hive OS and select the disk image file (there is only one there, you won’t confuse it).
- Then double-click on the central line (here we select the media on which the image will be recorded). Select our flash drive.
- After that, click on Continue, and then on the Start button. We wait for the installation to complete, and then close the program.
That's all! Hive OS is installed on external media. Now we insert it into the USB connector of the farm and open it.
Use Hive OS for free
With Hive OS, we offer you many useful features with which you can increase the productivity of your workers and, accordingly, your income. Moreover, we give you the opportunity to use our operating system for free. There are three ways to do this:
Install Hiveon ASIC firmware
To improve your ASICs and increase their performance, we have created custom firmware for Antminer S17, S17 Pro, S10, S9, S9j, S9i and T9+ (this list is updated regularly). Take a look at the main characteristics of our firmware:
- Improving the energy efficiency of devices
- Overclocking chips
- Automatic adjustment of worn out chips
- Ability to select frequencies and voltages both manually and automatically
- Restoring devices that have been infected with viruses
- Virus protection
- Temperature and hashrate controllers
- Built-in wattmeter
- If a fan or chip breaks down, the LEDs on the ASIC start blinking
With Hiveon ASIC firmware, you will increase the performance of your equipment and start earning more. Also, you can use Hive OS for free. The only additional condition is the commission for parallel mining - it is 2%.
Use Hiveon pool
Paid users can pay for Hive OS through a 3% commission on Ethereum mining on the Hiveon pool. Essentially, you pay to use the pool, but Hive OS is free.
If you are a free user and mine Ethereum on the Hiveon pool (or any other coins on other pools), you can have 4 free rigs (no commission will be applied to them). Find out more here.
Start using ViaBTC pool for BTC mining
ViaBTC is one of the best Bitcoin mining pools. By becoming our referral on the pool, you can use Hive OS for free until April 19, 2022 (hopefully by this time the virus will stop terrorizing the planet??). Also, you will receive a discount on the commission in the amount of the ViaBTC pool (0.5%).
The steps required to participate in the promotion are described in detail here. You can also learn more about the ViaBTC pool there.
Launching Hive OS and setting up mining
This process can be divided into 2 stages. When setting up for the first time, it is advisable to use 2 gadgets (for example, a farm with an inserted flash drive with a connected monitor and a regular PC for setup; or a farm with a monitor and a smartphone). This will be more convenient, but if you want, you can perform all subsequent steps exclusively on the farm. First, let's go through the first stage.
Launching Hive OS and synchronizing it with the official website
Here we will have to work both with the farm itself and carry out some manipulations on the online platform:
- Open the flash drive inserted into the farm’s motherboard. When the primary files are loaded, we move on to another gadget.
- From another computer or smartphone, log into the hiveos.farm website.
- We create an account on this online resource.
- In the “Farms” section, click on the “Workers” block.
- Click on the add one button.
- In the window that appears, select the platform type (GPU or ASIC), enter the name of the worker, and then click on the “Add” button. Tags and description are optional.
- A page will appear in front of you on which RIG_ID and RIG_PASSWORD will be written. They need to be entered into the window in which we have Hive OS open. Before this, it is advisable to go to the worker settings and enter the exact number of video cards installed in your farm (this can be done later, but it’s better in advance).
- Enter RIG_ID and RIG_PASSWORD in the mining operating system window and press Enter. You will see the message “Happy Mining!” This means that the synchronization of the farm with the account was successful.
Now all we have to do is start production. We'll talk about this further.
Setting up and starting mining
When working with Hive OS, cryptocurrency mining is activated by creating a flight sheet and adding it to the worker. This is done very simply:
- First of all, we create a wallet to store the cryptocurrency that we plan to mine. Almost any storage options are suitable: software, online, hardware, mobile. You can also use paper media, but working with them is not so convenient.
- After creating the storage and generating a public address in it, go to the “Workers” block and select the “Wallets” subsection.
- In the menu that appears, click on the “Add wallet” button.
- Enter the public wallet address (for example, Ethereum wallet ID). Let's come up with a name for it. After that, click on the “Create” button.
- Then go to the “Flight sheets” subsection.
- There we indicate the type of coin (in our case it will be Ether), select a wallet (its name will be indicated), and a mining pool (at this point you will also be asked to select a server). At the end we indicate one of the proposed miner options.
- Click on the “Create flight sheet” button.
- After that, go again to the “Workers” subsection and click on the rocket icon (it’s at the top).
- Click on our flight sheet and click on the “Apply” button.
- After this, mining will begin.
That's all, actually. Coin mining has begun through your chosen pool. You can create several workers and pair them with different farms (for this you only need an ID and password). So, we looked at the general principles of mining using the Hive OS operating system. Now we will analyze in detail the mining of coins on the hiveon.net pool, which is a kind of addition to the main software shell.
Get a discount
If you have a large number of workers, you will pay less for Hive OS:
| Number of workers | Discount |
| 50+ | 10% |
| 100+ | 20% |
| 250+ | 30% |
| 500+ | 40% |
| 1000+ | 50% |
The discount applies to the total number of workers on your farms. For example, you have 40 workers on one farm and 20 on another. This means that the discount will be calculated based on the number of 60 workers (10%).
If we take the example of 60 workers and assume you are using rigs (each rig costs $3), then their standard total cost would be $180. But with the discount you will pay $162. Sounds promising, doesn't it? ASICs cost $2. So if you have 60 ASICs, their standard cost will be $120. With the discount, you will only need to pay $108.
Similar “discount” rules apply to the Hiveon pool commission:
| Number of workers | Discount | Commission |
| 50+ | 10% | 2.7% |
| 100+ | 20% | 2.4% |
| 250+ | 30% | 2.1% |
| 500+ | 40% | 1.8% |
| 1000+ | 50% | 1.5% |
Setting up miners to work with Binance pool on Windows
Setting up miners to work with Binance Pool is no different from setting up for other pools. The only distinguishing feature is the need to specify the worker name exactly as you named your Mining Account in Binance Pool. In our case, this is Cryptoage1. If you have several mining rigs, then you can create the appropriate number of mining accounts on the Binance pool. Each mining rig will have its own unique worker name. It is also possible to group workers by specifying a name for them in the miner settings Cryptoage1.1, Cryptoage1.2.
Because the popular Claymore miner has not been updated for a long time and does not support DAG files larger than 4Gb, so we recommend using the following miners: Phoenix Miner, TeamRedMiner, LolMiner, Gminer, NBminer, Bminer.
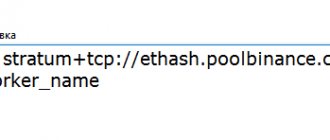
Let's give an example of the startup file for the Phoenix miner, or more simply a bat file. To do this, open and edit the file start_miner.bat
You can download the latest version of Phoenix Miner 5.2e from this link
| setx GPU_FORCE_64BIT_PTR 0 setx GPU_MAX_HEAP_SIZE 100 setx GPU_USE_SYNC_OBJECTS 1 setx GPU_MAX_ALLOC_PERCENT 100 setx GPU_SINGLE_ALLOC_PERCENT 100 PhoenixMiner.exe -pool stratum+tcp://ethash.poolbinance.com:1800 -pool2 sstratum+t cp://ethash.poolbinance.com:25 -wal Cryptoage1 pause |
In this example, you need to replace Cryptoage1 with your Mining Account name from step 3.
For different rigs, you can indicate your account with serial numbers separated by a dot. For example: Cryptoage1.1, Cryptoage1.2, Cryptoage1.3, etc.
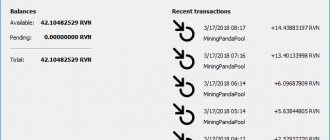
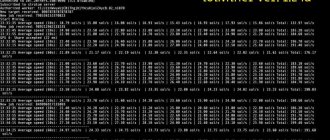
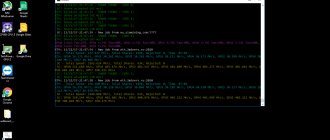
We launch the created Bat-file and if there are no connection errors with the pool (server), then after a few minutes the data on your mining rigs will appear on the pool in the Statistics .
Get your bonus
We offer several bonuses: 30% deposit bonus and 3% deposit bonus in Stablecoins. To get them, follow these instructions:
30% deposit bonus
Step 1: You must be an account holder and have been using paid features of Hive OS for 2 weeks.
Step 2: After these 2 weeks, you need to make 3 months deposit into your account. Then you will receive 30% of this amount.
You do not have to independently calculate the amount required to receive a bonus. If you are eligible to receive a bonus, you will see a minimum amount in the “Your Funds” tab (you can pay more, but a minimum amount is required to receive the bonus). Simply make a deposit and receive your 30% bonus.
For example, your deposit amount is $300. This means you will receive $90 as a bonus. This is a pretty good extra amount.
3% deposit bonus in Stablecoins
If you are a Hive OS user, you can get a 3% bonus on any stablecoin deposit amount. We accept the following stablecoins:
- USDT
- TUSD
- USDC
Making a deposit in stablecoins is very simple:
Step 1: Select Hive as provider:
Step 2: Add a deposit address for your stablecoins. You can copy it using this button:
Step 3: Once you are in the wallet, enter the desired deposit amount:
Step 4: Click Send
That's all - stablecoins are deposited, the bonus is received:
Let's say you deposit 120 USDT. As a bonus, you will receive 3.6 USDT.
Setting up RaveOS to work with Binance pool
Read more about installing and configuring RAVEOS here: Installing and configuring RaveOS - Linux operating system for mining cryptocurrencies on video cards
Go to the Wallets settings, create a wallet for Ethereum or change the settings of an existing wallet
RaveOS, like HiveOS, has Binance Pool in its pool lists, so there should be no problems with switching to Binance.
Binance Pool Registration
- For beginners
- Services
Bring referrals
With Hive OS you can earn money even when you pause your mining process - just join our referral system. Some users earn more than $1000 per month, and if they become your referrals, you will have a good passive income.
To invite referrals, follow these instructions:
Step 1: Register and receive a referral link with your account ID.
Step 2: Share the link on social networks, forums or blogs.
Step 3: New users who register using your referral link will be marked as your referrals.
The referral reward will depend on the activity of your referrals - we have provided two options.
Referrals that only use Hive OS
If your referral has made a deposit and added miners, you will receive 10% of their payments for Hive OS. For example, today a referral paid $3 - you will receive $0.3. If he paid $100, your reward will be $10. If the referral made a deposit but did not add miners, the reward system will not work.
Please note that the referral reward is counted ONLY upon payment by the referral for using Hive OS.
Also, if the daily charge goes into debt, the referral payment will only occur when the farm debt is paid off in full.
Setting up HiveOS to work with Binance Pool
You can read more about installing and configuring HiveOS here: Installing and configuring HiveOS - Linux operating system for GPU mining rigs and ASICs
Here we will tell you in more detail how to set up a flight sheet to work with Binance Pool.
The best thing about HiveOS is the presence of Binance Pool in the pre-installed OS settings, which makes setting up mining rigs even easier.
In the Pool dialog, select Binance from the list
Next, select a server from the list provided
Next, go to the miner settings and in the “Wallet and Template Worker” window, enter your Mining account.
Next, don’t forget to save the changes you made and run the worker with a new flight sheet.
In a few minutes, mining statistics will appear on the Binance pool website.
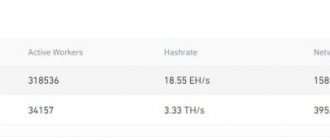
Please note that in the statistics section you need to select the ETHASH algorithm so that you can see your Ethereum mining statistics.