XMRig Miner (NSD) stands for new malicious software involved in the mining of digital currencies on an infected computer. Owners of such computers will not receive any benefit from the presence of XMRig Miner (NSD) within the system. Instead, the processor's power will be constantly under high load for the purpose of generating income for other people.
XMRig Miner (NSD)
While XMRig Miner (NSD) is active on the system there will be an extremely high load on the computer's performance. You will not be able to fully enjoy the functionality of the workstation as the computer will constantly freeze and there may be times that you will not be able to use it at all.
XMRig Miner (NSD) injection is often the result of the user's failure to be careful, especially when downloading and installing some free program. In times like these you should definitely pay more close attention to what else you are going to make part of your system. Of course, in case you have read some additional programs, it is imperative that you do not allow any hidden installations to occur. In conclusion, XMRig Miner Injection (XMR) is a result of poorly protecting your computer with existing security applications that do not perform their direct function of protecting your system.
XMRig Miner (NSD)
Removing XMRig Miner (NSD) is possible only with tested antivirus tools that can effectively detect all associated components that may be associated with this type of infection. We strongly recommend that you thoroughly scan your computer with our recommended software, which explains how to install the system in the proper manner.
Review
XMRig
is a program for mining coins using the RandomX, KawPow and CryptoNight algorithms. Suitable for both AMD and Nvidia family video cards and processors. Official binaries are available for Windows, Linux, macOS and FreeBSD.
The program has a developer commission of 1-5%. In this step-by-step instructions we will tell you how to set up commissions and batch files for different coins.
Recommended drivers:
- Adrenalin Edition 18.5.1
- Adrenalin Edition 18.5.2
- Adrenalin Edition 18.6.1
Features: Open source.
High performance.
Official Windows support.
randomx support.
Nicehash support.
Algorithms
| Algorithm | Memory | Ver. | Description | Note |
| cn/upx2 | 128 KB | 6.12.0+ | CryptoNight-Femto (variant of CryptoNight V2 for Uplexa). | |
| argon2/chukwav2 | 1 MB | 6.4.0+ | Argon2id (Chukwa v2). | CPU only |
| cn/ccx | 2 MB | 6.2.0+ | Conceal (CCX) | |
| kawpow | — | 6.0.0+ | KawPow (Ravencoin) | GPU only, not supported by xmrig-proxy |
| rx/keva | 1 MB | 5.9.0+ | RandomKEVA (RandomX variant for Keva). | |
| astrobwt | 20 MB | 5.8.0+ | AstroBWT (Dero). | |
| cn-pico/tlo | 256 KB | 5.5.0+ | CryptoNight-Pico (Talleo). | |
| rx/sfx | 2 MB | 5.4.0+ | RandomSFX (RandomX variant for Safex). | |
| rx/arq | 256 KB | 4.3.0+ | RandomARQ (RandomX variant for ArQmA). | |
| rx/0 | 2 MB | 3.2.0+ | RandomX (Monero). | |
| argon2/chukwa | 512 KB | 3.1.0+ | Argon2id (Chukwa). | CPU only |
| argon2/ninja | 256 KB | 3.1.0+ | Argon2id (NINJA) | CPU only |
| rx/wow | 1 MB | 3.0.0+ | RandomWOW (RandomX variant for Wownero). | |
| cn/fast | 2 MB | 3.0.0+ | CryptoNight variant 1 with half iterations. | |
| cn/rwz | 2 MB | 2.14.0+ | CryptoNight variant 2 with 3/4 iterations and reversed shuffle operation. | |
| cn/zls | 2 MB | 2.14.0+ | CryptoNight variant 2 with 3/4 iterations. | |
| cn/double | 2 MB | 2.14.0+ | CryptoNight variant 2 with double iterations. | |
| cn/r | 2 MB | 2.13.0+ | CryptoNightR (Monero's variant 4). | |
| cn-pico | 256 KB | 2.10.0+ | CryptoNight-Pico. | |
| cn/half | 2 MB | 2.9.0+ | CryptoNight variant 2 with half iterations. | |
| cn/2 | 2 MB | 2.8.0+ | CryptoNight variant 2. | |
| cn/xao | 2 MB | 2.6.4+ | CryptoNight variant 0 (modified). | |
| cn/rto | 2 MB | 2.6.4+ | CryptoNight variant 1 (modified). | |
| cn-heavy/tube | 4 MB | 2.6.4+ | CryptoNight-Heavy (modified). | |
| cn-heavy/xhv | 4 MB | 2.6.3+ | CryptoNight-Heavy (modified). | |
| cn-heavy/0 | 4 MB | 2.6.0+ | CryptoNight-Heavy. | |
| cn/1 | 2 MB | 2.5.0+ | CryptoNight variant 1. | |
| cn-lite/1 | 1 MB | 2.5.0+ | CryptoNight-Lite variant 1. | |
| cn-lite/0 | 1 MB | 0.8.0+ | CryptoNight-Lite variant 0. | |
| cn/0 | 2 MB | 0.5.0+ | CryptoNight (original). |
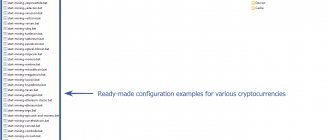
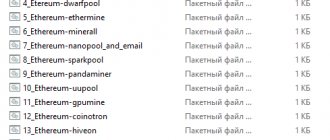
Traditionally, at the end of the article there will be examples of ready-made .bat files. As well as an archive with a fully customized program.
If you find these instructions useful, you can thank us by running mining on a niche wallet for a while.
Setup guide
In order to mine coins you need:
- Download program.
- Unzip to any convenient location.
- Edit the .bat file with the desired coin.
- Insert your wallet address.
- Launch the program by double clicking on the file with the .bat extension.
The contents of the compiled miner look like this:
Arguments for mining can be written both in the config.json file and in files with the .bat extension. The cryptocurrency mining process starts by double-clicking on the batch file. For example, monero-supportxmr-CPU.bat will mine Monero on the CPU.
Let's look at the setup in more detail.
Settings
To mine coins using the randomx algorithm, we need to create or edit a ready-made batch file for the coin you need. These are the basic settings, which are enough for mining. We'll look at secondary settings later.
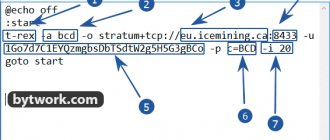
Body file for Monero
- xmrig this key will indicate which program will be launched. Let's leave it as is.
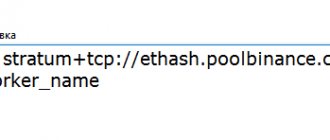
- -o pool.minexmr.com indicate the address of your pool for mining. In this example we have minexmr.com, because at the time of writing, it received the most positive reviews.
- 443 after the pool address, we indicate the pool port separated by a colon.
- -u 84XFxjQVYoJjQBeyfbcYBgJ1tw4cgywGyTp12nQw3mSKZctgMYuPGRH1y2LuBAS8yyT8ZX2NDS3CXbfFAxdXQJwAGMoMDSq after the -u key we indicate the address of your digital wallet. Get it from a cryptocurrency exchange, or install a cold wallet.
You can add the “pause” key at the very bottom of the batch file, so that in the event of a program error or incorrect syntax of the .bat file, the program does not immediately close, but displays the code and description of the error on the screen.
Ready setup example:
xmrig -o pool.minexmr.com:443 -u 84XFxjQVYoJjQBeyfbcYBgJ1tw4cgywGyTp12nQw3mSKZctgMYuPGRH1y2LuBAS8yyT8ZX2NDS3CXbfFAxdXQJwAGMoMDSq -k —tls pause
Attention! In order for the program to run, you must strictly adhere to the syntax of the .bat file. Observe all periods, colons and cons. Don't write extra spaces and symbols where they shouldn't be.
The program is launched by double-clicking on the batch file you made or edited.
Body file for Nicehash
- xmrig this key will indicate which program will be launched.
- -a randomx specify the algorithm. For Monero we leave this one. For coins based on the cryptonight or kawpow algorithm, indicate them.
- -o randomxmonero.eu.nicehash.com indicate your pool address. In this example, we have a pool for the Nicehash program.
- 3380 after the pool address, we indicate the pool port separated by a colon.
- -u 1Pz3EcHsRuJkraNRACUrBrLaxiTPP1VHJZ after the -u key we indicate the address of your digital wallet from your Nicehash account. Get it on a cryptocurrency exchange, or install a cold wallet
- .rig1 indicates the name of the farm. You can specify anything.
- —coin monero we indicate which coin will be mined.
Ready setup example:
xmrig -a randomx -o randomxmonero.eu.nicehash.com:3380 -u 1Pz3EcHsRuJkraNRACUrBrLaxiTPP1VHJZ.rig1 —coin monero pause
Body file for Nanopool
- xmrig this key will indicate which program will be launched.
- -o xmr-eu1.nanopool.org specify the Nanopool address.
- 14433 after the pool address, we indicate the pool port separated by a colon.
- -u 84XFxjQVYoJjQBeyfbcYBgJ1tw4cgywGyTp12nQw3mSKZctgMYuPGRH1y2LuBAS8yyT8ZX2NDS3CXbfFAxdXQJwAGMoMDSq after the -u key we indicate the address of your digital wallet.
- —coin monero we indicate which coin will be mined.
Ready setup example:
xmrig -o xmr-eu1.nanopool.org:14433 -u 84XFxjQVYoJjQBeyfbcYBgJ1tw4cgywGyTp12nQw3mSKZctgMYuPGRH1y2LuBAS8yyT8ZX2NDS3CXbfFAxdXQJwAGMoMDSq —tls —coin monero pause
At this point, you can complete the basic setup of the miner and launch the program.
But to complete the instructions, we will look at all the program keys in the “Advanced setup” section.
How to remove CPU Miner
Cleaning up CPU Miner involves getting rid of all browser add-ons with the name CPU Miner, all registry keys that are associated with this virus, and every virus file on the computer. Typically, removing an add-on in browsers with the name CPU Miner has an effect either before restarting the browser or before rebooting the system. The virus program repairs itself. You can remove all extensions and add-ons in browsers, remove it using the Add or Remove Programs function, find the program on your computer and get rid of them yourself. The work will be useless. However, only experienced computer users with extensive experience can clean the registry. If you make any mistake in the registry, you will need to reinstall the OS or it will be able to work, but errors will appear on an ongoing basis. Because of this, we advise only fairly experienced users to clean the registry themselves; moreover, you clean the registry at your own peril and risk. For this reason, we recommend automatic removal of CPU Miner using a utility called Spyhunter 4, created by Enigma software.
- Will clear all add-ons and extensions in the browser called CPU Miner.
- Will delete registry keys that are associated with CPU Miner and destroy only them. Your registry will not be damaged, the OS will work normally.
- This utility will clean CPU Miner virus from your computer.
- It will improve the functioning of the computer, it will start working better.
- Removes other malware and viruses from your computer.
- It will protect your computer from future threats.
Enable the Lock Pages in Memory option Windows (large page)
Allow the miner to access the memory. This setting increases hashrate.
Open gpedit.msc
If you have Windows 10 Education/enterprise or Professional:
Click Run in the start menu -> type: gpedit.msc and press Enter.
For those with Windows 10 Home
If you have Windows 10 Home (or Single Language Edition) then you have gpedit, but it is disabled by default and you need to enable it. You can use the .bat file from askvg.com, which will do all this for you.
Go to askvg.com
Scroll down to "Method 1: Windows 10 users only" and follow the instructions to download and run the .bat file.
Restart your computer according to the instructions.
Click "Run" in the start menu -> type: "gpedit.msc" and press enter.
In open gpedit:
- Expand Computer Configuration and navigate to Windows Configuration.
- Expand Security Settings.
- Expand Local Policies.
- Select "User Rights Assignment".
- In the right side corner, scroll down and select: Lock Pages in Memory.
- Select Add User or Group.
- Enter the username you use to log into Windows and select Check Names.
- If you have a Microsoft account with an email address, then include the @domain.com part in the name.
- The system will highlight your name.
- Click OK, and then close the main security policy screen. You'll need to restart your computer before starting the miner, but don't do it now - a restart will happen naturally later.
The picture below shows the screens you just saw. Click on the photo to expand and view it in large size.
enable page locking in memory
Is it worth removing such viruses?
Naturally, you can use the computer with annoying banners, this is not critical. However, the virus can open the way for other viruses from the manufacturer. Moreover, the viruses themselves are updated and improved. Thus, the malicious program not only displays ads, but can also easily store confidential data: credit cards, social networks, email passwords and other information that you type on a computer with a virus. This is certainly much more serious than browser ads.
Configuration Setup for AMD
Add us to your bookmarks to always be aware of what is happening in the world of mining.
Similar to NVIDIA, you can also customize AMD graphics cards. The same syntax you can use in the XMR STAK program can also be used in XMRig.
Here we can adjust the intensity. Example config.json for Vega64:
"threads": [ { "index": 0, "intensity": 1984, "worksize": 16, "strided_index": 2, "mem_chunk": 2, "unroll": 8, "comp_mode": true, "affine_to_cpu ": false },
And mining is also launched through a batch file.
Example batch file for AMD:
:start xmrig -a randomx -o xmr-eu1.nanopool.org:14444 -u 44tLjmXrQNrWJ5NBsEj2R77ZBEgDa3fEe9GLpSf2FRmhexPvfYDUAB7EXX1Hdb3aMQ9FLqdJ56yaAhiXoRsceGJCRS3Jxkn.5d3c802ee 0f8e12e4eb9792722b7816a42178aa29ef7477c138ddb940c55648d.rig1 -px —donate-level=1 —opencl goto start
Configuration setup for Nvidia
For NVIDIA and AMD versions of XMRig, the settings in the batch file may not be enough. There are still settings that we would like to specify. These are the thread settings.
If you are running a GPU using XMRig then editing this setting is important and you can expect optimal performance when tuning. Below is the code applicable to NVIDIA GPUs. It is written to the config.json file:
"threads": [ { "index": 0, "threads": 12, "blocks": 39, "bfactor": 8, "bsleep": 100, "affine_to_cpu": false }, ],
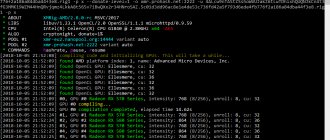
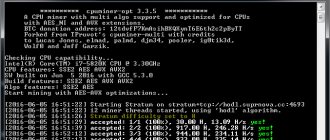
After starting the program, you will see the following information displayed: What does it mean?
Setting up streams
GeForce GTX 1070 8GB @ 2300/2920 MHz 16×39 8×25 arch:52 SMX:13
This means: 16 threads, x 39 blocks, bfactor 8 x and bsleep 25.
52 architecture and SMX 13 multiprocessor.
These are nothing but GPU settings and in order to get optimal performance on your graphics card, you need to play with these settings.
For example, your PC may freeze during mining and in this case, you can try to reduce the number of threads and bfactor.
Simple configuration for Nvidia:
"threads": [ { "index": 0, "threads": 12, "blocks": 39, "bfactor": 8, "bsleep": 100, "affine_to_cpu": false }, ], "pools": [ { "url": "pool url", "user": "wallet address", "pass": "x", "keepalive": true, "nicehash": false, "variant": 1, }
If you are using the program in a farm of multiple video cards, then you can add these parameters for each GPU by adding a comma. Here the index is the number of GPUs that is identified by your system.
Example:
"threads": [ { "index": 0, "threads": 12, "blocks": 39, "bfactor": 8, "bsleep": 100, "affine_to_cpu": false }, { "index": 1, "threads": 12, "blocks": 39, "bfactor": 8, "bsleep": 100, "affine_to_cpu": false }, { "index": 2, "threads": 12, "blocks": 39, "bfactor": 8, "bsleep": 100, "affine_to_cpu": false }, { "index": 3, "threads": 12, "blocks": 39, "bfactor": 8, "bsleep": 100, "affine_to_cpu": false }, ],
Mining starts through a batch file.
Example batch file for Nvidia:
:start xmrig -a randomx -o pool.supportxmr.com:5555 -u 44tLjmXrQNrWJ5NBsEj2R77ZBEgDa3fEe9GLpSf2FRmhexPvfYDUAB7EXX1Hdb3aMQ9FLqdJ56yaAhiXoRsceGJCRS3Jxkn.5d3c802ee0f8e1 2e4eb9792722b7816a42178aa29ef7477c138ddb940c55648d.rig1 -px —donate-level=1 —cuda goto start
Manual removal
If these manipulations are not enough, you will have to clean the computer manually or reinstall the system. Second phase:
If this does not help, then you need to restore the system or use a rollback to a successful configuration. If some virus software files are not deleted, then go through Safe Mode. In the same way, you can restore if important system files were erased during deletion. Unfortunately, third-party programs for removing XMRig, such as Unlocker, do not always work, since the malware itself has preventive protection.
Only as a last resort will you need to reinstall Windows. On the other hand, killing Windows may be faster than removing the virus. You decide.
Source
All command line arguments
Now let's look at all the settings. Most of these settings are needed to fine-tune performance to your hardware configuration.
Settings for allocation to the pool
-o, --url=URL specify the URL of the mining server.
-a, --algo=ALGO select a mining algorithm (see supported algorithms in the article above).
—coin=COIN specify the coin instead of the algorithm.
-u, --user=name username for the mining server.
-p, --pass=PASSWORD password for the mining server.
-O, --userpass=U:P password:user pair for the mining server.
-k, --keepalive Send keepalived packets to prevent timeout (requires pool support).
--nicehash enable nicehash support.
—rig-id=ID specify the farm ID for tracking statistics on the pool side (pool support is required).
--tls enable SSL/TLS support (requires pool support).
—tls-fingerprint=HEX specify the TLS pool HEX for the strict certificate.
—daemon use RPC daemon instead of pool for solo mining.
--daemon-poll-interval=N daemon RPC request interval in milliseconds (default: 1000).
—self-select=URL to independently select block templates from the URL.
-r, --retries=N specify the number of retries before switching to the backup pool server (default: 5).
-R, --retry-pause=N pause time between connection attempts (default: 5).
--user-agent Set the user-agent string for the pool.
—donate-level=N set the commission level, default 5%% (5 minutes every 100 minutes).
—donate-over-proxy=N stop commission control over the xmrig-proxy function.
Processor settings
—no-cpu disable the processor
-t, --threads=N specify the number of CPU threads
-v, --av=N select algorithm option, 0 - automatic selection
—cpu-affinity set the affinity of the miner process to the processor core(s), using the mask 0x3 for cores 0 and 1.
--cpu-priority set process priority (0 idle, 2 normal, 5 highest).
—cpu-max-threads-hint=N specify the maximum number of processor threads (in percent). This will be a prompt for autoconfiguration.
—cpu-memory-pool=N specify the number of “Lock pages in memory” of 2 MB for the persistent memory pool, -1 (auto), 0 (disable).
--no-huge-pages disable the "Lock pages in memory" option.
—asm=ASM ASM optimization, possible values: auto, none, intel, ryzen, bulldozer.
--randomx-init=N specify the number of threads to initialize the RandomX dataset.
--randomx-no-numa Disable NUMA support for RandomX.
API settings:
—api-worker-id=ID specify the ID of the custom worker for the API.
--api-id=ID Specify the custom instance ID for the API.
—http-host=HOST bind host for HTTP API (default: 127.0.0.1).
—http-port=N bind port for HTTP API.
—http-access-token=T specify an access token for the HTTP API.
—http-no-restricted enable full remote access to the HTTP API (only if an access token is installed).
OpenCL Settings (AMD):
—opencl enable mining on OpenCL (AMD).
--opencl-devices=N specify a comma-separated list of cards to mine.
--opencl-platform=N specify the OpenCL platform index or name.
--opencl-loader=PATH specify the path to OpenCL-ICD-Loader (OpenCL.dll or libOpenCL.so).
--opencl-no-cache Disable OpenCL cache.
--print-platforms display available OpenCL maps and exit.
CUDA Settings (Nvidia):
—cuda enable mining on CUDA (Nvidia).
—cuda-loader=PATH specify the path to the CUDA plugin (xmrig-cuda.dll or libxmrig-cuda.so).
--cuda-devices=N specify a comma-separated list of Nvidia cards for mining.
—cuda-bfactor-hint=N specify bfactor (hint for autoconfiguration (0-12)).
--cuda-bsleep-hint=N specify bsleep (autoconfiguration hint).
--no-nvml disable NVML (NVIDIA Management Library) support.
Event and error log:
-l, --log-file=FILE log all output to a file.
--print-time=N display hashrate report every N seconds.
--health-print-time=N display a health report every N seconds.
--no-color disable color output in the console.
Miscellaneous:
-c, --config=FILE load a configuration file in JSON format.
-B, --background run the miner in the background.
-V, --version display version information and exit.
-h, --help show help and exit.
--dry-run run the test configuration and exit.
--export-topology Export the hwloc topology to an XML file and exit.
Example for the ArQmA coin using the RandomARQ algorithm:
:start xmrig -a RandomARQ -o arqma.herominers.com:10641 -u ar3DrXowWeFdrCbwnfSWgchP9SSaMYnsyaU4M2kSwoTFJzZ5zSre6eZQSHxSQWC2y172CvZNUgmtZBzoxNWKHsBR33TWvAZnL.ad8a262ab0f41 d60.rig1 -px --donate-level=1 goto start
Problem solving
How to reduce commission?
By default, XMRig donates 5% of your power to developers. If you are generous, then leave it as is. If you want to set your preferred donation amount yourself, then edit donate-level. Minimum 1%. Example: --donate-level=1
THREAD #0 COMPUTE ERROR
Occurs after connecting to the pool and before receiving shares. The error occurs in some versions of the program when it cannot handle new AMD drivers. All you need to do to solve this problem is download the 17.x blockchain drivers and install them instead of the current drivers. It also helps reduce overclocking.
cryptonight_extra_cpu_final
This error is resolved by reducing the number of threads and blocks. Example:
"threads": [ { "index": 0, "threads": 32, "blocks": 15, "bfactor": 6, "bsleep": 25, "sync_mode": 3, "affine_to_cpu": false },
No CUDA device found!
This error occurs on Nvidia series video cards. The program cannot initialize the device.
Solution:
- check and reinstall drivers,
- use version cuda-9_2 or cuda-8.0 (selected depending on the generation of the video card)
Rejected: “low difficulty share”
This means that you have selected the wrong pool port. You receive tasks from the pool with the wrong difficulty. Be sure to connect to the correct port depending on your hardware. Typically, several categories of ports are indicated on pools: For a farm of high-performance cards, for a farm of medium-performance cards and for one video card, or for a home PC.
Rejected: “Wrong algo, use monero7 miner”
Rejected: "Wrong algorithm, use monero7." This means that you entered the wrong algorithm or were unable to change the algorithm option. You may also encounter this error when you overclock your graphics cards too much, so keep that in mind.
msvcp140.dll
Any .dll libraries are missing. These errors may occur on Windows. For example, a problem with a missing DLL file (msvcp140.dll) ". You can fix such errors by installing Microsoft Visual C++ 2015/x64.
Did you know that you can use XMRig and XMR STAK at the same time? But when both miners are launched, any of them will show the error “HTTP daemon failed to start”. To fix this, change the HTTP port settings in one of the configuration files.
Error: Exchange addresses need 64 hex character long payment IDs
This error occurs when the pool requires the wallet address and PaymentID for the coin. You can specify them like this:
-u Wallet address.PaymentID
Invalid address used for login
This error means that the address you are using is not a valid address for the pool. Check the pool url or try a different pool.
Processor power
The program defaults to 75% CPU power, which means your CPU is overheating. If you know what you're doing and want to get maximum performance from the CPU, then you can edit the max-cpu-usage values.
If you allow your processor to run in a farm, then make sure you monitor its temperature.
Thread settings for CPU
We explained these settings for the GPU above, but you can also set threads for the CPU. For example, if you are using a powerful processor such as AMD Ryzen Threadripper, you can go up to 32 threads.
"threads": 4,
If you are new and don't know what this is, then change the secure settings to true. Once you do this, XMRig will automatically set the optimal settings.
Why is he dangerous?
Virus is different from virus. Some viruses are relatively harmless (for example, some Amigo browser that installs against your wishes), while others are those that cannot be called anything other than outright extortion and a threat (for example, winlockers that block your computer and demand that you transfer money to a certain wallet to unlock it) ). At first glance, the miner seems like a harmless virus. Allegedly, someone is making money from you, but you yourself are not losing anything from this. But it is not so.
The presence of a miner virus on a PC leads to a heavy load on its components, the load leads to overheating, and overheating can damage computer components
As mentioned above, mining works through a huge number of calculations. To carry out these calculations, the computer loads its hardware components (processor, RAM, but mainly the video card, because it is where all the calculations take place and it is its power that the attacker is interested in). The more these components are loaded, the hotter they become. Excessive load causes overheating, and overheating causes component failure. In the best case, the presence of a miner virus will negatively affect the performance of the computer, for example, it will reduce FPS in games (the number of frames per second). If you are an avid gamer, then this alone should make you want to get rid of this virus as quickly as possible.
Hashrate check
You can check the hashrate, results and status of your video cards using two methods. The first is from the program console, and the second is using the API. By default, XMRig displays hashrate every 60 seconds, which you can change in the "print-time" settings.
Commands: hashrate, health, pause, resume
Also in the active program window, click:
- "h" to display hashrate,
- press "e" to display your GPU health,
- then "p" for pause
- "r" to resume.
If a miner submits shares to the pool, then it reports “accepted”. If it says "rejected" then there is something wrong with your configuration. Review it.
If you still have difficulties launching, write to us in the comments - we will help!
In the archive with the program you will find complete instructions in Russian, as well as examples of settings for different coins.
What is CPU Miner
CPU Miner is a virus that belongs to the adware subclass. This virus is automatically installed on your computer, after which it changes the start page of your browser and installs all kinds of advertising ads into it. Due to the presence of malware in the system registry, getting rid of CPU Miner is a difficult task. In most cases, this virus enters the system when downloading free software, all kinds of torrents, unofficial patches for computer games and other content from unreliable sites. The creators of these portals begin monetizing the content by wrapping the virus in a download file. A downloader is a special software that transfers downloaded content to you, while at the same time installing viruses that change the home page, install ads in the browser, install various redirects, and the like. CPU Miner belongs to the list of such programs.
- Remove CPU Miner automatically:
- Using Spyhunter 4
- Remove CPU Miner manually:
- Firefox
- Chrome
- I.E.