Article content
Share the article, help the site!
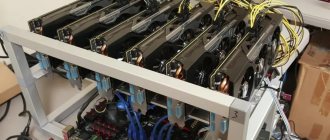
PCI-E or GPU riser cards are some of the most important components to create a reliable and efficient cryptocurrency mining rig. Their main goal is to solve the problem of installing multiple GPUs on a single motherboard, even if the motherboard does not have enough PCI-E x16 slots or the spacing between them is too small to accommodate multiple dual-slot or triple-slot GPUs.
PCI-E adapters come in different options and shapes. Some have full-length PCIe 3.0 x16 slots, while some have multiple USB 3.0 ports and PCIe 2.0 x1 slots. When it comes to cryptocurrency mining, risers with standard PCIe 2.0 x16 slots are the most popular.
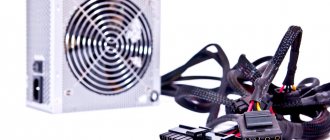
Since PCI-E adapters are used to connect multiple GPUs to your mining rig and thus improve overall mining performance, they also require a reliable power supply to power all those GPUs. High quality PCI-E risers are rated at 75W for your GPU. Some of them, however, send all that power through a 15-pin SATA connector, and some send it through a 4-pin Molex connector. While both of these connection methods are fine, keep in mind that some Molex connectors can output up to 192W, something that no SATA connector can do.
Another thing to look for when purchasing a PCI-E riser cable is whether the cable meets ATX specifications. Cheap PCI-E riser cables can typically deliver 54W of power, which is 21W less than required by ATX specifications. This could potentially overload the SATA/Molex connector and ultimately damage your GPU. Additionally, if the PCI riser has a very weak connection to the motherboard, it could potentially cause a voltage drop and thus cause your GPU to catch fire due to overheating of the wires and connections.
The great thing about PCI-E adapters is that they can also be connected to the motherboard via USB and can be placed almost anywhere. This allows you to build your own mining frame and design your own cooling system to keep all your GPUs healthy and running at full speed. Some high-end PCI-E risers come with LEDs that blink when an error occurs, which is a handy feature if you're debugging your system.
While there are many other ways to connect additional GPUs to your mining system (e.g. PCIe expansion cards, M.2 adapters, Thunderbolt controllers), using a PCI-E riser card is the safest and most reliable way to do so. Here are the best PCI-E riser cables you can buy right now.
Best Overall: Ubit 6-Pin Riser/MOLEX/SATA PCI-E Riser Cable
Interface : PCI-E x1 - x16 | Power Connectors : 6-pin, Molex, SATA | Length : 60 cm.
Based on hundreds of positive customer reviews, the Ubit PCI-E Riser Cable is one of the best GPU riser cables for cryptocurrency mining. This simple yet extremely reliable PCI-E adapter comes with additional features. It supports powering the GPU via a 6-pin power supply, a 4-pin Molex connector, or a 15-pin SATA connector, it has an LED indicator to indicate the connection status between devices, and it even comes with an extra coil to prevent EMI interference.
The Ubit PCI-E riser cable also comes with a 60cm USB 3.0 cable that gives you maximum flexibility when organizing the placement of your mining GPUs in your mining rig, and it comes with its own hook ties that allow you to properly manage your cables . Overall, the Ubit PCI-E riser cable is worth the price, and if you're looking for high-quality GPU riser cables, getting one of these shouldn't be too difficult.
Connecting a new video card
Once the PCI Express slot is free, you can begin connecting the new video card to the computer. First you need to insert the video card into the PCI Express slot. In this case, you need to ensure that the video card fits neatly into the connector, and that the metal edge of the video card does not damage the motherboard. At the time of installation, you should hear the latch engage, and the video card should fit into the PCI Express slot equally on both sides and stand level.
After the video card has been connected to the PCI Express slot, it needs to be secured in the case. To do this, you need to tighten 1 or 2 screws on the left side of the video card.
Next, you need to connect additional power cables from the power supply (if the video card has connectors for additional power).
This completes the connection of the video card to the computer. You can replace the side cover, connect cables, and turn on the computer.
Second place: FebSmart VER006C GPU riser
Interface : PCI-E x1 - x16 | Power Connectors : 6-pin, SATA | Length : 60 cm.
The FebSmart PCI-E Riser Cable is an ideal alternative to the Ubit GPU riser cable if you do not plan to use a Molex connector to power your graphics card for mining. Like the Ubit riser cable, the FebSmart PCI-E riser cable supports both PCIe x1 and PCIe x16 interfaces, and allows you to power the GPU through a 6-pin power supply or SATA power connectors.
The FebSmart PCI-E Riser Cable comes with an LED power indicator, a high quality 3.3V voltage transformer, and fully shielded 60cm USB 3.0 cables. This riser card also features gold-plated contacts, short-circuit protection, and is fully PCIe 4.0 compatible, making great if you plan to use an AMD motherboard for mining. Another plus is the fact that it works with Mac Pro systems, something you wouldn't normally expect from an adapter cable.
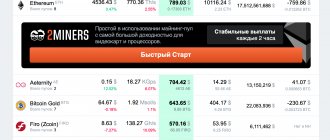
Why is it better not to use supplied adapters for additional power supply to risers?
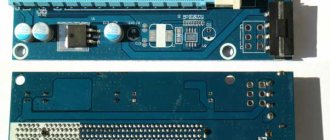
First of all, because of the cross-section of the wire, and secondly, because of the quality of the crimping of the connectors (see pictures below):
According to the “good” Chinese tradition, 18AWG is written on the wire (core diameter 1.024 mm), but in reality it will be good if they “put” 20AWG (0.812 mm). In the risers that came to me for research, the wire actually contained 23AWG (0.573 mm) - 2 times less than promised. The photo shows a comparison of the complete adapters from the black full-profile
and
green low-profile
risers.
In reality, this will be enough to power the video card via the PCI-E connector, because... the conductors on boards, video cards, and even recognized and proven cable risers over the years are actually smaller. But something else is important here - the diameter of the wire varies considerably from riser to riser. Depending on the conscience of the seller, he completes it with one or another adapter. Or maybe he himself doesn’t know if he equips the risers with adapters taken from another Chinese and believed in the indicated 18AWG on the shell. It is possible that you will come across a wire of such a cross-section that, under full load, will overheat and may burn out.
In addition, there is another problem with the Sata 15pin connector used. On a 12v line it is rated at 4.5A, i.e. 54 W, and up to 75 W are consumed by the video card from the slot. There are also known events with AMD cards when 75 W was not the limit. But this applies to the connectors that Molex officially produces; it is unknown what load the “Chinese” stamped ones can bear: they can be less, they can be more. Accordingly, such an adapter can only be used with cards that consume no more than 50 W from the slot. It's better not to use it at all.
Therefore, I recommend connecting additional power to the riser directly from the power supply, bypassing these adapters. If the riser has a 4pin Floppy connector, then solder directly into the connector or at least simply strip the adapter wires to check the cross-section. Be sure to check all 4 wires, because... in practice, I have come across cables where the yellow wire had an honest 18AWG, but all the others no longer had it. The Chinese are tricksters, so be prepared for surprises.
If you still need to connect the riser power to Sata, then no one forbids replacing adapters with obviously high-quality ones, 4pin IDE -> 15pin Sata exist at real 18AWG, I have them.
Best Quality: N.ORANIE VER009S Plus PCI-E Riser
Interface : PCI-E x1 - x16 | Power Connectors : 6-pin, Molex, SATA | Length : 60 cm.
The PCI-E VER009S Adapter Cable from N.ORANIE may look like any other PCI-E Adapter Cable. However, compared to other PCI-E adapters, this one has some special additional features. First of all, it comes with two 6-pin power supply connectors, which allows you to reduce the load on your motherboard and use an external power source to power your GPU for mining. Secondly, this adapter comes with four solid capacitors, which is great if you want maximum GPU stability.
VER009S also features two LED indicators. One indicates whether there is power on the +12V rail and the other indicates whether there is power on the +3.3V rail. This riser board also comes with a 60cm USB 3.0 cable and has holes on the PCB for easy installation. Overall, this is a high quality adapter cable and if you don't mind its fairly high price tag, definitely pick it up if you want to build a reliable and stable mining rig.
Discrete graphics accelerator
Such a device is made in the form of a separate module, which is mounted in a special slot. It is equipped with its own video memory, processor and cooling system.
p, blockquote 7,0,0,0,0 –>
A powerful video card gets very hot during operation, so it requires good cooling. As a rule, they are equipped with two or three large coolers, which can create considerable noise during peak loads.
p, blockquote 8,0,0,0,0 –>
Depending on the technical characteristics, such a video card allows you to run any games. At the same time, the gamer will not suffer from FPS drops, lags, freezes and crashes to the desktop if the device power meets the minimum system requirements of the game.
And even if it falls short a little, the graphics accelerator can be overclocked using special utilities. In addition, modern video cards often use DVI and HDMI slots to transmit video signals (read more about the connectors or video outputs of video cards).
p, blockquote 9,0,0,0,0 –>
Best Budget Riser: Mousika VER009S PCI-E Riser
Interface : PCI-E x1 - x16 | Power Connectors : 6-pin, Molex, SATA | Length : 60 cm.
The Mousika VER009S is a budget PCI-E riser cable that doesn't cost much and comes in a large set of six. Although this PCI-E riser cable is made by a Chinese brand, it comes with one 4-pin PSU connector and two 6-pin PSU connectors, which allows you to create different power supply designs. This PCI-E riser card also comes with two LED indicators, as well as its own 15-pin Molex and SATA connector and a 60cm USB 3.0 cable.
This PCI-E riser card also boasts that it features four solid-state capacitors that are designed to provide maximum power stability. Despite the low price, this PCI-E riser card also has gold-plated contacts and is available in three different colors: blue, black or red.
Best PCI-E riser card: XT-INTE PCI-E to USB 3.0 riser
Interface : PCI-E x1 - USB 3.0 | Power Connectors : No | Length : N/A
If your motherboard has run out of PCI-E slots and you want to turn one of them into a small mining rig, then the XT-INTE PCI-E Multiplier Card is the perfect solution for you. Now don't expect to turn your 10 GPU rig into a 20 GPU rig as you're mostly limited by the number of PCIe lanes your CPU and motherboard can handle, however with this multiplier card you'll be able to add up to four new ones GPUs to your mining rig.
The XT-INTE PCI-E multiplier card basically adds four new USB 3.0 ports to your mining rig that you can connect other GPUs to. You'll still have to buy regular PCI-E adapters to power your GPUs, but with four of these cards you can essentially connect up to 16 GPUs to your mining rig. However, its best feature is that it is quite cheap.
Preparing to connect a video card
Before connecting the video card to the computer, you need to perform a number of preparatory steps. First, you need to turn off the computer and completely disconnect it, that is, unplug the power cable that runs from the computer to the outlet. Do not do anything without this simple precaution, otherwise you risk receiving an electric shock or damaging your computer components. It is also advisable to disconnect all other cables from the computer, as they will interfere with your work.
Secondly, you need to remove the left side cover from the computer in order to gain access to the components.
Typically, the cover is secured to the body with two screws at the back. Remove these screws, slide the cover back a little, and remove it from the computer. After the cover is removed, place the computer on its side so that you can comfortably work with its insides.
Best PCI-Riser Extended PCB: XT-INTE PCI-E to PCI-E Riser
Interface : PCI-E x1 - x1 | Power Connectors : 6-pin, Molex, SATA | Length : 60cm
If you want to truly expand your motherboard with 4 new PCI-E slots that you can connect your GPUs to for mining, consider purchasing this XT-INTE PCI-E to PCI-E expansion card E. Like many other PCI-E riser cables and adapters, this card also allows you to add multiple additional GPUs to your mining rig. The only difference, however, is that this card comes with its own four PCI-E x1 slots and has one Molex, SATA, and 6-pin power connector to provide all your mining cards with the power they need.
This expansion card comes with its own set of mounting screws, as well as one 15-pin SATA power cable. It is fully plug and play, which means it requires no additional drivers and is fully compatible with Windows and Linux operating systems. While this expansion card doesn't bring anything new to the cable in terms of your GPUs' mining performance, it does offer you some additional customization options when it comes to setting up your mining rig.
Let's look at the types of PCI Expres 1x 16x risers that are on sale
Next, we will use a simplified method for classifying risers by the color of their PCB. In fact, within the same color, changes may occur during 'production', or risers with textolite of different colors may in fact be completely identical in technical terms.
Black full profile
Board marking PCE164P-N003 VER006
Stabilizer from
Diodes
or from
Fortune Semiconductor
Classic rectangular board, produced for the last 3 years. The protective Velcro is thick. The latch is manual, sliding. Additional power is connected via the 4pin IDE connector directly from the power supply unit (PSU) or through the included 4pin IDE 'female' -> 15pin Sata 'male' adapter. Both the first and second options are present in sufficient quantities on modern power supplies. However, it is worth taking a closer look at the markings and thickness of the cables. Inexpensive power supplies on the Sata line often use a 20AWG cable (American wire gauge, the lower the number, the thicker the wire), and not 18AWG, so I would not recommend connecting more than two risers to one such cable.
The backbone of the USB cable is cross.
Blue full profile
VER 4.0 board markings
Stabilizer
1084-33
The 'black' ones described above are completely analogous to a stabilizer from another manufacturer; the board layout is the same. The protective Velcro on the back of the board is thinner and softer, it sticks better to the board and does not come off if it is accidentally touched. There is no latch.
The backbone of the USB cable is cross.
Blue full profile
Board marking PCE164P-N003 VER005S
Stabilizer
G1084-33
from
(the manufacturer is not known to the author, who identified it - write in the comments!)
Almost complete analogy of the “black” and “blue” ones described above with a stabilizer from another manufacturer; the board layout is slightly different, but these differences are not used. The protective Velcro on the back of the board is the same as on the 'blue' USB risers. The latch is manual, sliding.
The backbone of the USB cable is cross.
Blue full-profile with additional 6pin power supply
Marking of PCE164P-N003 VER006С
DC-DC converter from
Fitipower
and stabilizer
G1084-33
from
(the manufacturer is not known to the author, who identified it - write in the comments!)
Here, our Chinese friends got a bit out of their way to get the much-needed 3.3v video card. From the 6pin connector we get a voltage of 12v, which goes to the FR9888 converter (load up to 3.5A, which seems to be with a decent margin), which, due to the wiring applied to it, already gives exactly 5v at the output. And these 5v, in turn, go to the G1084-33 stabilizer, which “turns” them into 3.3v.
It is not yet entirely clear why there was a need to fence such a garden, and not get by with one DC-DC converter.. Perhaps they were cobbled together from what was there or to get intermediate 5v on the board for future unknown purposes. You can write your ideas in the comments.
Accordingly, this riser does not require 5v/3.3v power supply from the power supply, because it has everything necessary 'on board' to obtain such voltages. Accordingly, it can be safely used on server power supplies.
However, I do not believe that increasing the number of nodes on the riser adds stability to it. Quite the contrary - there is a greater likelihood of breakdowns.
The board is from the same 'manufacturer' as the 'blue' risers above; the differences in wiring are not significant. The protective Velcro on the back of the board is the same as on the 'blue' and 'blue' USB risers. The latch is semi-automatic, push-type. These risers are intended for use with server power supplies, but the kit includes a Sata15pin - PCI-E 6pin adapter for connecting to regular power supplies. Use it with caution; the reasons are described in more detail in this material later in the text.
The backbone of the USB cable is cross.
Blue full-profile with DC-DC converter and 2 types of additional power supply 6pin/Sata15pin
EP105 VER 1.0 board markings
Full-fledged DC-DC voltage converter
MP2307DN
from
MonolithicPower
for 3A. Known, reliable and cold. The power of this converter is more than enough to spare. Works in tandem with a throttle.
Additional power can be connected either through the 6pin GPU connector or through the 2x Sata 15pin connector. Thus suitable for both server and conventional power supplies. Running from one Sata15pin threatens to burn out the connector, because... It is designed for 12v line only at 4.5A. Both types of additional power supply are connected in parallel; if you wish, you can connect to all connectors from the power supply at once - it won’t be any worse.
For this riser to operate, it does not require 5v/3.3v on the power supply, since the 3.3v voltage is available directly from the converter. Minimum nodes - maximum reliability. At the moment, I think this riser is the most optimal solution, although not the cheapest.
The backbone of the USB cable is cross.
Green low profile
Stabilizer from AMS
A more compact “aerodynamic” board. Additional power is provided via the 4pin Floppy connector. This connector on modern power supplies is present in the amount of 1-2, which is clearly not enough to power all the risers of an average farm. Adapters from IDE 4pin to 4pin Floppy may be included with some power supplies, but this is the exception rather than the rule. The riser comes with an adapter for 15pin Sata. Read more about the adapter itself in a separate paragraph below. The latch is semi-automatic, push-type.
USB cable backbone - cross
But the most important thing is that these risers are dangerous
for use just because of the 4pin Floppy connector. The fact is that its calculated load is about ~40W at 5v and 12v together. A video card, as we know, consumes up to 75W from the slot, and in the case of a USB riser it can consume more due to losses on the stabilizer. Accordingly, there is a real chance of getting a melted connector, and with some chance of a fire. But if this riser is modified, then it can be used. The modification consists of desoldering this connector and installing a full-fledged 4pin IDE instead, as on full-profile risers.
The photo above shows 3 stages of reworking such a riser:
- removing the plastic part of the connector,
- removal of excess length of contacts and subsequent tinning,
- soldering wiring directly with insulation.