Program for video cards of the AMD family. Designed for mining coins running on the CryptoNightV7, CryptoLightV7 algorithm. Coins such as Monero, Elya, MoneroV, etc.
The program is no longer relevant. See the list of the best mining software here.
In the version starting with v11.3, the developer fee is 0%, unlike the Claymore version for Ethereum, where the commission is 2.5%.
The program does not support Monero RandomX!
List of supported fork programs:
XMR-Stak 2.5.0 Xmrig 2.8.1 SRBMiner 1.6.8
System requirements:
- Operating system x64-bit only
- AMD graphics cards (Nvidia not supported)
- Swap file from 16 GB (if you have several video cards or a farm)
Let's move on to the settings.
Claymore's Dual Miner
Claymore—or simply “Glue” among miners—has long been the most popular miner for Ethereum and other Dagger-Hashimoto coins, including Ethereum Classic, Pirl, Callisto, and Expanse. The miner worked perfectly with NVIDIA and AMD video cards, and did not require additional complex settings.
In addition, he showed an excellent hashrate - more than any other miners. The miner's commission was 1 percent, that is, within an hour the program mined 36 seconds to its developer's wallet, but otherwise it was free. For weak video cards with 2 and 3 GB of memory, no miner commission was charged. All miners knew the following: if you want to mine Ethereum, use Claymore’s, there’s nothing to think about.
Claymore's on Bitcointalk
The developer of the miner has always remained anonymous. Updates to the program appeared on github, as well as in Claymore's thread on the bitcointalk forum, where the miner was discussed.
Claymore's ZCash Miner for mining using the Equihash algorithm
Claymore's ZCash Miner program is designed for mining cryptocurrencies based on the Equihash algorithm, the most popular of which are:
- ZCash (ZEC),
- Zclassic (ZCL),
- Zencash (ZEN),
- Komodo (KMD),
- Hush (HUSH).
The new fork of Bitcoin Gold is also mined using the Eqiuhash algorithm.
The program works with most modern AMD video cards, including the new AMD Vega. For NVIDIA use EWBF CUDA ZCash miner.
Unlike Claymore's Dual, only the Equihash algorithm is supported here. That is, to mine two coins at the same time, use Dual Miner, in Dagger Hashimoto + Decred, Siacoin, Lbry, Pascal mode.
The miner is easy to set up even for users with average PC knowledge; setup instructions will be below. For experienced users, there are advanced settings that allow you to more accurately customize your production for a specific rig.
Claymore's ZCash Miner, like the Ethereum miner, contains a built-in web server for remote monitoring and management of farms. Also in the archive there is a universal farm manager, Remote manager, which works with all Claymore GPU miners.
Problem with Claymore's miner
The developer regularly appeared online and posted updates to the miner. The latest such update was version v15.0, which was released on December 4, 2022. This version supports mining up to and including epoch 384.
Claymore's miner release
Let us remind you that all coins of the Ethash algorithm - also known as Dagger Hashimoto - have a special DAG file loaded into the video card memory. The latter increases in size with each era, and the era itself lasts 30 thousand blocks.
We checked the miner and made sure that at epoch 384 it still really works, but at epoch 385 it already produces the following error:
Pool sent wrong data, cannot set epoch, disconnect.
The developer Claymore has not been in touch with the community for almost a year, so the mining community is convinced that he will not appear again, and the development of the program has been abandoned. This means that starting from epoch 385 - namely block 11,550,000 (30,000 x 385 = 11,550,000) - the miner will refuse to work.
Let's count together when this will happen. At the time of writing, pools are working on blocks 11,460,317 on the ETC network and 11,112,083 on the ETH network. The average time to find a block is 13.2 seconds. This means there are 89,683 blocks left for ETC, or just under 14 days. At the same time, the ETH miner will work longer - 437917 blocks or 67 days.
Claymore's Dual Miner will stop mining Ethereum on New Year's Eve - December 29, 2022. The miner will “fall off” from the Ethereum Classic network on November 6, 2022.
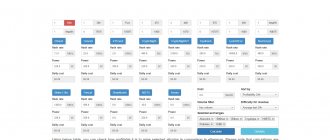
How to overclock and reduce voltage
The miner allows you to control the overclocking of the core and memory without third-party software, as well as reduce the voltage of the video card chip.
Voltage settings in millivolts, as well as overclocking and power consumption limits are settings for advanced users. If you don't know what's what, it's better to first familiarize yourself with the basic principles of overclocking and card voltage management
Only make these settings if you are confident in what you are doing.
Overclocking memory and core
Core
For video cards of the AMD family, when mining coins of the Ethash algorithm, for example Ethereum, core overclocking is not necessary at all. You only need to overclock the video memory.
For the video card core, on the contrary, we lower it so that the temperature is lower and there is room to reduce power consumption.
1150 is the lowest core frequency without a profitability drawdown
-cclock (value) set the video card core overclocking in MHz (0 means disabled (default) and the program will not control overclocking). If not specified or equal to zero, the miner will not change the current clock speed. You can also specify values for each card, for example "-cclock 1150,1150,1167,0". For example, to overclock the core to 1100 MHz, specify -cclock 1100
Memory
On the contrary, the memory needs to be overclocked. Usually, to achieve the coveted 30-32 Mh/s from the rx 570, rx 580 card, you need to overclock the memory to 2000 - 2150.
In order to overclock the video memory, you need to use the -mclock switch. If the value is not specified or equal to zero, then the miner will not change the current clock frequency. You can also specify values for each card, for example "-mclock 2000,2000,2150,2150".
Usually, when overclocking, first add 20 MHz until the first freezes/crashes occur. Having found the extreme overclocking point, it is necessary to subtract 10 MHz from the maximum overclocking until the system begins to operate stably.
Once you have empirically found the optimal overclock (each card always has different values, even if the cards are from the same manufacturer), we recommend reducing it by an additional 10-20 MHz. The fact is that despite the fact that these settings work now, in the future the system may freeze when the DAG epoch changes and more resources are required to build it.
Power limit
The first and easiest way to reduce the power consumption of cards is to use the Power Limit setting.
Power Limit is the simplest option for reducing the power consumption of video cards (unlike Core Voltage, which can harm the card if the settings are incorrect).
-powlim (value) allows you to set the card's power consumption limit in % (from -75 to 75, 0 by default).
For example, if we want to reduce the power consumption limit of a video card, we can specify -powlim -20 directly in the batch file, which will reduce power consumption by 20%. Can be specified for individual cards. For example: -powlim 0,-20,-10,10.
Core Voltage
The second and more productive way to reduce the power consumption of cards is to use the Core Voltage setting.
Be careful when setting core voltage
-cvddc (value) allows you to set the GPU core voltage in MV (0 means disabled (default) and the program will not control the voltage of video cards). For example, "-cvddc 1050" means 1.05V. You can also specify values for each card, such as "-cvddc 950,900,950,900". Supports the latest AMD 4xx cards on Windows only.
As practice shows, most cards maintain a voltage of 950 (0.95 v). When underestimating energy consumption, it is best to start with 1000 and gradually reduce this figure. At the same time, if the program works stably for 20-30 minutes, then you can try to reduce the voltage even more. For example, up to 900 mv (0.90 v).
Many video cards operate stably at 850 mv (0.85 v). At the same time, the hashrate does not decrease. But energy consumption is reduced, which means temperature and electricity bills.
Which miner is best for Ethereum
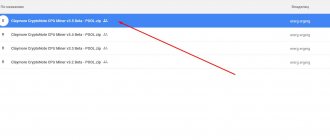
We always try to help our pool miners choose the best and easiest to use software. On the “How to get started?” page and in the FAQ section there are settings for the most popular miners. In addition, in our quick start archive you can always find ready-to-use configured versions of miners. Working with the archive is easy. All you need to do is change the wallet address in the bat file to your own. The archive password is 2miners.
For Ethash coins, we have traditionally recommended two miners: Claymore's and Phoenix. We recommended them because in our experience they are the most stable miners. At the same time, they provided the maximum hashrate and worked with any video cards - both NVIDIA and AMD.
Settings for Phoenix and Claymore's
We often heard rumors that Claymore stole the code from someone, Phoenix stole the code from Claymore, Phoenix inflates the hashrate, but in fact it is lower - and so on. There are always rumors and there will be rumors.
Claymore will stop mining soon, so we decided now is the perfect time to run an experiment to help determine the best Ethereum miner for 2022 and 2021.
We would like to point out that the miner developers did not take part in the tests in any way, did not ask us to change the results or anything like that. They did not know about this study at all.
Key Settings
Configuration is done by entering commands and additional information into the command line.
Let's look at the variables to be edited:
- -epool – indicates the address of the pool through which ETH will be mined. It is important to work through Stratum pools, since proxies will reduce the hashrate;
- -ewal – ETH wallet for withdrawing mined coins;
- -epsw – password to enter the pool. The default is “x”;
- -eworker – name of the walker;
- -esm – activation of Stratum for Ethereum;
- -etha – mining algorithm for AMD;
- -asm – activates the use of GPU assembly cores;
- -ethi is an intensity variable that affects hashrate. Set to level 8. Specified individually in order separated by commas. For each case it is calculated empirically;
- -eres – epoch index. It is important to put a buffer with a reserve. So that loading a fresh DAG file does not drop the miner;
- -allpools – parameter 1 indicates you do not want to mine coins for developers;
- -allcoins – parameter 1 is specified for ETH forks;
- -etht – time separator for requests in SOLO. Specified in milliseconds;
- -erate – allows you to enable/disable sending the hashrate indicator to the pool;
- -estale – sending expired shares to the pool;
- -dpool – pool where the double coin is mined;
- -dwal – double coin wallet;
- -dpsw – password of the double coin pool;
- -di – indicator of the number of video cards involved in mining. The basic add-on uses all cards in the system;
- -mode – solo or dual mining mode;
- -dcoin – indication of the double coin for mining;
- -dcri — intensity parameter for the second coin;
- -dcrt – interval between requests for double-coin operation;
- -ftime – time period after which production is returned to the main pool;
- — r – reboot Claymore dual miner;
- -minspeed – minimum hashrate indicator for ETH;
- -retrydelay – delay between connection attempts;
- -logfile – indicates the name of the file to which all logs will be added after a reboot;
- -nofee – developer fee. Solo mining 1% for double 2%;
- -benchmark – activation of test mode to determine the hashrate in the current or any necessary mining epoch;
- -li – option to reduce mining intensity. Reduces operating temperature, but at the same time as hashrate;
- -lidag – activation of the reduced intensity mode when creating DAG files;
- -ejobtimeout – time-out period in minutes for Ether. If the miner does not receive new tasks within the specified period, he is disconnected from the pool;
- -djobtimeout – time-out for double coin;
- -tt — target temperature of the graphics core;
- -ttdcr – configuration that reduces the double-coin intensity variable when the core exceeds the temperature specified in the previous variable;
- -ttli – reduces the overall mining intensity if the core T has reached the set value;
- -tstop – radical stop of production when the temperature specified in the parameter is reached. Helps avoid losing cards in case of overheating;
- -fanmax – the configuration limits the maximum operating speed of GPU fans;
- -fanmin – add-on for the minimum rotation of coolers, below which they will not go even without heating the core;
- -cclock – core frequency indicator in megahertz;
- -mclock – memory frequency indicator in megahertz;
- -powlim – parameter that sets the power load. It is possible to specify for each card used in the farm;
- -cvddc – variable responsible for the GPU core voltage. To achieve a real figure of 1.05V you need to set it to 1050. Can be configured for each farm card. Supported by the latest series of AMD cards;
- -mvddc – setting the memory voltage, following the example of the variable described above;
- -mport – Preset remote management port. Supports split rights settings;
- -colors – activation/deactivation of color text display in the Claymore dual miner;
- -platform – indicates the platform on which the video card was released.
Note. Configurations responsible for core voltage, memory, thermal management and cooling system within the Claymore miner add-ons only work with cards from AMD. Nvidia does not support such extensive settings, so other variables can be changed to get a good balance of performance and reliability.
go
Ethereum Miner Fee
Cryptocurrency mining software is usually paid for. The exception is Ethminer, an open source miner with no fees.
How do miner developers charge? Very simple. Part of the time the program mines into the developers’ wallet. Some programs do this in the background (without disconnecting from the pool), others need to sometimes disconnect from the pool, connect to the pool for mining commissions, and then back to the user's pool.
For example, the Phoenix commission is 0.65 percent - once every hour and a half, the miner connects to the pool specified by the developers and digs into their wallet for 35 seconds, then returns back.
Phoenix Commission
lolMiner, in turn, always mines a commission without disconnecting from the pool, 1 out of 142 shares goes to the developer, that is, the commission is 0.70 percent.
In our experiment, each program mined a developer commission. We have not disabled this option.
It is important that in our experiment we compared programs taking into account the software commission. We assessed how much a user actually gets when using a particular miner.
Let's say the program mined 1,000 shares in an hour, of which 993 went to the user, and 7 to the miner developer. We calculated the miner's performance based on these 993 shares that the user received. After all, this parameter is the most important.
Setting up Claymore's Dual Miner for Ethereum mining on Nvidia and AMD video cards
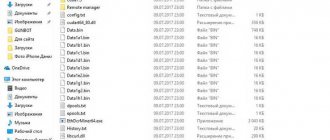
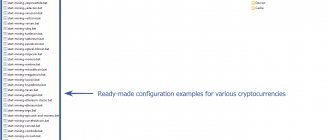
After downloading and unpacking the archive, open the folder with the miner and see the following contents.
In the folder with the miner, among other things, we are interested in two files: EthDcrMiner64.exe and start.bat. EthDcrMiner64.exe is the miner itself, but if you decide to start mining by opening this file, each time you will have to enter the settings for pools, wallets, mining intensity, etc. in the console. In order to avoid unnecessary work, start.bat is useful to us. When you open this file, the miner (EthDcrMiner64.exe) is launched and all the necessary settings are automatically registered in the console. Of course, provided that we save these settings in advance in start.bat.
To set the correct settings in start.bat, you need to open it in a text editor. To do this, right-click on the file and select “Edit” from the drop-down list. And we see the following:
Setting up pools and wallet in the start.bat file
At the time of writing, the best pool in terms of remuneration (and therefore in terms of profit received) is ethermine.org. In addition, it is very convenient: it does not require registration, statistics on the pool website will be displayed by your Ethereum wallet number. We will not dwell on the pool in detail: this is a topic for a separate article, and to start mining on this pool, the next step is enough.
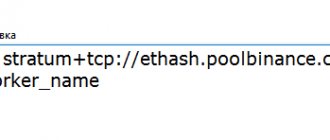
- In our bat file we change us1.ethpool.org:3333 (delete) to eu1.ethermine.org:14444. After this action, mining when starting the miner will be carried out on the ethermine pool
- We change 0x493c4afb73b490e988650b9758e7736c72af748f (delete) to your Ethereum address. After this action, the mined Ethereum will be sent to the wallet you specified.
Half the work is done and, if we remove everything that follows -epsw x, we will get configured solo Ethereum mining. But we won’t delete anything, and what follows is the Decred setup. I can’t say that I like the dcr.suprnova.cc pool, but at the time of writing, it is the most optimal. Registration is required to mine on this pool.
- Follow the link and register. Pay attention to the PIN code, you will need it to change the settings for withdrawing the mined currency.
- After registering and logging into your account, follow the link and create a Worker.
- In our bat file we change Redhex.my (delete) to Your_Login.Your_Worker (specified during registration and creation of the Worker, respectively).
System optimization for optimal production
The developer recommends performing the following steps to optimize the system for mining:
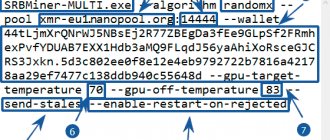
- Write the following lines at the beginning of start.bat :
setx GPU_FORCE_64BIT_PTR 0 setx GPU_MAX_HEAP_SIZE 100 setx GPU_USE_SYNC_OBJECTS 1 setx GPU_MAX_ALLOC_PERCENT 100 setx GPU_SINGLE_ALLOC_PERCENT 100
- Increase the swap file to 16Gb (minimum). To do this (using Windows 10 as an example): Right-click on the “This PC” icon on the desktop - Select “Advanced system settings” - “Advanced” - “Performance” - “Settings” - “Advanced” - “Virtual memory” — “Change” — Uncheck “Automatically select paging file size” — Set the required paging file size
- Add the -dcri
After that, we go to the very end of the line and add -dcri 40. In this case, the value 40 is not necessarily optimal. This parameter needs more fine tuning. Save start.bat and run the file. A couple of minutes after running the bat file in the console, you should have something like the following (depending on video card models, overclocking, etc., the hashrate may differ):
Now we carry out fine tuning using the “+” and “-” keys on the keyboard and the dual mining calculator. Your task is not to adjust the minimum hashrate losses on Ether using + and -, but to find the optimal ratio of Ethereum and Decred hashrate, constantly checking the resulting hashrate on the profitability calculator.
After the optimal value -dcri is found, it must be written in start.bat. After this, the dual mining setup can be considered complete.
Experiment conditions 2Miners
For the experiment, a test pool was launched on the EXP coin of the Ethash algorithm with a low difficulty share of 64M. If you don’t know what it is, read our article “What are balls in mining. How the complexity of decisions affects cryptocurrency mining.”
On the ETH 2Miners pool, the difficulty of the ball is currently 8.6G. On the test pool, the difficulty of the ball is 134 times lower, that is, the mining farm will find much more solutions over the same period of time than on the “combat” pool. This was done specifically to evaluate the miner’s work in a shorter period of time, rather than waiting days for results. We could have made the difficulty of the ball even lower, but in this case we were afraid to hit some performance limit of the processor, miner, network, and so on. However, miners are not optimized to send tens of shares per second.
Each miner was tested for exactly 2 hours. We assessed the work of the miner by the number of shares (solutions) that the miner sent in two hours of work. At the same time, we, of course, noted the hashrate readings that were indicated in the miner in order to debunk myths about inflated readings, or, conversely, to make sure that “the miners are blatantly lying.”
Miner professional
It didn’t matter to us at all whether the miner had a commission or what it was equal to, because we only analyzed the miner’s effective work - how many shares he sent “for the benefit” of the user.
The test used two different operating systems - Windows and Linux, as well as two types of cards - AMD and NVIDIA.
The real hashrate was calculated using the formula:
Number of balls * Difficulty of balls (64M) / Time in seconds (7200)
The hashrate displayed in the miner is indicated for the last minute before the miner is turned off. Please note that usually the miner “overclocks” for some time, that is, the hashrate that is displayed in the miner window grows slightly. This is due to the fact that the generation of the DAG file at the initial stage interferes with the statistics. That is why we looked at the hashrate value for all miners at the same time.
Applying card timings on the fly without flashing video card firmware in version 14.0
In version 14.0, new commands were added to apply video memory timings on the card without flashing the factory BIOS:
This will help maintain the warranty on the cards in case they fail.
The -driver command installs or removes the driver that is necessary to apply memory timings (divisor between the reference frequency and the RAM speed) and closes the miner after it. This option is only available for Windows and requires administrator rights to execute.
Use the -driver install command to install the driver, -driver uninstall to remove the driver. Since the driver is not signed, the miner enables "Test Mode" in Windows, you need to reboot to apply it.
This option is only needed if you want to install or remove the driver separately, in any case the miner will install the driver automatically if the -strap command is used.
-strap applies the specified memory timings (Memory Strap). This option is only available for Windows and requires AMD drivers 18.x or later (most tests were done on 19.4.3).
Currently only AMD Polaris cards are supported, support for other cards will be added later.
The miner has a built-in database of timings, all of them are tailored for memory (4 GB or 8 GB) and memory type (Samsung, Elpida, Hynix, Micron).
The timings are sorted by intensity, i.e. -Strap 1 supports a higher memory clock than -strap 2, etc. For the best hashrate, you also need to set the memory clock to a high, so -strap is a good starting point for tests.
You can specify only the timing index, for example, -strap 1 will apply the first timing from the database for all Polaris video cards depending on the amount of memory and its type, the miner will show the full name of the timing.
Or you can specify the timing directly in the format "POL8S1": "POL" means Polaris, "8" means 8GB, "S" means Samsung memory, "1" means index.
A zero index means the default timing from the native VBIOS of the card, that is, no timings are applied.
You can also use the "@" symbol after the timing to specify the memory clock, it works like -mclock but overrides it, for example -strap ,POL4H3,0.
You can also specify values for each card, for example -strap ,POL4H3,0.
If timing is imposed, the miner will return the old timing and memory overclock when the miner is closed.
The best way to find the best timing is to set -strap 1, (it sets timing #1 for the first card and no timings for the rest of the cards) and then increase the memory clock to see what clock speeds and hashrate you can achieve.
The same goes for timing #2, etc.
You can also specify a raw timing string (96 characters). Please note that one parameter value means that this timing is applied to all video cards, use "0" to apply timing to one video card,
for example, -strap 0,,0 applies timing #1 and 2200 MHz memory clock to the second video card only.
NOTE. If the specified timing does not work, Windows crashes. After a reboot, the default recovery time is restored and you can try other settings.
Testing miners for Nvidia
A gaming computer with the following characteristics was used for testing:
- Windows 10
- Processor i7-9700K
- 16GB DDR3 RAM
- Video card Nvidia GeForce GTX 1080 Ti Armor 11G memory GDDR5X (Micron)
- MSI Afterburner Settings: Core Clock +100, Memory Clock +450
- Driver: 451.67
- ETHlargementPill-r2 included
MSI AfterBurner
Miners that were tested:
- Phoenix Miner 5.1c
- Ethminer 0.19.0
- Gminer 2.29
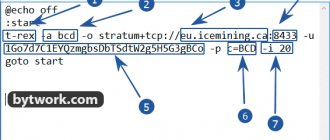
- T-Rex 0.18.2
- NBMiner v32.1
- Bminer 16.3.1
Testing miners for AMD
For testing, a farm with three different AMD video cards was used:
- MMP OS (Linux kernel 5.4.40)
- Driver amdgpu-pro 20.20
- Intel Celeron G1840 processor
- 4GB DDR3 RAM
- Video card SAPPHIRE Radeon RX 580 4G, 1200 core, 1900 memory, firmware for mining
- Video card SAPPHIRE Radeon RX 570 16G, 1200 core, 1900 memory, standard firmware
- Video card SAPPHIRE Radeon RX 580 8G, 1200 core, 2100 memory, firmware for mining
Miners that were tested:
- Phoenix Miner 5.1c
- TeamRedMiner 0.7.15
- lolMiner 1.11
- Nanominer 1.11.0
- NBMiner 32.1
Best Ethash miner for Nvidia. Test results
Test results for Nvidia
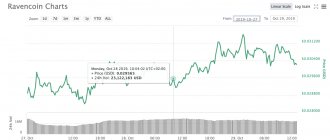
It was surprising to us that the T-Rex miner won the test. We know this miner well as one of the best for the KawPoW algorithm for Ravencoin and MTP for Zcoin, but we have never tried it for Ethash. It performed well on Ethash and Gminer - a miner that we recommend for RVN, AE, BEAM, CTXC, GRIN, MWC and ZEL coins.
While Claymore and Phoenix were resting on their laurels and occupying leading positions, new miners were working hard to optimize the code. A screenshot of the work of the winner of our experiment, the T-Rex miner, is presented below.
Work of the T-Rex miner
bminer performed the worst of all, that is, you can call him an outsider. The test results for all other miners differ slightly.
Best Ethash miner for AMD. Test results
Test results for AMD
There was a serious fight among AMD miners for first place. TeamRedMiner and lolMiner showed the best results. We give them the victory. There is no surprise here: in recent months in the 2Miners chat everyone has been talking about how these are the best miners for AMD video cards. The difference of 18 balls at the end of the experiment should definitely be classified as an accident. We recommend that you independently test the best option from TeamRedMiner and lolMiner for your configuration.
Phoenix Miner was in third place with a minimal lag. Right behind it is Nanominer. NBMiner showed a good hashrate, but within two hours the miner crashed several times when trying to mine the commission, after which it restarted itself and continued mining. Probably, this would not have happened on the production Ethereum server, and the results would have been different.
Setting up Claymore's ZCash AMD GPU Miner for mining on AMD GPUs
Claymore's ZCash AMD GPU Miner is a program designed for mining ZEC cryptocurrency on RADEON AMD video cards.
Let's configure the .bat for the zcash.flypool.org pool. Why him? Because you don’t need to register, register a separate login.worker, and it’s trivial that I used it myself, everything worked and the coins were withdrawn on time.
ZecMiner64.exe -zpool eu1-zcash.flypool.org:3333 -zwal t1HvM3M8cmU252PeQmtP3K9MzyeJzx5KLqu.260 -zpsw x
ZecMiner64.exe - miner executable file
- -allpools 1 - indicated if the manipulation occurs on a pool where the User is used instead of the wallet address.Worker
- -zpool — pool indication
- -zwal - wallet or user.worker
- -zpsw is the password for the worker, in this case it is not needed and you can specify it with peace of mind - x
If you have cards with 1-2 GB memory, we recommend adding the following lines in the .bat file:
set GPU_FORCE_64BIT_PTR 1 set GPU_MAX_HEAP_SIZE 100 set GPU_USE_SYNC_OBJECTS 1 set GPU_MAX_ALLOC_PERCENT 100 set GPU_SINGLE_ALLOC_PERCENT 100
As a result, the code in the bat file will look like this:
This code will help increase the hashrate on some cards by one and a half to two times.
Additional options for the executable file
You can add more parameters to the config for flexibility:
-i Production intensity. Possible values: 0 ... 9. 0 is the minimum value (it is possible to use CPU power for mining), 8 is the maximum value. You can also set the value of this parameter for each device individually, as shown in the example: "-i 0.9, 1".
-di GPU devices, defaults to all available GPU devices. For example, if you have 4 GPUs and you specified the parameter value “-di 02”, then only two of the four devices will be available for mining, specifically the first and third in the system with indexes #0 and #2, respectively.
Use the “-di detect” parameter to determine the correct GPU value and obtain (manage) temperatures (additionally requires specifying a non-zero value for the “-tt” parameter); Keep in mind that this parameter will not work if you do not have everything configured for mining GPU devices available in the system.
You can also turn on/off cards directly while the miner is running by specifying the value of the card number parameter in the range from “0...9”. In addition, you have the opportunity to view current information about the system and devices in the miner operating mode by specifying the “s” key in the parameter.
-ftime FAILOVER parameter—failover from the main pool to the secondary pool if it is impossible to connect to the main one within a certain specified period of time. By default, the switchover time is 30 minutes, change the parameter value to zero if you have only one pool.
-wd The watchdog parameter is active by default and has the value “-WD 1”. If any of the threads does not respond within 1 minute, or OpenCL calls return with an error, then the miner will be automatically closed (or restarted in the case of joint setting with the “-r” parameter, you can find a description below). To disable the parameter, specify the value “-WD 0”.
-li low intensity mode - mode of low production intensity. Reduces the mining intensity; this mode is recommended to be used when any of your GPU devices heat up too much during the mining process.
Please note that using this mode can significantly reduce your production speed value. The higher the value of the -li parameter, the lower the extraction speed and the lower the heating temperature. For example, with a parameter value equal to “-li 10”, the extraction speed and heating temperature will be much lower than with a value equal to “-li 1”.
- You can specify the value of this parameter individually for each GPU device, as described in the example: “-li 3,10,50”.
- “-li 0” - (default value) low mining intensity mode is disabled.
— tt parameter allows you to set the operating temperature of the GPU device. For example, “-tt 80” means that the operating temperature of the device is 80°C. In addition, you can specify the values for each card individually, as shown in the example: “-tt 70,80,75”.
It is also possible to set a static value for the fan rotation speed, for this you need to specify a parameter value with a negative sign, for example, the parameter value “-tt -50” sets the fan rotation speed to 50%.
- “-tt 0” - value to disable control and hide GPU device statistics.
- "-tt 1" - (default) does not control fan modes, but displays GPU and fan temperatures every 30 seconds. Change the value of this parameter to anything from 2 to 5 if you want to change the time from 30 seconds to a longer period of time.
-tstop A parameter that sets the critical temperature of the GPU; when the specified temperature is reached, mining will be automatically completed. For example, “-tstop 95” means that when the GPU temperature reaches a value equal to 95 degrees Celsius, mining will be stopped abnormally. After stopping mining, the miner program will automatically close after 30 seconds. To immediately close the miner program and stop the operation of the GPU device, it is necessary to specify the value of the parameter “=tstop” with a minus sign, as indicated in the example: “-tstop-95″ with this value, the miner program will close as soon as any of the GPU devices reaches the GPU temperature value equal to 95 degrees Celsius.
- You can specify the critical temperature values for each card individually, as shown in the example: “-tstop 95,85,90”.
- "-tstop 0" - (default value). The function is disabled by default.
- In addition, to enable the "-tstop" parameter, you must specify a non-zero value for the "-tt" parameter.
-fanmax set the maximum fan speed, in percentage, for example, "-fanmax 80" will set the maximum fan speed to 80%. You can also define values for each card, for example "-fanmax 50,60,70".
- This option only works if the miner program controls the cooling system, i.e. when the "-tt" option is used to specify the target temperature.
- The default value is "100".
-fanmin set the minimum fan speed, in percentage. For example, "-fanmin 50" will set the minimum fan speed to 50%. You can also define values for each card, for example "-fanmin 50,60,70".
- This option only works if the miner program controls the cooling system, i.e. when the "-tt" option is used to specify the target temperature.
- The default value is "0".
Phoenix Miner overestimates hashrate. Myth or reality?
We believe this is a myth. Yes, according to the results of our experiment, the real Phoenix hashrate turned out to be slightly lower than the declared one at 49.03 MH/s versus 49.49 MH/s, but do not forget that the miner’s commission is 0.65 percent, that is, every 90 minutes a miner mines for 35 seconds for its developers. Taking into account this 0.65 percent, the Phoenix hashrate turns out to be quite accurate. Moreover, Phoenix displays the Effective Speed hashrate value. So, Effective Speed did not rise above 49 MH/s, as you can see in the screenshot below.
Phoenix miner work
In the experiment on AMD Phoenix video cards, the miner showed a hashrate of 89.08 MH/s, while the Effective Hashrate was 86.33 MH/s, the real hashrate based on the shares sent to the pool was 86.35 MH/s.
As you know, mining by its nature is highly dependent on luck. In an ideal world, Effective Speed should be equal to Eth Speed, but in this experiment we see that the miner was simply unlucky. Maybe he's always unlucky? Write to us about it on Twitter or Telegram. However, if you look specifically at the effective hashrate, the miner shows its performance quite well.
So, no matter how much you love scandals, intrigues and investigations, our verdict: Phoenix Miner measures hashrate accurately. You should watch Effective Hashrate.
Claymore CryptoNote CPU Miner for mining on processors
Claymore's CryptoNote CPU Miner is designed for mining cryptocurrency on the PC's central processor. Today, this is not the most profitable mining option, since it is much inferior in terms of profitability to GPUs. On processors you can mine coins with the CryptoNight algorithm:
- Monero (XMR),
- Sumokoin (SUMO),
- Karbowanec (KRB),
- Bytecoin (BCN).
For CPU mining, a computer with any powerful processor from Intel or AMD is suitable. In addition, multiprocessor servers are supported. Any version of Windows: x86 or x64.
The program runs on most modern processors. In this case, a video card is not used, but you can use GPU mining simultaneously with a CPU miner. This will allow you to fully utilize the full potential of your farm.