Team Red Miner is an optimized miner only for AMD video cards and FPGA devices. The miner can only be configured via the command line. This means that you will need to create or edit ready-made launch files (.bat files).
The developer's commission (DevFee) depends on the algorithm you choose for mining cryptocurrency. It ranges from 0.75% to 3.0%. For Ethereum mining the commission is 1%. And for mining RavenCoin using the KawPow algorithm, the commission will be 2%.
What is TeamRedMiner
TeamRedMiner
is software exclusively for AMD mining, developed by programmers with the nicknames Todxx and Kerney666.
This software can mine cryptocurrencies such as Ethereum, Ravencoin, Grin, Zcoin and others.
This is a command line program. This means you run it either from the Windows command line or Linux console, or create shortcuts to predefined command lines using a Linux Bash script or a Windows command (.bat) file.
How to use?
The miner is configured only through a batch file (a file with a .bat extension). There is no need to configure the configuration (there is auto-configuration).
Brief summary about installing TeamRedMiner:
- Download the program.
- Unzip to any convenient location.
- Get a wallet address from a cryptocurrency exchange or install an official wallet.
- Enter your wallets into .bat files.
- Save your changes.
- Launch the program via the batch file.
- Increase your profits by increasing the intensity and fine-tuning of your program.
Setting up for Ether
| Pool address (-o) | stratum+tcp://eu1.ethermine.org |
| Port: | 4444 |
| Wallet (-u) | Wallet address |
| Password or farm name | Worker Password |
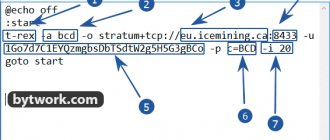
To set up a batch file for ETH, we need to enter 6 commands one by one:
- teamredminer.exe is the name of the program that will launch. Please note that the batch file itself must be located in the same folder as the program itself
- -a ethash - after the -a key we indicate the algorithm for mining. In this example, Ether, so ethash is specified
- -o stratum+tcp://eu1.ethermine.org - specify the pool address. This example uses ethermine.
- :4444 - after the colon we indicate the pool port. For ethermine it is 4444.
- -u 0x0c19EfE277b4e64f26c93b3a48A26EeD310421c8 - after -u we write the address of our wallet to which mining will take place.
- .trmtest - indicate the name of the worker after the dot. You can specify anything. It is needed for the name of the farm, when you will track statistics on the pool.
This is what the TeamRedMiner batch file will look like for eth on the ethermine pool:
teamredminer.exe -a ethash -o stratum+tcp://eu1.ethermine.org:4444 -u 0x0c19EfE277b4e64f26c93b3a48A26EeD310421c8.trmtest -px
Setting up for NiceHash
Here is a batch file for NiceHash:
teamredminer.exe -a kawpow -o stratum+tcp://kawpow.eu.nicehash.com:3385 -u 3LZhp4g3m7YWqR4hAPrZsKWbyo7hRBmqvy.trmtest -px
This is an example for RVN:
- kawpow — specify the mining algorithm. In this case Ravencoin
- kawpow.eu-west.nicehash.com - specify the pool server for nicehash
- 3385 - write the port from the pool
- 3LZhp4g3m7YWqR4hAPrZsKWbyo7hRBmqvy - and wallet. Important! To mine using NiceHash, you need to indicate your BTC wallet, not the coin you are mining.
Ready example:
teamredminer.exe -a kawpow -o stratum+tcp://kawpow.eu.nicehash.com:3385 -u 3LZhp4g3m7YWqR4hAPrZsKWbyo7hRBmqvy.trmtest -px
Starting the program
We launch the program by double-clicking on the file with the .bat extension.
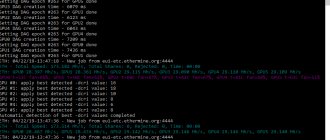
When launched for the first time, the program will tell us the following information:
information at start
- The top line will contain everything that we indicated in the body file.
- The process of initialization (recognition) of video cards has started.
- The initialization process was completed successfully. The program selected the configuration (CN 8+7:AAA).
- Runtime Command Keys: h - help, s - stats, e - enable gpu, d - disable gpu, t - tuning mode, q - quit - You can use some commands directly during mining if you click on the active miner window and press the keys: h - help, s - statistics, e - maps on, d - maps off, t - tuning mode, q - exit.
- The program connects to the pool.
- The program successfully connected to the pool and got work for video cards.
- The pool set the current mining difficulty, and the program also connected to the pool for a commission to the developer (Dev pool).
Algorithms and fees
| Algorithm | Fee |
| Ethash on Polaris GPUs | 0.75% |
| Ethash on all other GPUs | 1.0% |
| Kawpow | 2.0% |
| Nimiq | 2.5% |
| Cryptonight R | 2.5% |
| Cryptonight v8 upx2 | 2.5% |
| Cryptonight v8 turtle | 2.5% |
| Cryptonight v8 half | 2.5% |
| Cryptonight v8 double | 2.5% |
| Cryptonight v8 rwz | 2.5% |
| Cryptonight v8 | 2.5% |
| Cryptonight heavy | 2.5% |
| Cryptonight haven | 2.5% |
| Cryptonight saber | 2.5% |
| Cryptonight concealer | 2.5% |
| Chukwa-512 (Turtlecoin) | 2.5% |
| Chukwa-1024 (Turtlecoin) | 2.5% |
| x16r | 2.5% |
| x16rv2 | 2.5% |
| x16s | 2.5% |
| x16rt | 2.5% |
| MTP | 2.5% |
| Cuckatoo31 | 2.5% |
| Cuckarood29 | 2.5% |
| Lyra2rev3 | 2.5% |
| Lyra2z | 3.0% |
| Phi2 | 3.0% |
Teams
-algo or a short synonym for this command -a - specifies the algorithm for mining (for example: 'ethash', 'kawpow', 'cuckatoo32', 'beamhash')
Important! Use either the long synonym -algo or the short synonym -a. There is no need to use both together.
-h, --help — display help information and exit
Configuration
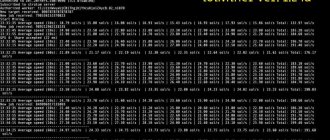
When you first start it, the process of automatically configuring the video card configuration will start:
- The miner reports that the program is looking for the best configuration for video cards and this process is 10% ready (this process takes up to 10 minutes depending on the video cards and their number).
- Meanwhile, one of the video cards found the first ball (solution for the block). This is interesting because it is for the balls that we are paid for the participation of our video card power in mining. Here you can find out about the full structure of remuneration for miners.
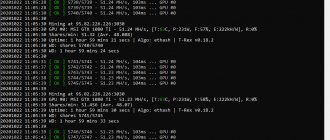
After waiting a little more, we finally see the hashrate of the video cards and other data:
program hashrate
- GPU 1 [61C, fan 59%] cnr: 834.8 h/s, avg 828.0 h/s, pool 940.3 h/sa:5 r:0 hw:0 - all information for the video card.
- [61C, fan 59%] - temperature and fan speed
- cnr: 834.8 h/s, avg 828.0 h/s, — hashrate and average hashrate
- pool 940.3 h/s - hashrate that we send to the pool
- a:5 r:0 — correct ball 5 accepted, rejected — 0.
- hw:0 - hardware errors - 0
- Total — the total hashrate of all video cards.
- Stats Uptime: 0 days, 00:11:05 - total mining time.
Success
The success of Red Teaming is not determined by how well the attack team captures the network.
A Red Teaming project is successful when the attack team achieves its goals and the defense team is able to learn and improve the organization's security posture. Success can also be determined by answers to the following questions:
• How long does it take for the defense team to detect attackers? • Do existing tools detect attackers? • Does the defending team follow its TTP when the attacking team's actions raise the alarm? • Can the defense team detect communication channels with the attackers' command center (C2)? • Can defenders profile attackers based on indicators of compromise (IOC) on the network and hosts?
Firo wallet.
You can use the standard official wallet from the developers’ website, which downloads the entire chain of blockchain transactions, accordingly takes up a lot of disk space, and also requires constant synchronization.
I don't think anyone really needs this. There is a more convenient alternative.
And this is, of course, the Firo wallet on the best cryptocurrency exchange Binance.
First, you need to register an account if you don’t already have one.
Then go to the Wallet - Fiat and Spot section.
Enter the name of the coin in the search and you will see it in the list below.
Click on “Enter” to create a Firo exchange wallet.
Next, select the correct network, which is indicated in the screenshot.
And click on the yellow button to generate the address of your Firo wallet on Binance.
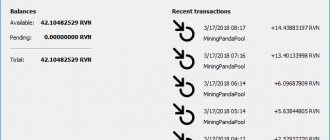
The following address information should appear.
Historical reference
Like many other things in our daily lives (duct tape, microwave, canned goods, etc.), the term Red Teaming comes from the military-industrial complex. During the Vietnam War, American military pilots practiced air combat skills and learned from their own mistakes, thereby increasing their skill level without actually losing pilots and aircraft. But the name “red team” most likely appeared during the confrontation with the Soviet Union. Historically, the Reds attack and the Blues defend.
The security guards in Budapest also liked this term;)
Watch the video
subscribe
Autoconfiguration continues.
autotuning process completed
- The program selected the best config for the algorithm.
- The miner advises using this particular configuration (now it is used by default). You may have others, depending on the version of the miner, the type of video cards, their overclocking, etc.
- CN-Config Auto-Tuner is complete, mining continues with the best configurations found!
We have looked at the basic settings that will already allow you to start mining. It is recommended to do the first launch with minimal or no overclocking of video cards and test the Miner for stability. While the program is being tested, you can move on to advanced settings.
Red Team vs Blue Team
The term Red Team comes from the military and defines a "friendly" attacking team.
In contrast to it, there is a team of defenders - the Blue Team. The difference between Red Team operations and a classic pentest is primarily in the regulations of actions and the anticipation of the protected party. Also, during a “classic” pentest, “white lists” are often used, restrictions on the time of work carried out, and the level of interaction with the system. When conducting Red Team operations, there are practically no restrictions; a real attack is carried out on the infrastructure: from attacks on the external perimeter, to attempts at physical access, to “hard” socio-technical techniques (not fixing a click on a link, but, for example, a full-fledged reverse shell).
The Blue Team's task is to protect the infrastructure blindly: the team of defenders is not warned about the attack or its differences from real attackers - this is one of the best factors to test both the protective systems and the ability of specialists to identify and block attacks, and subsequently investigate incidents. After the operation is completed, it is necessary to compare the tested attack vectors with recorded incidents to improve the infrastructure protection system.
The Red Team's approach is most closely related to a targeted attack - APT (Advanced Persistent Threat). The Red Team should consist of experienced professionals with extensive experience in both building IT/IS infrastructure and experience in compromising systems.
What makes Red Team Operations different:
- Duration. Attacks can be carried out over several months.
- Hardcore. Attackers can have a rather harsh impact on the infrastructure, which can lead to the failure of some infrastructure components.
- Lack of traditional penetration testing templates. (A case from practice - during a bypass of the access control system at one of the audit sites, the team carried out office equipment containing critical data outside the company - naturally, in agreement with the work manager).
Red Teaming is an attempt to gain access to a system by any means, including penetration testing; physical access; testing of communication lines, wireless and radio frequency systems; testing employees through social engineering scenarios.
The Red Team concept of operations allows penetration testing to be carried out as realistically as possible.
Goals
Like any activity, Red Teaming has a purpose.
The goals of attackers can be different (the main thing is that they do not violate laws and trade secrets), for example: • capturing and securing the network; • the ability to move freely online; • gaining access to an application or data; • gaining access to a server or workstation; • the ability to extract critical data and bypass leak protection (DLP); • the ability to remain undetected for a certain period of time; • ability to perform operational impacts.
Myth No. 3: Red Teaming is essentially a competition that identifies winners and losers.
There are no winners or losers in Red Teaming. The attackers do not have the goal of quietly and unnoticed to take over an organization’s server or network. At the initial stage, the attacking team will act silently, but as soon as it approaches the target at “arm’s length”, it will begin to “make noise” to attract the attention of the defenders. If they detect and block attackers early, they will have no way of knowing how the enemy might proceed next. But if there are no winners and losers, how do you define success?
Team approach
Red Team is similar to a military operation: the targets or objects of attack, areas of responsibility and roles of team members are determined.
Often, a Red Team may include an insider who transmits data from within the company or performs auxiliary functions. A clear distribution of roles, systems of operational interaction and data analysis determine several roles for the sniper and medic:
- team leader - management;
- operatives - active phase of the attack;
- insiders - this role may not be present;
- analytics - analysis and normalization of the received data.
Updates/Releases
Update v0.9.0
Added initial support for ethash FPGA. See FPGA_GUIDE.txt for details.
Update v0.8.7
- General: Added offline test mode for (almost) all algorithms (see -Benchmark).
- Network: Improved the situation with "Failed to connect to the developer pool." An error message appears.
- For users in China, it is advisable to use "-dev_location=cn".
- Network: Added experimental support for DNS-over-HTTPS (see -Dns_https and -dns_https_sni).
Update v0.8.6.3
- Autolykos2: Emergency release to support larger pads from block 614400. Some GPUs (mostly Vegas) will require a higher core clock to achieve the same performance as previous versions due to larger pads breaking some previous optimization. More optimizations will come in future releases.
- Autolykos2: Added --autolykos_ignore_diff argument for certain pools that are incompatible with the ERGO miner reference pool implementation.
- Progpow: Fixed incorrect --help text for --prog_micro_tune.
Update v0.8.6.2
- Firopow/MTP: Added synthetic algorithm mtp_firopow, which will use the correct algorithm based on system time and disable the miner during the Firo fork on October 26th.
- Ethash/progpow: Split the ethash and progpow algorithms into separate binaries, mainly for some Vegas that encountered stability issues when moving from 0.8.5 to 0.8.6.
- Autolykos2: added Tonga support.
- Enhanced SSL Usage: Changed default SSL behavior to not provide the SNI hostname during the handshake. This makes it easy to run tunnels for TLS/SSL ports on public pools. See the updated --help section on the -o argument to learn how to force the SNI hostname to be sent.
Update v0.8.6
- Firopow: Added new algorithm for the upcoming Firo fork (see Start_firo.sh/bat). Before the fork, only mining is available on the test network, see Start_firo_testnet.sh/bat.
- Firopow/kawpow: Rewrote the tuning guide (see KAWPOW_FIROPOW_TUNING.txt).
- Firopow/kawpow: Small hashrate improvements, mainly by choosing the default full GPU tune and adding a micro-tuning engine for the Polaris GPU (see new argument -prog_micro_tune).
- Autolykos2: added support for records and display of submission difficulty.
- General: Fixed Radeon VII support in latest win drivers. NOTE: HBCC must be DISABLED for all Vegas.
- General: Fixed fan control not working for Navis in some driver versions.
- General: Improved enabling Windows Compute mode with automatic elevation (with --uac) and GPU restart.
Update v0.8.5
- General: Added Windows clock / voltage / built-in timing control (beta feature). See the section in --help and CLOCKS_VOLTAGE_CONTROL.txt.
- General: Fixed some fan control issues in Windows, mainly for Big Navi GPUs.
- General: Added temporary memory limits (stop/resume), see --Mem_temp_limit and --mem_temp_resume.
- Ethash: Added support for forcing ethash pool hashrate reporting (see --Eth_hash_report).
- Ethash: Fixed hashrate reporting for Crazypool when using failover pools.
- Autolykos2: Added additional subscription support, for example for Nicehash.
Update v0.8.4
- General: Added a fix for a crash when loading GPU cores in newer drivers, such as Big Navi on Adrenalin 21.6.x.
- Emergency Patch: Fixed an issue where mining in Haven was generating mostly errors after the recent hard fork.
Update v0.8.3
- General: added Autolykos2 algorithm for ERGO (very good update for Vega 56/64 , see AUTOLYKOS_TUNING.txt manual).
- General: Improved and simplified ZIL dual mining for ethash/kawpow/verthash/autolykos2 (see new guide DUAL_ZIL_MINING.txt).
Update v0.8.2.1
Minor bugfix release:
- Bugfix: Fixed an issue with Windows that would intermittently read zero GPU stats and blow up fans (bug 0.8.2).
- Verthash: Added --verthash_max_uploads=N parameter to control whether the verthash table is loaded into the GPU at startup. Some chipsets have problems running >4 GPUs simultaneously. A common error is that multiple GPUs will immediately die on startup when running a full install, but run fine if you only run 3-4 GPUs.
- Verthash: Fixed support for GPUs with 2GB memory.
Update v0.8.2
Key points:
- Added Verthash algorithm (use -a verthash). o Good choice for Polaris 4GB GPUs. o Please read VERTHASH_TUNING_GUIDE.txt for quick tuning instructions. o Bad algorithm for Navi GPUs, RDNA architecture is not suitable. o Hashrate at high setting: 560 kHz/s (Polaris), 1.2 MH/s (RX Vegas), 850 kHz/s (5700XT).
- Tonga GPUs (R9 285/285X/380/380X, W7100, S7150) are now supported for ethash and kawpow.
- Fixed device name parsing for ROCm 4.1 and new Windows drivers.
- API: Added sensor power, connection temperature, and memory temperature to API output.
- Other changes: o Expanded support for up to 24 GPUs (previous maximum was 16 GPUs). o Better handling of driver issues related to GPU clock/temp stats. o Sensor power is now displayed in the 30 second statistics output. o Fixed DEAD watchdog false positives for small GPUs creating kawpow DAGs. o Kawpow now fully works with MiningPoolHub, regardless of bad seedhash values.
Update v0.8.1.1
- Added Big Navi support. This is just a basic version of support for all supported Navi algorithms (ethash, kawpow, mtp, nimiq). o Kernels are close or identical to Navi10 A-mode (ethash) and Navi10 default modes (kawpow, mtp, nimiq). o Please read the updated ETHASH_TUNING_GUIDE.txt to see the small tuning section at the very end of the file. o Big Navi should run in A-mode for ethash (default choice), not B-mode. Read the setup guide for more information.
- Eth+zil mining: Added new min_epoch pool strategy to switch between regular eth and eth+zil pools. See an example of using the start_zil_eth (.bat/.sh) startup script.
- Ethash: Navi display gpus now uses A-mode by default to prevent memory allocation issues, especially on Windows. Navi gpus without a connected monitor will still work in B-mode.
- Statistics: now correct handling of negative temperatures under Linux.
Hashrate of video cards on Firo.
Nvidia:
- Nvidia GTX 1060 3/6 GB - 1.6 Mh/s;
- Nvidia GTX 1070 8 GB - 2.1 Mh/s;
- Nvidia GTX 1070ti 8 GB – 2.65 Mh/s;
- Nvidia GTX 1080 8 GB – 3 Mh/s;
- Nvidia GTX 1080 ti 11 GB – 3.65 Mh/s;
- Nvidia GTX 1660 6 GB – 1.5 Mh/s;
- Nvidia GTX 1660 ti 6 GB – 1.8 Mh/s;
- Nvidia RTX 2060 6 GB – 2.1 Mh/s;
- Nvidia RTX 2070 8 GB – 2.6 Mh/s;
- Nvidia RTX 2080 8 GB – 3.5 Mh/s;
- Nvidia RTX 2080 ti 11 GB – 4.3 Mh/s;
- Nvidia RTX 3060 - 2.6 Mh/s;
- Nvidia RTX 3070 - 4.0 Mh/s;
- Nvidia RTX 3080 - 5.5 Mh/s;
- Nvidia RTX 3090 - 6.4 Mh/s.
AMD:
- AMD RX 470 4/8 GB - 1.5 Mh/s;
- AMD RX 480 4/8 GB - 1.5 Mh/s;
- AMD RX 570 4/8 GB – 1.5 Mh/s;
- AMD RX 580 4/8 GB – 1.5 Mh/s;
- AMD RX 590 8 GB – 2 Mh/s;
- AMD Vega56 8 GB – 2.7 Mh/s;
- AMD Vega64 8 GB – 2.8 Mh/s;
- AMD Radeon VII 16 GB - 3.3 Mh/s.
- AMD Radeon RX 5700XT 16 GB – 2.0 Mh/s;
- AMD Radeon RX 6700XT 16 GB - 3.4 Mh/s.
Possible user problems
The miner may freeze when running on the Ethash algorithm, especially with Polaris cards. The cause is most often a high default intensity value. Set the intensity manually and reduce the acceleration.
Use a miner version no lower than v0.7.2 with a fix for the DEAD error on kawpow and a solution to the problem with new drivers and support for 5600 series video cards. The latest release v0.7.7 fixed a regression error for ethash Nicehash.