Overclocking a video card and the risks associated with it
Overclocking a video card is a change in some of the standard parameters of its operation, as a result of which its performance increases (on average by 5-20%). In many cases overclocking
allows the user to comfortably play computer games that his video card cannot handle at standard settings.
Therefore, thanks to overclocking, you can save money by postponing or even refusing to purchase a more powerful video card. But not everything is as simple as it seems at first glance. There is a downside to all this. The fact is that an overclocked video card is more susceptible to failure. When starting overclocking, you must be clearly aware that your actions can damage the computer's hardware. You should resort to overclocking if you are willing to take risks to increase the performance of your video card. On the other hand, if overclocking
wisely and do not try to squeeze too much out of the video card, this risk becomes insignificant.
It is necessary to take into account that overclocking increases the electrical power consumed by the video card. Before overclocking, it is advisable to make sure that the current strength of the power supply along the +12V line exceeds the needs of the video card with a margin. Otherwise, the power supply may cause unstable operation of the computer. Read about assessing the compliance of the power supply with the requirements of the computer here. The article discusses one of the methods for overclocking GeForce series video cards
.
To make the article more visual, the author structured it in the form of a description of overclocking the “experimental” GeForce GTS 450 video card. In a similar way, you can overclock any card from nVidia GeForce. Below are images describing all the necessary steps. If you have a graphics adapter from ATI (Radeon), there is no point in reading this article. To overclock a video card,
the user needs to increase the following parameters of its operation: • graphics core frequency; • memory frequency; • frequency of shader units. To ensure stable operation with the new parameters, you will also have to slightly increase the video card supply voltage. We will not delve into the description of these parameters. For those interested, read about them here.
How to overclock an AMD card
Overclocking an AMD video card can be done using standard tools found in the OverDrive or WattMan driver package.
First, you need to update the AMD driver, since the latest version of the software implies more stable operation of the hardware. It is recommended to use the 3DMark or FurMark benchmarks as a program for testing the capabilities of the video adapter.
The overclocking process is carried out as follows:
- Go to “Radeon Settings”, “Games”.
- Open “Global Settings” and go to the “Global Wattman” (or “OverDrive”, depending on the installed drivers) tab.
- First, you need to increase the power consumption of the graphics adapter. This can be done in the “Limited power consumption” section by moving the slider to the right side a few notches. After this, save the changes.
- Then the long process of gradually increasing the core and video memory frequencies begins. Having saved the changes, launch the 3DMark or FurMark program and begin testing the card.
- If artifacts appear on the screen in the form of freezes, blinking and other signs of unstable operation, cancel the test. We reduce the frequency and carry out the same operations until the optimal settings for overclocking are found.
If desired, you can also overclock the monitor. In the settings you need to open the “Display” section and create a new custom resolution. In the “Screen refresh rate” item, you need to gradually increase the number of Hz.
MSI Afterburner is another program for overclocking an AMD video card, which will allow you to carry out the process of increasing performance more accurately using additional parameters.
Overclocking a GeForce video card
Before you start overclocking,
you need to find out the indicators of the above parameters of the video card in its normal state.
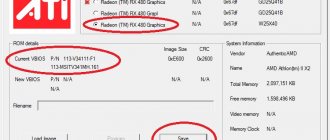
For this purpose, you can use the free utility GPU-Z
. After installation and launch, the GPU-Z utility will show detailed information about the computer’s video card, including the data we need.
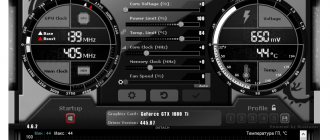
The image shows that the experimental GeForce GTS 450 in normal mode has the following parameters (circled in red): • graphics core frequency (GPU Clock) - 783 MHz;
• frequency of shader units (Shader) - 1566 MHz; • video card memory frequency (Memory) - 902 MHz (1804). Please also note that with these parameters, the GeForce GTS 450 video card demonstrates the following productivity (circled in green): • PixelFillrate - 6.3 GPixel/s • TextureFillrate - 25.1 GTexel/s • memory bandwidth (bandwidth) - 57, 7 GB/s. To change these parameters we will use the free program nVidia Inspektor
.
nVidia Inspektor does not require installation. After downloading, just run it. A window will open, in the lower right corner of which there is a button called “Show Overclocking”. You need to click on it with the mouse and in the next dialog box confirm the opening of additional parameters (click the “Yes” button). After this, the video card overclocking
(see image).
First, let's raise the core frequency (GPU Clock) and shader unit frequency (Shader Clock). These parameters are interrelated. Therefore, increasing the frequency of shader units will automatically entail an increase in the frequency of the graphics core. To increase it, you need to move the Shader Clock slider to the right. I do not recommend increasing the frequency by more than 15% of the original one. If for our GeForce GTS 450 we raise the Shader Clock by 15% of the original (1566 MHz), we will get somewhere around 1800 MHz. In cases with other video cards, the performance will naturally be different. By increasing the Shader Clock, you can see that the graphics core frequency will also increase. For the GeForce GTS 450 Shader Clock was increased to 1800 MHz, the graphics core frequency automatically increased to 900 MHz (see screenshot). For the changes to take effect, you must click the “Apply Clock&Voltage” button.
Before you move on to increasing the frequency of the video card's memory, you need to make sure that it is stable with the new parameters of the core and shader units.
To this end, the video card needs to be tested to perform some task related to processing graphics data. An excellent stability test is the free program FurMark
. To check the video card, install and run FurMark. In the program window, press the “BURN-IN test” button and watch the picture (“rotating hairy donut”, see image). If for a long time (at least 10-15 minutes) no artifacts appear on the image (flickering, dots, blinking and other signs of instability), then the video card with the new parameters is working normally. In addition, during FurMark testing it is necessary to monitor the temperature of the video card. The temperature graph appears at the bottom of the FurMark window. The temperature should not exceed 90 degrees C. If artifacts appear or the temperature becomes too high, you need to stop the test (by pressing the Escape button), slightly reduce the frequency of the video core and shader units (in the nVidia Inspektor program) and then repeat the test.
When the optimal frequency for the core and shader units is found, you can continue overclocking the video card.
We return to the nVidia Inspektor program window and increase the video card memory frequency in the same way (move the Memory Clock slider to the right). After changing the parameters, do not forget to click the “Apply Clock&Voltage” button to take effect. The stability of the video card with overclocked memory
must also be checked using the FurMark test. If artifacts appear, the memory frequency must be reduced until stability is achieved. In the case of our experimental GeForce GTS 450, the memory frequency was increased by 15% from 1804 MHz to 2075 MHz. Determining the maximum operating frequencies for the video core, shader units and memory is the longest and most difficult stage of overclocking. After its completion, all that remains is to slightly increase the video card’s supply voltage to ensure higher stability of its operation. To do this, in the nVidia Inspektor program window you need to slightly (1 “step”) move the “Voltage” slider to the right. For the GeForce GTS 450, the voltage was increased from 1.075 V to 1.125 V. To make the changes take effect, do not forget to click the “Apply Clock&Voltage” button (see image above). The nVidia Inspektor program allows you to save the new video card settings to a separate file. In the future, in order to quickly transfer the video card from normal to overclocked state, it will be enough to simply run this file. Let's create such a file for the settings we have made. To do this, in the program window you need to click the “Creat Clocks Chortcut” button. A settings file will be created on your computer desktop.
If you want your graphics card to automatically overclock when you turn on your computer
, you need to add this file to a folder called “Startup”. Windows opens all the files in this folder during startup, so the video card will automatically overclock when you turn on the computer.
In Windows XP, Vista, 7, the Startup folder is located in the Start menu. You need to find it there, right-click on it and select “Open” in the menu that appears.
In Windows 8 and Windows 10, opening the Startup folder is a little more difficult. Detailed recommendations on this issue are located here.
The video card can also be overclocked “forever”, that is, it can be made to constantly operate at higher frequencies of the graphics core and video memory without using nVidia Inspektor or any other program. For this purpose, the increased frequencies suitable for it, which were determined in the manner described above, must be flashed into its BIOS. Instructions for flashing the BIOS of a video card are available here.
Zotac Firestorm
Zotac produces this utility The utility requires Windows 7 and later to operate.
Zotac Firestorm uses a combo panel to display and configure basic parameters:
- processor frequencies;
- the frequency that the memory uses;
- the temperature to which the processor is heated;
- relative fan speed;
- maximum voltage value, etc.
The user can switch between profiles and adjust settings. Both automatic setting of optimal (according to Zotac Firestorm) parameters and manual setting of preferred values are allowed. All changes are applied in real time, and the monitoring system allows you to immediately track the effect.
- Pros: convenient settings and profile support, recommended by NVIDIA.
- Cons: only for manufacturer cards.
Checking overclocking results
Let's compare the main indicators of an overclocked video card with those without overclocking. Before overclocking,
the experimental GeForce GTS 450 demonstrated the following productivity (see above): • PixelFillrate - 6.3 GPixel/s;
• TextureFillrate — 25.1 GTexel/s; • memory bandwidth (bandwidth) - 57.7 GB/s. After overclocking,
the following results were obtained (see screenshot): • PixelFillrate - 7.2 GPixel/s (14.2% increase); • TextureFillrate - 28.8 GTexel/s (14.7% increase) • Memory bandwidth (bandwidth) - 66.4 GB/s (15.0% increase).
To test productivity gains under realistic conditions, the
3DMark11
.
This is one of the most popular graphics adapter performance tests. In 3DMark11 without overclocking,
the GeForce GTS 450 showed a result of 2272 points,
after overclocking - 2573 points
.
That is, the increase in video card performance in practice was 13.2%
(see screenshots).
Before overclocking
After overclocking
conclusions
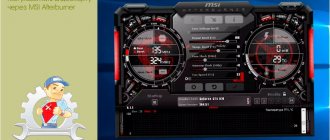
Now you know how to overclock an Nvidia MSI GTX 1060 (6 GB) video card. In today's article we gave a full example of how and what to do, as well as in what sequence. For overclocking we used the MSI Afrerburner utility. Performance measurement results: before overclocking - 4501 points for the entire system as a whole and 4208 points for the video card; after overclocking - 4836 points for the system as a whole and 4566 points for the video card. Consequently, the performance increase was +7.4% for the system as a whole and +8.5% for the video card. If you need a small performance boost, be smart and careful
Overclocking your video card will allow you to do this at minimal cost.
If you find an error, please select a piece of text and press Ctrl+Enter.
Related posts:
No related photos.
Rate this article:
( 1 ratings, average: 5.00 out of 5)
Tweet Pin It
about the author
entertainm30
I have a higher education in the field of computers. I know a little about free software. In my free time I spend my free time repairing equipment. I am the proud owner of a 3D printer. I think self-education is very important for today.
After overclocking the video card
After overclocking,
the temperature of the video card changes significantly upward, which can affect the cooling status of other computer devices.
In addition to the video card, the system unit contains other “heating” components - the central processor, the motherboard chipset, etc. Therefore, after overclocking, at least at first, it is advisable to carefully monitor the temperature of all the main devices of the computer. For example, you can use the free program SpeedFan . If the temperature of any computer device turns out to be too high, you need to take care of improving air circulation in the system unit case by installing additional coolers (fans) for intake and (or) exhaust. You should also keep in mind that an increased temperature of a computer or its individual devices may be caused by a failure or contamination of their cooling system with dust. The procedure for eliminating these problems is described on our website in the article on cleaning and lubricating coolers.
Characteristics of GT 220
The ancestor of the card with index 220 is the flagship of the series - the 295th model, from which the card, first of all, inherited the GPU architecture.
The GT216 processor, built on 2 texture-processing clusters (TPC) and 8 texture units (TMU), is responsible for video processing. TPCs, in turn, have a total of 48 thread processors (24 per core), and TMUs have 8 units per core (16 in total). GPUs are made using updated 40 nm technology.
The card is equipped with a 128-bit memory bus, delivering 8 operations per clock. In relative units, the characteristics of the Nvidia Geforce GT 220 are approximately 20% of the power of the top 295 model. This is compensated by integrated support for modern technologies - DirectX 10.1 and Shader Model 4.1.
We also worked on the audio component - the device supports eight-channel LPCM audio, as well as DivX, MPEG-2 and Flash video codecs built into the hardware.
The card has 1 Gb of DDR3 memory, which operates at 800 MHz by default.
The price of Geforce GT 220 as of August 2022 fluctuates around 23-30 USD. Used copies are valued at 15-20 USD.
There is something to compare with
At one time (released in 2009), this video card was very popular, primarily due to its low price. Some call it a cheap plug. But despite this, the GeForce GT 220 has competitors, and they position themselves as good video cards.
The main competitor of the GT 220 can be called the Radeon HD 4650, but in terms of core frequency the 220 has a slight advantage. The shader frequency is slightly higher than that of its competitor, the Radeon HD 4650. But in this regard, the Radeon wins, having 320 processors and 48 stream processors on board. In the detailed table below you can see a more detailed comparison of the GeForce GT 220 competitors.
| Maximum digital monitor resolution | 2560×1600 |
| Maximum VGA resolution | 2048×1536 |
| Standard monitor connectors | DVI, VGA, HDMI |
| Multiple monitor support | Yes |
| HDCP | Yes |
| HDMI | Yes |
| Audio input for HDMI | SPDIF/HDA |
| GeForce 9500 GT | GeForce 9600 GSO | GeForce GT 220 | Radeon HD 4650 | Radeon HD 4670 | |
| Core, operating frequency, MHz | 550 | 550 / 650 | 625 | 600 | 570 |
| Number of separate texture filtering and addressing work units | 16 | 48 / 32 | 16 | 32 | |
| Number of individual ROPs | 8 | 12 / 16 | 8 | 16 | |
| Stream processors, operating frequency, MHz | 1400 | 1375 / 1625 | 1360 | 600 | 750 |
| Stream processors, number | 32 | 96 / 48 | 48 | 320 | |
| Video memory capacity options, MB | 256 / 512 | 384 / 512 | 512 / 1024 | 512 | |
| Video memory type options | DDR2/DDR3 | DDR3 | DDR2/DDR3 | DDR2 | DDR3 |
| Memory operating frequency, MHz | 800/1600 | 1800 | 800/1580 | 800 | 2000 |
| Memory bus width, bits | 128 | 192 / 256 | 128 | 128 | 128 |
| DirectX version support | 10.0 | 10.1 | |||
| OpenGL version support | 2.1 | 3.1 | |||
| PhysX version support | Eat | No | |||
| Availability of hardware video acceleration | Eat | ||||
| Availability of built-in audio codec | No | Eat | |||
| Energy consumption, W | 50 | 105/90 | 58 | 50 | 60 |
Despite the low performance, the GeForce 210 can compete with current analogues of ultra-budget video cards. The niche of this video adapter is a basic computer.
Characteristics
This video chip immediately began to be positioned as a budget option with a low price, although the manufacturer indicated that the card could be safely used for gaming programs. And if we talk about the core frequency, the GeForce GT 220 has 625 MHz. Not bad performance when compared with the line in this series. The frequency of shaders is 1360 MHz, and their number is 48 pieces.
The GeForce GT 220 was sold in two configurations with different amounts of video memory: 512MB or 1024MB. The type of memory it supports also comes in two versions: DDR2 on the 512MB version, and DDR3 on the 1GB video adapter.
The GeForce GT 220 has a video memory frequency of 800 MHz for the 512 MB version and 1580 for the cooler version. The memory bus received its well-deserved 128-bit. More detailed characteristics are below in the table.
| Name | GeForce GT 220 |
| Core | GT216 |
| Technical process | 40 nm |
| Number of transistors | 486 million |
| Core operating frequency | 625 MHz |
| Memory options and frequency | DDR2 500 (1000)/DDR3 790 (1580)/GDDR3 1012 (2024) |
| Memory bus | 128-bit |
| Bandwidth (Gb/s) | 16.0/25.3/32.4 |
| Number of individual shader units | 48 |
| Frequency of individual shader units | 1360 |
| TMU on conveyor | 16 |
| ROP | 8 |
| Shaders Model | 4.1 |
| Fill Rate (Mpix/s) | 5000 |
| Fill Rate (Mtex/s) | 10000 |
| Supported maximum version of DirectX | 10.1 |
| Memory options | 512/1024 |
| Connection is made through the interface | PCI-E 2.0 |
What games will run on the Nvidia Geforce GT 220
The GT 220 in games proves to be a good card for the average level (for games no older than 2011-2012).
For comparison, the list shows games of different levels with average graphics settings:
- Undemanding level (Far Cry 2) – 25 FPS;
- Medium level (Devil May Cry 4) – 28 FPS;
- High level (Battlefield 3) – 9 FPS.
Obviously, a comfortable game can only be played on undemanding mid-level games. In general, the card is perfect for such legendary games as:
- Online Legend - World of Warcraft;
- Civilization IV;
- Sims III;
- Left 4 dead;
- Fallout 3 New Vegas.
It is unlikely that you will be able to enjoy all the beauties of textures and graphics at medium settings of these games, but clear and comfortable gaming with a minimum of lags is guaranteed.
Game tests
But how will a cheap video card behave when playing shooters or simple strategies?
We'll start with Far Cry 2.
- Maximum settings – 14 FPS
- Medium – 20 FPS
- Minimum – 24 FPS
We continue testing using the game “Devil May Cry 4”.
- Maximum settings - 23 FPS
- Medium – 28 FPS
- Minimum – 36 FPS
Of the newer games, we took "Battlefield 3". At maximum settings the game simply did not start. Overall the result is very weak.
- Maximum settings - none
- Medium – 9 FPS
- Minimum – 13FPS
New games are too tough for the GeForce GT 220, but for older, less demanding games this card is suitable. According to nVidia, the GT 220 is perfect for the following games:
- World of Warcraft;
- Spore;
- Sims3;
- Left 4 Dead;
- Fallout3.
Tests
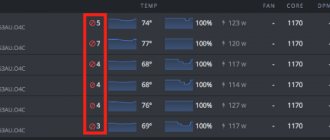
As for the tests, the results are quite comparable when you consider the price. Is a cooling system with a small but quiet cooler effective? During prolonged load, the graphics chip heated up to 72ºC, although this is not critical, it is not the best indicator. Although the cooler has the ability to regulate its speed, this did not affect the temperature reduction. The rotation speed of the blades did not change from the standard 35%; it increased to 39%.
Information about software testing is given below:
- Futuremark 3Dmark score – 7860
- Futuremark 3Dmark Vantage – 3370
- PassMark – 178
Comparing ultra-budget devices, the GeForce GT 220 shows not bad results.