Hello.
In most cases, game lovers resort to overclocking a video card: if the overclocking is successful, then the FPS (frames per second) increases. Thanks to this, the picture in the game becomes smoother, the game stops slowing down, and playing becomes comfortable and interesting.
Sometimes overclocking can improve performance by up to 30-35% (a significant increase to try overclocking :))! In this article I want to focus on how this is done and the typical questions that arise.
I also want to point out right away that overclocking is not a safe thing; if you do it ineptly, you can damage the equipment (besides, this will be a refusal of warranty service!). Everything you do according to this article is done at your own peril and risk...
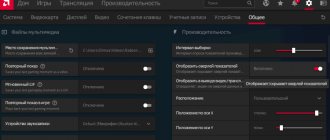
In addition, before overclocking, I would like to recommend one more way to speed up a video card - by setting optimal driver settings (By setting these settings, you do not risk anything. It is possible that by setting these settings, you will not need to overclock anything). I have a couple of articles about this on my blog:
- - for NVIDIA (GeForce):
- - for AMD (Ati Radeon):
What is an overclocking profile?
In general terms, overclocking is pushing your hardware beyond its factory settings, possibly improving its performance. The overclocking profile can also be used for other purposes, such as downvolting (reducing the power consumption of your equipment). There are many ways to use overclocking, and we will try to describe some of them in this article.
Overclocking is a trial and error process that requires patience to achieve the desired results. You should always let your hardware run with each set of new overclocking profiles for some time to see if those specific settings remain stable. Equipment can sometimes behave differently, producing unpredictable results. Deflected balls are one way to check whether the acceleration changes were successful.
Deflected balls
Rejected shares are shares that your miner produced, but they were either not submitted in time to be included in the block or contained an error. The most common reason for a high number of rejected balls is due to overclocking the graphics processing unit (GPU) to the point that it produces erroneous balls. The lower the number of rejected shares relative to accepted ones, the higher the efficiency of your GPU overclocking profile.
That being said, most users leave their hardware at default settings as overclocking results may vary for each user. This also largely depends on the actual components the manufacturer uses, as some components can be overclocked beyond spec and some simply don't perform that well.
How to use
To use the program, you must first download, install and configure it.
Let's consider all these points. First you need to download the program.
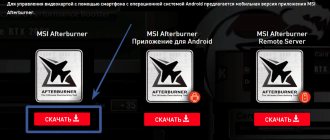
To do this, go to the official MSI Afterburner website and scroll down the site to the download section:
How to install MSI Afterburner
After you have downloaded the archive, unzip it, go to the unzipped folder and run the installation file “MSIAfterburnerSetup.exe”. Where to install is up to you, but it is advisable to use standard system paths - C:\Program Files (x86)\MSI Afterburner - this is for Windows 10.
Click “next” everywhere.
Having reached the point “select program components to install”, uncheck the “Riva Tuner Statistics Server” checkbox.
Then click “next” and wait for the installation to complete.
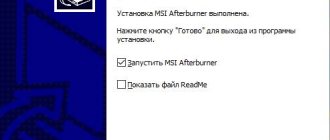
After installation, launch MSI Afterburner.
MSI Afterburner is very easy to use. In order to understand how the program works, let's study the parameters and what they are responsible for.
Creating an Overclocking Profile
All overclocking profiles are created individually for each farm and cannot be used between farms. You can create a profile for the entire farm or a profile for a specific worker. Worker-specific settings will always override any farm-wide settings. For example, this way you can set the optimal desired settings for the entire rig, and then fine-tune each rig individually.
To add a new profile, go to the Overclocking Profiles of your farm and click on the Add OC Profile . In the Save Overclocking as Template , give your profile a name, and click Save .
Creating a new overclocking template
You have created a template that will later be used by specific workers or your entire farm. This template can then be copied and modified for different combinations of miners or algorithms.
The template you create will be used by all your GPUs, but the settings are different for Nvidia and AMD. You can have separate sets of settings for both types of GPUs in the same profile if your rig runs on Nvidia and AMD GPUs, and they will be applied to each type of GPU individually.
To edit your overclock profile, click on the plus icon next to your profile name and follow the instructions depending on your GPU type.
Editing an overclocking template
Please note that you can use the most popular templates by going to the Popular Presets and finding your video card model.
Overclocking Nvidia GPUs
Before changing any settings, you can run the nvidia-smi command to find out your current GPU settings. To do this remotely from the control panel, go to your worker and click on the Run Command on the toolbar at the top of the screen.
Toolbar
You can specify one value for all cards or a list of values for each card separated by a space. For example:
150 is the same value for all GPUs.
0 100 0 0 0 140 - this means GPU0 = 0, GPU1 = 100, and so on.
Nvidia overclocking window
Algo field is used to specify overclocking settings for a specific algorithm. You can create a separate set of overclocking settings for each algorithm individually, or select Default Config , which will apply to all algorithms, but can be overwritten by the algorithm settings themselves.
- +Core Clock (Mhz) - increases the GPU core clock frequency in MHz. The minimum and maximum values for your GPU can be found in the Nvidia X Server Settings tool by going to the PowerMizer tab on your rig. For GPUs, 0 will always be the default (factory) value.
- Memory (Mhz) - increases the GPU memory speed in MHz. This value is typically double what you see in AfterBurner. For example, if on Windows it is +800 MHz, then the value here should be 1600. The minimum and maximum values for your GPU can be found in the Nvidia X Server Settings tool by going to the PowerMizer tab.
- Fan (%) - Controls the speed of your GPU's fan/fans. For GPUs, 0 will always be the default (factory) value. The default fan speed is determined not by the miner, but by the BIOS of your GPU.
- Power Limit (W) - controls power consumption. These values must be absolute, unlike AfterBurner where the values are percentiles. You can check your power limits in your rig's GPU list. For example, power limit 60.00W, 120.00W, 140.00W means the first value, 60.00W is the minimum value, 120.00W is the default value and 140.00W is the maximum value. This setting will not apply if your values are less than or greater than your GPU's min/max values.
- Turn Off LEDs - This turns off the LEDs on your GPU, if any. This option may not work on some GPUs.
- OhGodAnETHlargementPill - only works with Nvidia GTX 1080 series. Provided by OhGodACompany.
- Click Save and that's it.
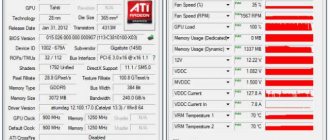
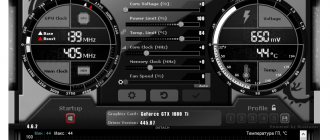
Core Clock parameter
This parameter shows the current frequency of the graphics chip or, as it is also called, the graphics core. Core Clock is measured in megahertz (MHz). The higher this indicator, the more operations per second the video card can perform.
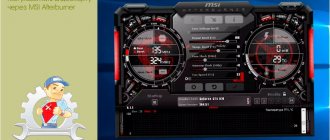
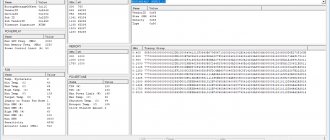
Main program window
You should start overclocking by changing this parameter. But this must be done carefully, increasing with each step by 10-15 MHz. After each change, you need to test the video card in games or in the Furmark program for at least an hour to make sure that the card works stably at the changed frequency.
Passing a stress test with a video card in the Furmark program
Remember to monitor the temperature of the video card to prevent overheating.
It should be noted that not all video cards are good at chasing the core. Some can handle an increase of 200-300 MHz without problems, receiving a 10 percent or more increase in performance, and some, with an increase of 100 MHz, begin to display artifacts or crash the video driver. Everything is individual for literally each card.
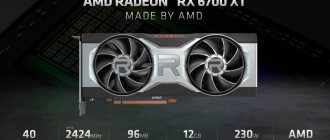
Example: Overclocking Nvidia GTX 1060
Here is an example overclocking profile for the Nvidia GTX 1060 GPU.
Please note that these values are provided as an example. Use at your own risk.
Example of Nvidia overclocking settings
- Algo - we chose Default Config because we want to apply it to all algorithms
- +Core Clock (Mhz) — 130
- Memory (Mhz) — 2000
- Fan (%) - left blank for default settings
- Power Limit (W) — 120
- Turn Off LEDs - our GPU doesn't have LEDs, so we skipped this setting
- OhGodAnETHlargementPill - This setting is only available for 1080 series GPUs, so we skipped it
- Click Save and that's it.
Overclocking AMD GPU
Before changing any settings, you can run the amd-info command to find out your current GPU settings. To do this remotely from your control panel, go to your worker and click on the Run Command on the toolbar at the top of the screen.
Toolbar
You can specify one value for all cards or a list of values for each card separated by a space. For example:
150 is the same value for all GPUs.
0 100 0 0 0 140 - this means GPU0 = 0, GPU1 = 100, and so on.
AMD overclocking window
Algo field is used to specify overclocking settings for a specific algorithm. You can create a separate set of overclocking settings for each algorithm individually, or select Default Config , which will apply to all algorithms, but can be overwritten by the algorithm settings themselves.
- Core Clock (Mhz) - adjusts the core frequency. A good value should be around 1100. If Core State , the default value of 5 will be used for the frequency setting. All values should be absolute.
- Core State (Index) - Essential if you are trying to reduce the voltage of your card. You should use this setting in conjunction with the Core Clock and Core Voltage . This is called DPM (Dynamic Power Management) or “Power Level” of the GPU kernel. For RX GPU, this value is from 1 to 7. The default value is 5. Lower this value for downvolting. If you decide to use one of the default values, then you do not need to adjust the values in Core Clock and Core Voltage .
- Core Voltage (mV) - Necessary if you are trying to reduce the voltage of your GPU. You will also need to configure the Core State , or the voltage setting will use the default value of 5. You can, for example, set the value to 900 (mV), or, for example, the value 65284 from the VBIOS table.
- Memory Clock (Mhz) - sets the memory clock frequency. All values are absolute.
- Mem State (Index) is a very advanced parameter. Change it if there are problems with undervoltage. If everything works within specification, don't change this value. RX cards are known to have 1 or 2 memory values (3 including 0 - standby state). The default will be the highest value. But some rare cards are known to be unable to undervolt at a higher value, and need a lower value. For example, the highest value is 2, and for undervolting you can set it to 1. This option should be used with the Memory Clock .
- Fan (%) - to adjust the fan speed. Note that miners like Claymore will still control the fan speed. You must disable fan control in the miner configuration for this setting to work. We recommend leaving this field blank if you have AutoFan enabled (we'll talk more about it in other articles).
- Aggressive undervolting - Selects the set overvolting parameter for each DPM state.
- Click Save and that's it.
How to overclock a video card
Overclocking MSI Afterburner follows standard overclocking and testing techniques to find the highest and most stable settings. Don't forget to click the "Apply" button after any changes.
- To begin, set the “Power Limit” and “Temp Limit” sliders to maximum. With these settings, the graphics card will be more energy efficient and will reach higher temperatures. The graphics card will never reach its upper limit unless there is a serious hardware failure, so don't be surprised if the maximum temperature seems dangerously high. Card manufacturers define these parameters and therefore they are considered safe and there is no risk of damaging the video card.
- Increase the core clock speed slider a little. Each tick on the slider represents one MHz above or below the stock clock speed, depending on whether you move up or down. We recommend adding 20 to 30 MHz. Don't forget to click "Apply" after increasing the clock speed.
- For each increment, run Kombustor in the background and check for artifacts, flickering screen, black flashes, or crashes. Take a couple of minutes to observe each change.
- Once you encounter a consistent number of graphical issues, stop increasing the clock speed. Don't worry about unusual behavior; this is to be expected and is the GPU's way of telling us that it has reached its maximum power. Crashes and black screens will reset the graphics card driver, after which you can restore the clock speed in a few seconds.
- Reduce the core clock speed in small increments of about 5 MHz until all artifacts/graphics issues are gone and Kombustor is stable. We also recommend testing any changes in the context of a demanding miner or game. Raise the settings to ultra to force the graphics card to work harder to see the changes more clearly. If you have problems, reduce the clock speed.
- Next, we will apply the same stress test to the memory clock speed, but with a larger step. We recommend 50 to 100 MHz.
- Once you encounter persistent graphical problems in Kombustor, reduce the memory clock speed in small steps until you find a stable speed. Also test it in game.
- Now we want to test the new core and memory clock speeds over an extended period. Launch Kombustor and let it run for a good 10 minutes, checking for artifacts and glitches. Reduce the speed in small increments until you have a stable combination of both.
- Once you're happy with the overall stability, be sure to save your settings as a profile by clicking the floppy disk icon and then one of the profile buttons 1-5.