Hello, Habr! We continue our series of articles devoted to tools and methods of data analysis. The next 2 articles in our series will be devoted to Hive, a tool for SQL lovers. In previous articles, we looked at the MapReduce paradigm, and the techniques and strategies for working with it. Perhaps many readers found some solutions to problems using MapReduce somewhat cumbersome. Indeed, almost 50 years after the invention of SQL, it seems quite strange to write more than one line of code to solve problems like “calculate the sum of transactions by region for me.” On the other hand, classic DBMSs such as Postgres, MySQL or Oracle do not have such flexibility in scaling when processing large amounts of data and when the volume reaches a larger volume, further support becomes a big headache.
Actually, Apache Hive was invented to combine these two advantages:
- Scalability of MapReduce
- Ease of use of SQL for data selection.
Below the cut we will tell you how this is achieved, how to start working with Hive, and what restrictions there are on its use.
general description
Hive appeared in the depths of Facebook in 2007, and a year later the hive source code was opened and transferred under the management of the apache software foundation.
Initially, hive was a set of scripts on top of hadoop streaming (see the 2nd article of our series), later it developed into a full-fledged framework for executing data queries on top of MapReduce. The current version of apache hive (2.0) is an advanced framework that can work not only on top of the Map/Reduce framework, but also on top of Spark (we will have separate articles about Spark in a series), as well as Apache Tez.
Apache hive is used in production by companies such as Facebook, Grooveshark, Last.Fm and many others. At Data-Centric alliance we use HIve as the main log storage for our advertising platform.
Overclocking AMD and NVIDIA video cards, main mistakes
It is advisable to overclock when the usual hashrate values are set lower and electricity consumption is higher.
To optimize work, you need to go to the rig menu to the third tab Overclocking.
And after that click on the edit button in the configuration.
The overclocking menu looks like this. The parameters for each video card are different; you need to look for documentation for each or select it manually.
For 1080 series cards there is a special switch tablet. For newer video adapters it is useless; you do not need to enable it.
Overclocking examples for some popular cards.
Primary overclocking is installed. If you need to configure individual parameters for each card, then they are written separated by a space, as indicated in blue immediately under the Default Config inscription in the overclocking window.
The settings will be updated and the set values will be written in green.
Overclocking Nvidia video cards is the same as in the Windows operating system, but there is one significant difference. In Hive OS, frequencies need to be specified twice as high.
For AMD video adapters, you need to remember that power consumption limits are changed by selection. You need to manually select the optimal value for the kernel state.
This is interesting: How to buy Bitcoin for rubles as profitably as possible
For AMD video cards, the memory status index starts from parameter “1”, which indicates maximum savings, and “2” is the maximum possible operating efficiency.
Farm users constantly set the wrong overclock, overestimating this indicator, and putting too little voltage on the core.
You need to use various individual settings and select the optimal option for overclocking video adapters for the best efficient operation.
The most popular mining errors for AMD cards:
- incorrect BIOS firmware;
- lack of voltage (undervolting);
- different video cards in one assembly.
More rarely, mining may not start due to an incorrect combination of farm components.
Architecture
Hive is an engine that turns SQL queries into chains of map-reduce tasks.
The engine includes components such as Parser (parses incoming SQL queries), Optimimer (optimizes the query to achieve greater efficiency), Planner (schedules tasks for execution) Executor (runs tasks on the MapReduce framework. For hive to work, a metadata storage is also required. The fact is that SQL involves working with objects such as a database, table, columns, rows, cells, etc. Since the data itself that hive uses is stored simply as files on hdfs, it is necessary to store somewhere the correspondence between hive objects and real ones files.
A regular relational DBMS such as MySQL, PostgreSQL or Oracle is used as metastorage.
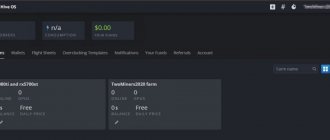
Who uses the HiveOS system
HiveOS is an operating system for mining. It is easy to install and even a beginner can operate it.
Pros of using HiveOS
- The platform is very simple and can be set up in about 20 minutes.
- Clear interface. It may seem confusing at first, but after half an hour of use you can quickly understand where and what is.
- User support is excellent.
- Conveniently controlled in a browser or via a smartphone in the application. You don't need a laptop or PC to work with workers.
There is one significant disadvantage - the cost of use. The first worker is free , for each subsequent one based on a video card you will need to pay an additional $3, for mining on an ASIC $2.
Command line interface
In order to try working with hive, the easiest way is to use its command line. A modern utility for working with hive is called beeline
(hello to our partners from the operator of the same name ). To do this, on any machine in the hadoop cluster (see our hadoop tutorial) with hive installed, just type the command. $beeline Next you need to establish a connection with the hive server: beeline> !connect jdbc:hive2://localhost:10000/default root root Connecting to jdbc:hive2://localhost:10000/default Connected to: Apache Hive (version 1.1. 0-cdh5.7.0) Driver: Hive JDBC (version 1.1.0-cdh5.7.0) Transaction isolation: TRANSACTION_REPEATABLE_READ 0: jdbc:hive2://localhost:10000/default> root root - in this context, this is the username and password. After this you will get a command prompt where you can enter hive commands.
Also, sometimes it is convenient not to enter sql queries into the beeline command line, but to first save and edit them in a file, and then execute all queries from the file. To do this, you need to run beeline with the database connection parameters and the -f parameter indicating the name of the file containing the queries:
beeline -u jdbc:hive2://localhost:10000/default -n root -p root -f sorted.sql
Installing the Hive OS image on a PC
To proceed to downloading the operating system and creating a flash drive, you need to click Download Hive OS on the hiveos.farm/install page. You need to download the Zip archive and unzip it on your PC.
On the same page below there is a utility for creating an Etcher installation flash drive; you need to follow the link, after which a window will appear to create an image with the OS on removable media.
Creating a bootable USB flash drive
After installing the program and downloading HiveOS, you can begin installation. You must select Flash from file on the Etcher website.
Follow the simple instructions, first select the unzipped file with the operating system, and then the flash drive where the image will be written. The program will begin installation.
Then you need to set up the mining process, create a log file with information, and also copy it to removable media.
Data Units
When working with hive, you can select the following objects that hive operates on:
- Database
- Table
- Partition
- Bucket
Let's look at each of them in more detail:
Database
The database
is an analogue of a database in relational DBMS.
A database is a namespace
containing tables.
The command to create a new database looks like this: CREATE DATABASE|SCHEMA Database and Schema in this context are the same thing. IF NOT EXISTS
addition, as you might guess, creates a database only if it does not already exist.
Example of creating a database:
CREATE DATABASE userdb; To switch to the appropriate database, use the USE command: USE userdb;
Table
A table in hive is an analogue of a table in a classic relational database.
The main difference is that the data from hive tables is simply stored as regular files on hdfs. These can be ordinary text csv files, binary sequence files, more complex columnar parquet files and other formats. But in any case, the data over which the hive table is configured is very easy to read and not from hive. There are two types of tables in hive:
Classic table
, data to which is added using hive.
Here is an example of creating such a table (example source): CREATE TABLE IF NOT EXISTS employee ( eid int, name String, salary String, destination String) COMMENT 'Employee details' ROW FORMAT DELIMITED FIELDS TERMINATED BY '\t' LINES TERMINATED BY '\n ' STORED AS TEXTFILE; Here we have created a table in which the data will be stored in the form of regular csv files, the columns of which are separated by a tab character. After this, the data can be loaded into the table. Let our user have in his home folder on hdfs (I remind you that you can download the file using hadoop fs -put
) a file sample.txt like: 1201 Gopal 45000 Technical manager 1202 Manisha 45000 Proof reader 1203 Masthanvali 40000 Technical writer 1204 Kiran 40000 Hr Admin 1205 Kranthi 30000 Op Admin We can load data using the following command: LOAD DATA INPATH '/user/root/sample.txt' OVERWRITE INTO TABLE employee;
After hive will move
the data stored in our file to hive storage. You can verify this by reading the data directly from a file in hive storage in hdfs: [ [email protected] ~]# hadoop fs -text /user/hive/warehouse/userdb.db/employee/* 1201 Gopal 45000 Technical manager 1202 Manisha 45000 Proof reader 1203 Masthanvali 40000 Technical writer 1204 Kiran 40000 Hr Admin 1205 Kranthi 30000 Op Admin Classic tables can also be created as the result of a select query on other tables: 0: jdbc:hive2://localhost:10000/default> CREATE TABLE big_salary as SELECT * FROM employee WHERE salary > 40000; 0: jdbc:hive2://localhost:10000/default> SELECT * FROM big_salary; +——————+——————+———————+————————-+—+ | big_salary.eid | big_salary.name | big_salary.salary | big_salary.destination | +——————+——————+———————+————————-+—+ | 1201 | Gopal | 45000 | Technical manager | | 1202 | Manisha | 45000 | Proof reader | +——————+——————+———————+————————-+—+ By the way, SELECT to create a table in this case will already launch a mapreduce task .
External table
, data into which is loaded by external systems, without the participation of hive.
EXTERNAL
keyword , and also specify the path to the folder where the files are stored:
CREATE EXTERNAL TABLE IF NOT EXISTS employee_external ( eid int, name String, salary String, destination String) COMMENT 'Employee details ' ROW FORMAT DELIMITED FIELDS TERMINATED BY '\t' LINES TERMINATED BY '\n' STORED AS TEXTFILE LOCATION '/user/root/external_files/'; After this, the table can be used in the same way as regular hive tables. The most convenient thing about this is that you can simply copy the file to the desired folder in hdfs, and hive will automatically pick up new files when querying the corresponding table. This is very convenient when working, for example, with logs.
Partition
Since hive is an engine for translating SQL queries into mapreduce tasks, usually even the simplest queries to a table lead to a full scan of the data in that table.
In order to avoid a complete scan of the data for some of the columns of the table, you can partition this table. This means that data related to different values will be physically stored in different folders on HDFS. To create a partitioned table, you need to specify which columns will be used for partitioning:
CREATE TABLE IF NOT EXISTS employee_partitioned ( eid int, name String, salary String, destination String) COMMENT 'Employee details' PARTITIONED BY (birth_year int, birth_month string) ROW FORMAT DELIMITED FIELDS TERMINATED BY '\t' LINES TERMINATED BY '\n' STORED AS TEXTFILE; When loading data into such a table, you must explicitly indicate which partition we are loading the data into: LOAD DATA INPATH '/user/root/sample.txt' OVERWRITE INTO TABLE employee_partitioned PARTITION (birth_year=1998, birth_month='May'); Now let's see what the directory structure looks like: [ [email protected] ~]# hadoop fs -ls /user/hive/warehouse/employee_partitioned/ Found 1 items drwxrwxrwx — root supergroup 0 2016-05-08 15:03 /user/hive/warehouse /employee_partitioned/birth_year=1998 [ [email protected] ~]# hadoop fs -ls -R /user/hive/warehouse/employee_partitioned/ drwxrwxrwx — root supergroup 0 2016-05-08 15:03 /user/hive/warehouse/employee_partitioned /birth_year=1998 drwxrwxrwx — root supergroup 0 2016-05-08 15:03 /user/hive/warehouse/employee_partitioned/birth_year=1998/birth_month=May -rwxrwxrwx 1 root supergroup 161 2016-05-08 15:03 /user/ hive/warehouse/employee_partitioned/birth_year=1998/birth_month=May/sample.txt It can be seen that the directory structure looks in such a way that each partition corresponds to a separate folder on hdfs. Now, if we run any queries with a restriction on partition values in the WHERE condition, mapreduce will take input data only from the corresponding folders.
In the case of External tables, partitioning works in a similar way, but such a directory structure will have to be created manually.
Partitioning is very convenient, for example, for dividing logs by date, since as a rule, any requests for statistics contain a date limit. This allows you to significantly reduce query time.
Bucket
Partitioning helps reduce processing time if the queries typically know the restrictions on the values of a column.
However, it is not always applicable. For example, if the number of values in a column is very large. For example, this could be a user ID in a system containing several million users. In this case, dividing the table into buckets will come to our aid. One bucket contains table rows for which the value matches the hash function value calculated using a specific column.
Whenever working with bucketed tables, you must remember to enable support for buckets in hive (otherwise hive will work with them as with regular tables):
set hive.enforce.bucketing=true; To create a table divided into buckets, use the CLUSTERED BY set hive.enforce.bucketing=true; CREATE TABLE employee_bucketed ( eid int, name String, salary String, destination String) CLUSTERED BY(eid) INTO 10 BUCKETS ROW FORMAT DELIMITED FIELDS TERMINATED BY '\t' LINES TERMINATED BY '\n' STORED AS TEXTFILE; Since the Load command is used to simply move data to hive storage, in this case it is not suitable for loading, since the data must be preprocessed by correctly dividing it into buckets. Therefore, they need to be loaded using the INSERT command from another table (for example, from an external table): set hive.enforce.bucketing=true; FROM employee_external INSERT OVERWRITE TABLE employee_bucketed SELECT *; After executing the command, we will make sure that the data is indeed divided into 10 parts: [ [email protected] ~]# hadoop fs -ls /user/hive/warehouse/employee_bucketed Found 10 items -rwxrwxrwx 1 root supergroup 31555556 2016-05-08 16:04 /user/hive/warehouse/employee_bucketed/000000_0 -rwxrwxrwx 1 root supergroup 31555556 2016-05-08 16:04 /user/hive/warehouse/employee_bucketed/000001_0 -rwxrwxrwx 1 root supergroup 31555556 2016-0 5-08 16:04 /user /hive/warehouse/employee_bucketed/000002_0 -rwxrwxrwx 1 root supergroup 31555556 2016-05-08 16:04 /user/hive/warehouse/employee_bucketed/000003_0 -rwxrwxrwx 1 root supergroup 31555556 2016-05-0 8 16:04 /user/hive /warehouse/employee_bucketed/000004_0 -rwxrwxrwx 1 root supergroup 31555556 2016-05-08 16:04 /user/hive/warehouse/employee_bucketed/000005_0 -rwxrwxrwx 1 root supergroup 31555556 2016-05-08 1 6:04 /user/hive/warehouse /employee_bucketed/000006_0 -rwxrwxrwx 1 root supergroup 31555556 2016-05-08 16:04 /user/hive/warehouse/employee_bucketed/000007_0 -rwxrwxrwx 1 root supergroup 31555556 2016-05-08 16:0 4 /user/hive/warehouse/employee_bucketed /000008_0 -rwxrwxrwx 1 root supergroup 31555556 2016-05-08 16:04 /user/hive/warehouse/employee_bucketed/000009_0 Now, when querying for data related to a specific user, we will not need to scan the entire table, but only 1/10 part of this table.
home
The Hive blockchain is one of the blockchains emerging in 2022. It moved to its own network after being forked from the Steem blockchain in March 2022. This was one of the most controversial forks of 2022 because Tron founder Justin Sun
played a big role in this fork. In this article, we'll look at general information about Hive, its uses, and its distribution options.
The main reason why Hive left the Steem blockchain was to create a decentralized and social blockchain. Former Steem users thought Tron and Tron founder Justin Sun
took over and institutionalized Steem. The Hive platform stands out because it is a social blog and contains cryptocurrency rewards. Additionally, the platform uses decentralized applications and uses smart media tokens (SMT) as a medium of exchange.
On the Hive platform, users can publish their own articles, and these articles cannot be censored. Any content creators earn HIVE tokens of Hive's native cryptocurrency based on the content they create. Hive rewards are distributed using tokens that appear as a result of a certain inflation.
Users can optionally convert their HIVE tokens into Hive Power. This is the same as staking. With Hive Power, users can earn recurring income and have more control over their messages.
At the same time, HIVE tokens can be used to vote on blockchain decisions. Unlike Steem, Hive requires staked tokens to remain on the network for at least 30 days. Thus, deferred decisions prevent any attempt to hack the system.
Since the Steem blockchain was created, there has almost certainly been a major hard fork. Because initially the developers somehow mined 80% of their STEEM tokens. Thus, other users could not mine. Thus, the Steem blockchain was switched to DPoS consensus. The first creators responded to this quite quickly. However, Steem assured that the mined tokens would be spent on development, and the issue was partially closed.
This atmosphere of trust lasted for about 4 years. But the storm erupted when the Tron Foundation acquired Steemit Inc. in February 2022. The previously mentioned mined tokens went to Tron. Tron used these tokens to influence the governance of the blockchain. Things were starting to heat up. The Steem community took action to block Tron's access to the mined tokens and lock up the tokens. For this purpose, a soft fork was made with voting. However, Tron was allegedly able to rewind this soft fork because it has good relationships with exchanges that hold large amounts of STEEM.
As a result, the community found a solution to the hard fork problem, and preparations began. Many users thought that Steem was now in the hands of Tron. Thus, on March 20, 2022, the Hive blockchain was born.
During the hard fork, the Hive blockchain copied the Steem blockchain exactly. Thus, all content was transferred to the Hive platform. At the same time, these accounts were also copied and HIVE was distributed by dumping the number of STEEM tokens into the accounts. However, accounts belonging to Steemit Inc were kept separate from this migration event. Thus, 80% of the mined tokens were not redistributed.
Many users who were active on Steem and switched to Hive began selling STEEM tokens. Normally events should have been discontinued after a hard fork, but this did not happen.
Hive's governance tracker found that several accounts were acting in Tron's interests. There are rumors that these accounts are blacklisted by Hive. However, it is known that nodes running a Tron hard fork cannot obtain permission to create Hive blocks. In response, Tron confiscated 20 Hive supporters from the node's Steem tokens. Steem claimed that this move was made to prevent hostile actions. These conflicts did not affect ordinary users. They could log into their accounts on both sides or use whichever platform they wanted.
Hive, like Steem, continues the DPoS model. In this system, users can select witnesses (a type of node). Selected witnesses have voting rights based on the support they receive.
In addition, Hive has the following features:
- Blocks can be crafted in 3 seconds. — Transaction fees have been eliminated. — The network gets high scaling. - You can create a personal wallet and account names. — Escrow capacity. — Includes a reward system for social networks.
The Hive blockchain differs from Steem in several key ways:
— The Hive blockchain does not include 80% of the total number of previously mined tokens, as is the case with Steem. — The developers have included a 30-day cooldown for new betting actions to prevent takeover attacks. - In the new system, other actions do not take effect during the 30-day Hive recovery. It is expected that there will be more leadership changes in the future.
Hive has a main platform called hive.blog. However, it is available to users on another platform called Peakd. The Peakd platform is very important because it allows third-party decentralized applications to be hosted on the platform. These decentralized applications were increasingly common on Steem before the hard fork. There are about 100 decentralized applications on the Steem platform. Among the most notable are YouTube-like Dtube, Instagram-like platform APPICS, and Steem's card game Steem Monster.
After April 2022, about 20 applications were migrated from Steem to Hive. One of them was the card fighting game Splinterlands. Splinterlands has been one of the most popular apps on Steem. A website, hiveprojects.io, was created containing general information about decentralized applications. According to this list, there are currently over 50 decentralized applications on the Hive platform.
Checklist for using hive
Now we have sorted out all the objects that hive operates on. After the tables are created, you can work with them, just like with tables in regular databases. However, do not forget that hive is still an engine for running mapreduce tasks on regular files, and it is not a full-fledged replacement for a classic DBMS. Careless use of heavy commands such as JOIN can lead to very long tasks. Therefore, before building your architecture based on hive, you need to think several times. Here is a small checklist for using hive:
- There is a lot of data that needs to be processed and it does not fit on the disk of one machine (otherwise it is better to think about classic SQL systems).
- Data is mostly just added and rarely updated (if updates are frequent, you might want to think about using Hbase, for example, see our previous material.
- The data has a well-structured structure and is well divided into columns.
- Data processing patterns are well described by declarative query language (SQL).
- The response time to a request is not critical (since hive works based on MapReduce - you shouldn’t expect interactivity).
How to manage a rig through the hiveos.farm website
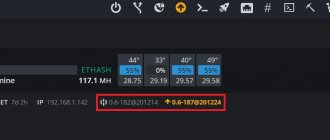
In the top panel of the screen in the web interface on the Hive OS website there is a control panel, in which each button is responsible for a specific operating parameter.
To see the panel, you need to go to the previously created worker by clicking on it on the main page of the site, and then select the rig.
Here you can manage power, set up an Internet connection, launch and work with the miner, control the temperature, or use watchdog.
An important menu item is Remote Access or Remote Access.
You need to click on Hive Shell Start and wait while a special login link is generated.
It is located in the left corner of the screen in the Hive Shell section.
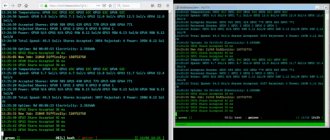
In the loaded console you need to enter the miner command.
The miner console will launch, which shows all the important details. For example, effective hashrate, temperatures and other important information required during the mining process.
Checking work
If mining was launched on the ETH network, then you can go to the website ethermine.org. In the search bar at the top near the orange button you need to enter the address where the coins are mined.
The panel contains all the important information, how much is mined per day or week, all unpaid profit, hashrate.
At first, the statistics will not correspond to reality; you need to wait from 2 to 3 hours. After this the numbers will be correct.
In the settings on the third Settings tab, you can specify an e-mail. Important notifications will be sent to it if mining suddenly stops.
There you can also specify when payments will be sent. The minimum value is 0.05 ETH.
Application
Hive OS has an app and it has all the features of the desktop version. You can control mining rigs from your phone.
Hive OS is one of the best operating systems for mining. It is easy to use; you can control the process through the platform’s website or mobile application.
Registration, first connection and setup are very simple; it will only take half an hour to set up the mining rig and start making money from cryptocurrency mining.
Hive Features
- The operational interface uses SQL-like syntax to provide rapid development capabilities and ease of use.
- Avoid writing MapReduce and reduce developer training costs
- Unified metadata management, can share metadata with impala/spark etc.
- Easily extensible, HDFS+MapReduce allows you to grow your cluster size and support custom features.
- Autonomous data processing: e.g. log analysis, offline analysis of massive structured data
- Hive execution latency is relatively high, so hihve is often used in cases where real-time requirements are low.
- Hive has the advantage of processing large data, but has no advantage in processing small data, so the execution latency of Hive is relatively high.
Basic Introduction to HIVE
Hive is an open source code from FaceBook designed to collect data statistics in massive structured logs, which later became the open source Apache Hive project. Hive is a Hadoop based data warehouse tool that can map structured data files into a table and provide SQL-like (also known as HQL) query function, its essence is to convert HQL into MapReduce program, flexibility and scalability are better, support custom functions (UDF), a custom storage format for data processing and storage, but because its time delay is longer, it is suitable for offline data processing.