In 2022, the demand for equipment for receiving cryptocurrencies has increased. According to Avito, interest in advertisements with video cards increased by 2.6 times, in mining farms by 4. The number of sales increased by 18-20%. Beginners, out of habit, install Windows 10 on a farm, then, having assessed its shortcomings in practice, look for alternatives. Among them, HiveOS is an Ubuntu-based operating system, adapted for managing and monitoring farms and setting up rigs. Let's look at where and how to download the operating system, what it is, and how to use it. Let's show the process of writing HiveOS to a flash drive using Rufus.
Tariffing in Hive OS
Balance in Hive OS is a prepaid system.
You need to make a deposit to have more than 4 (four) free workers in your account or use paid services in your free account. The deposit can be minimal; it is not necessary to pay the entire month in advance. It is possible to top up your balance even by $1, for example, to try it out.
Workers are charged per day, not monthly. Tariffing is carried out every 5 minutes during the day. This means that a worker that has only been active for a while will be charged in proportion to the active time, and not for the whole day. If a worker was online and we see him in the statistics, he will be taken into account. If a worker has been disabled, it is not taken into account - you do not need to deactivate it in the interface to stop billing for it.
Funds are debited from the balance for the previous day. For example: $0.5 will be debited from your balance at 04:00 on June 4 for 5 rigs online from 04:00 on June 3 to 04:00 on June 4.
Console sharing
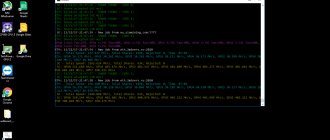
A very important feature of Hive Shell is the ability to share the console. You can observe (or even participate in) the activities carried out by the person with whom you have shared access to the worker via Hive Shell. Using this feature is extremely simple - just open the same link that you shared with another person. This is what it looks like (on the left - Hive Shell is running in the FireFox browser, on the right - through the PuTTY client):
All actions in one console are reflected in the other.
GPU Installation
Burning a disk image
Verified Mining Motherboards for 2022
You will need to burn the Hive OS image to an SSD. Although many users prefer USB drives, we recommend SSD. Start by extracting the image from the .zip file, and then burn the .img file to the drive.
Windows users can burn the image using HDD Raw Copy Tool, Win32 Disk Imager, Rufus or Etcher.
MacOS or Linux users can easily do this using Etcher or some other programs.
When the image is burned, you will find a newly created disk on your system where you can pre-configure your worker using Farm Hash or using its ID and password. Find HIVE on the disk and open it with a text editor. You can use the built-in text editors on Windows, MacOS and Linux, or download a free alternative. For example, Notepad++ for Windows or Sublime Text for MacOS and Linux.
Now choose one of two options:
Optional step - Farm Hash
Once the image is copied, you can go to your Windows, Linux or Mac drive and find the file in the root folder. It looks like this:
Contents of the rig-config-example.txt file
Enter your Farm Hash in the field, copying the value from the Settings tab. The field should now look like this:
In this case, there is no need to configure RIGID or RIGPASSWD. Just save your settings file and rename it to . Continue by completing the image installation and start your worker. It will automatically connect to the control panel.
Optional step - manual setup
Once the image is copied, you can go to your Windows, Linux or Mac drive and find the file in the root folder. It looks like this:
Contents of the rig-config-example.txt file
Find and fill out these two fields:
That's it, just save your settings file and rename it to . Continue by completing the image installation and start your worker. It will automatically connect to the control panel.
Creating a bootable USB flash drive with HiveOS
Go to the Install site menu to download the required installation image.
There are several types of installation images: for ASICs, for GPU rigs, and a separate image for Vega video cards. For all other video cards you need to select a GPU image. Downloading is possible in two ways: a ZIP file directly from the site or a torrent file if the HiveOS site is overloaded.
To record a downloaded image, you cannot simply copy the file to a flash drive, because you need a special “bit” recording mode for the flash drive to become bootable.
Recording an image occurs in three stages.
1. Selecting the downloaded hiveos image; it is not necessary to extract the image itself from the archive, because the program will do it itself. Select Image button
2. Select a USB flash drive or disk where the image will be written.
Overclocking AMD GPU
Top 10. best mining programs 2021
Before changing any settings, you can run the command to find out the current GPU settings. To do this remotely from your dashboard, go to your worker and click the Run Command button on the toolbar at the top of the screen.
You can specify one value for all cards, or a space-separated list of values for each card. For example: 150 - one value for all GPUs. 0 100 0 0 0 140 - means GPU0 = none, GPU1 = 100, etc.
AMD OS window
The Algo field is used to specify overclocking settings for a specific algorithm. You can create a separate set of overclocking settings for each algorithm separately, or select a default setting that will apply to all algorithms, but can be overwritten by the algorithm settings themselves.
- Core Clock (Mhz) - sets the core frequency. A good value would be around 1100. If the core state is disabled, then the default state of 5 will be used to set the frequency. All values must be absolute.
- Core State (Index) - This is necessary if you try to lower the power of the video card. You must use this setting in conjunction with the Core Clock and Core Voltage settings. This is called DPM (Dynamic Power Management) or "Power Level" of the GPU kernel. For RX GPUs this value is from 1 to 7. The default value is 5. Reduce the value to downstream. If you choose to set one of the default states, you do not need to set any values in Core Clock and Core Voltage.
- Core Voltage (mV) - Required if you are trying to lower the video card core voltage. And you must set the Core State or the default 5 state will be used to set the voltage. You can set values such as 900, mV value or values such as 65284 from the VBIOS table.
- Memory Clock (Mhz) - sets the memory clock frequency. All values are absolute.
- Mem State (Index) is a very advanced parameter. Change this if there are problems with undervolting. If everything works within specification, don't change this value. It is known that RX cards have 1 or 2 memory states (3 including 0 - an unoccupied state). By default, the highest state will be selected. But some rare cards are known to not be restored to the highest condition and must be chosen to be the lowest. For example, the highest value is 2, and for undervolting you need to set the state to 1. You should use this option with the Memory Clock setting.
- Fan (%) - to set the fan rotation speed. Keep in mind that miners like claymore will still control the fan speed. You must disable fan control in the miner configuration for this to work. We recommend leaving this field blank if you have enabled AutoFan. We will write more about AutoFan in our future articles.
- Aggressive undervolting - Selects the specified overclocking setting for each DPM state.
Click "Save" and you're done.
Make sure the client and mods you are using are the same version
A common cause of the error we are considering is different versions of the Minecraft client and mod installed on the PC. Either the user is using an outdated version of the client, or any mod installed on the Minecraft server is not updated.
We recommend updating your client and then each of your mods one by one.
After the update, the “Failed to synchronize registry data” error in Minecraft may disappear. If the error continues to appear, continue to the next section.
How to register on the hiveos.farm website, create an account and wallet?
Best Cryptocurrency Mining Pools 2021
To use OS Hive, you must go through the registration procedure and create an account protected by a password and, preferably, two-factor authentication.
To register Hive, you must enter name information, desired login, email address, select the desired time zone and create an account password.
After registration, a window will appear that displays the login, the status of the farms and the current balance in the user’s account (in this case one farm):
To ensure protection against hacking, it is advisable to install two-factor authentication through the “account” menu, where you need to move the corresponding slider to the right:
To create a worker (rig ID), click on the farm field in the main window of your account, after which a window will appear that allows you to:
- create workers - IDs and passwords for each rig;
- track work statistics;
- create wallets containing information about the addresses where the cryptocurrency mined will be transferred;
- create flight sheets that contain a mining configuration that can be used on any rig;
- create overclocking profiles for different algorithms and rigs;
- in the activity tab, track actions with your account;
- in the access tab, track authentication actions in the account of other users;
- use billing to process payments for your account (necessary when managing more than three rigs);
- configure your personal account.
If you forgot your hive os password, no problem, enter your email address and they will provide you with a recovery token and a link to change your password.
A more serious problem will be the loss of the two-factor authentication code; be sure to save the 2FA connection code on paper or electronic media.
To create a worker in the farm window, click the plus in the white square:
Select adding a worker from the drop-down list:
In the pop-up window, configure the new worker in accordance with the rig to which it will belong:
After this, a window with the rig ID, password and FARM_HASH data will appear in your account:
The rig ID and password for it need to be rewritten; they will be needed to activate it during the first boot.
To further work with the rig, it is necessary to create wallets that will save information about the addresses to which coins will be transferred during mining. To create them, click on the name of the farm (at the top left of the personal page https://the.hiveos.farm/farms) and select the wallets menu. On the page that opens, activate the add wallet button:
In the window that appears, select the name of the coin from the drop-down list, enter the corresponding address of your wallet and give it a name (in this case, Monero).
All created wallets can be monitored and, if necessary, edited in the wallet menu of each farm.
To configure mining for a specific pool, use the flight list menu (they act as BAT files in Windows), in which you select from the drop-down lists:
- mining algorithm (coin):
- the desired wallet (address where funds from mining will be transferred);
- a pool and the servers closest geographically (ping) are selected;
- miner program;
- the name of the selected configuration (flight sheet) is specified.
After setting up the configuration, click the create flight sheet button in the lower right part of the rig settings window.
SSD M.2 is visible in BIOS, but not recognized in the system
Let's start with the first one - the disk is not initialized. The Windows operating system (OS) is very easy to fix. Open the “Disk Management” snap-in. This can be done in various ways depending on the version of the operating system you are using.
1. Right-click (RMB) on the “Computer” icon, select the “Manage” line and go to the “Disk Management” section;
2. Press the combination Win + R, enter diskmgmt.msc there and click “Ok”;
3. For Window 10, diskmgmt.msc can be entered in the search bar;
4. And the easiest option for Windows 10 users is to right-click on the Start menu icon and select “Disk Management”.
In Windows 8 and higher, a window will immediately appear asking you to initialize the disk using MBR or GPT. In this window, simply click “OK”.
On Windows 7 you need to do this manually. We focus on the disk status “Not initialized”.
Right-click the disk number and select “Initialize disk.”
After initialization, the target disk will switch to the “Basic” status. Online".
We create a section on it. Right-click, select “Create a simple volume”, and in the wizard window that opens, select “Next”.
Set the partition size. If you want one partition for the entire disk space, then leave it as is.
We assign the desired letter under which the disk will appear in the system.
Select disk formatting options (in this case, leave everything as is).
We check that everything is correct and click “Finish”.
We get an initialized disk and partition, visible in the system and ready for use.
Adding your workers
Once you've finished setting up your account, it's time to connect your rigs to your control panel. GPU and ASIC rigs are called the same - workers. You will have two options for connecting your workers: through Farm Hash or through manual configuration. Farm Hash is used to connect your workers to the farm without first creating a rig in the control panel. This is our new and fast method of connecting a rig to a rig, so we recommend it for most users.
- Farm Hash
Each farm has its own unique hash (Farm Hash). To find it, go to your farm's Settings tab. Once you have burned the installation image, you can add yours to a file, which you can find in the root folder of the image. We'll talk about this in more detail a little later.
Farm Hash can be effectively used with Hive Flasher for mass installation of rigs. More details about Hive Flasher can be found here.
- Manual setting
For users who have previously used Hive OS, this ability to connect workers to the control panel will already be familiar. This includes using a rig ID and password for each miner that will be configured. Although this method is a little more tedious than connecting workers through Farm Hash, we left it for the convenience of “old school” users.
Click on the plus in the top right corner and select the Add Worker option.
The Add New Worker window will appear, it will contain the following fields:
- Select one of the options: GPU or ASIC.
- Name — the name of your rig. It could be anything. For example, rig01; garagerig_; and so on. You can also leave this field blank.
- Password - your miner's password. You can enter a password that is convenient for you, or generate one by clicking on the double arrow icon.
- Tags - customize tags to logically separate projects with filters for different farms and workers. Tags can be created by going to the Settings tab.
- Description - description of your rigs. This is purely for your convenience. For example: The rig at my parent's garage; Store room rig; Rig on Park St. 251, that I only use for mining Monero; and so on.
- Once you're done, click the Add button.
Now you will see your rig added to the list of workers, but first you will need your rig ID. Once you have pre-created your worker, you will be redirected to its panel. Go to the Settings tab and you will see the rig ID and password.
You will need your rig ID and password during the first installation and first launch, if you chose this option instead of Farm Hash. So we recommend writing them down.
How to update the kernel on Hive OS
The option for remote control of rigs through the Teleconsole service was integrated into the Hive infrastructure back in 2022. But the service often malfunctioned, so the team released its own ready-made solution, called Hive Shell. You can activate remote access through the menu interface by clicking Hive Shell Start. You will be able to manage the mining farm from any remote computer by clicking on a special clickable link that opens the worker’s terminal window. You can configure shared access or control via an SSH client. But don’t give the link to just anyone, otherwise the attacker will be able to reconfigure the rig to his wallet.
Hive developers periodically release updated versions of kernels. They added support for the latest models of video cards, processors and other components, as well as new releases of drivers and mining software, and bugs were fixed. You can install the latest release of the operating system using Hive Shell. Log in to the worker and give the command to activate the update (hive-replace -y –stable).
Once the process is complete, reboot and you can continue working. But if the updated Hive has more highly efficient miners for mining a particular coin, a new flight sheet should be created.
Popular Hive commands
Regular users are accustomed to controlling their computer through a graphical interface. But, if you decide to engage in crypto mining, you will have to learn how to work with the terminal and create executable files. If several years ago, developers were still trying to release miners with a graphical shell, now this idea has almost been forgotten. Well, if you decide to switch from the usual Windows to the highly efficient Hive OS, then you should know (or better yet, learn by heart) a set of control commands.
| Team | Description |
| miner | Displays the running miner |
| miner start (stop) | Used to start (finish) mining |
| miner config | Outputs the miner configuration to the terminal |
| sreboot | Reboot |
| sreboot shutdown | Immediate shutdown |
| dmesg | System messages and boot log |
| ifconfig | Available network interfaces |
| iwconfig | Connected wifi adapters |
| net-test | Diagnosing network problems |
| top -b -n 1 | Shows all running processes |
| wd status | Watchdog Status |
| timedatectl | Time and date synchronization |
| hello | Hello server |
Commands for AMD rigs:
| Team | Description |
| amd-info | Data about all connected AMD video cards |
| amdcovc | Core and memory frequencies |
| wolfamdctrl -i 0- -show-voltage | Graphics adapter voltage. The number 0 indicates the serial number |
| chmod +x ./amd_install.sh | Allows the AMD driver update process to start |
| ./amd_install.sh | Running an AMD driver update |
Commands for Nvidia:
| Team | Description |
| journalctl -p err | grep NVRM | List of video card errors |
| nvidia-driver-update 430 | Driver installation (number indicates version) |
| nvidia-driver-update --list | List of available drivers |
| nvtool--clocks | Core and memory frequencies |
| nvidia-driver-update | Driver update |
| nvidia-driver-update --remove | Uninstalling the driver |
Other commands:
| Team | Description |
| /hive/opt/opendev/watchdog-opendev reset | Resetting the watchdog |
| sreboot wakealarm 120 | Reboot the power supply |
| disk-expand -s | Extending the current section |
| hpkg list miners | List of installed miners |
| journalctl -u hivex- -no-pager | View server log |
| logs-on | Saving logs to disk |
| logs-off | Storing all logs in memory |
| selfupgrade --force | Forced system update |
| firstrun -f | Re-enter ID and password |
We recommend remembering the following key combinations
- Ctrl + C, cancel the running command.
- Ctrl + A, exit the screen (miner or agent) without stopping the process itself.
- Ctrl + A, Space or Ctrl + A, 1,2,3 switch between screens.
To manage the system, you can open a separate terminal and enter commands on the keyboard, as well as work remotely via the Hive Shell web console, or an IP address.
Overclocking AMD and NVIDIA video cards, main mistakes
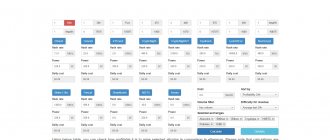
To overclock video cards in Hive OS, use the overclocking profile menu on the farm page (https://the.hiveos.farm/):
By clicking on the add OS profile button, many different profiles can be created to suit each coin.
To make it easier to find the profile that is most suitable for the mining algorithm for a particular coin, you can give it an appropriate name:
You can enter overclocking parameters by clicking on the pencil icon in the line of the selected profile. A window appears in which you can change the core and memory frequencies for each card, set the fan speed, and set a consumption limit:
For AMD video cards, a template is used that is more suitable for these types of cards:
Overclocking parameters are set in the same way as in Windows, but when setting the memory frequency of Nvidia cards, you need to set values twice as high as in Windows. When overclocking AMD cards, power consumption limits can be changed by selecting core state values.
For AMD video cards, you can also set the memory status index (1 – maximum savings, 2 – maximum efficiency). The main mistakes when overclocking a rig are setting the overclock too high or the core voltage too low (for AMD video cards). It must be taken into account that mining with different algorithms requires the use of individual overclocking settings, each of which can be set in its own overclocking settings configuration.
If you decide to mine with Hive OS amd cards, sometimes there are problems at startup and during the mining process. Most often they are associated with custom BIOS firmware of GPUs, undervolting and the presence of video cards of different models in the same assembly.
Sometimes, Hive OS errors during the mining process occur due to incorrect operation of farm components (motherboard, risers).
But in general, according to developer statistics, the number of reds and greens using the latest Hive OS update is approximately the same.
Are there any alternatives to the mining platform?
Miners note the following operating systems for receiving cryptocurrency:
- RaveOS is a tool for setting up, managing and monitoring ASICs and mining rigs.
- RavinOS is an operating system optimized for mining on most systems with a mobile application for managing and monitoring installations.
- Hashr8 is a cryptocurrency mining rig manager with support for a wide range of CPUs and GPUs. Works with 600+ pools and fifty miners.
- MinerBabe OS is a Chinese miner management system based on Ubuntu for mining a dozen cryptocurrencies, monitoring the process, and managing statistics. Allows you to remotely service installations.
- SimpleMiningOS is a modification of Linux code for mining on graphics accelerators. Compatible with all video cards, mines a dozen cryptocurrencies, automatically finds drivers. Allows you to overclock video cards and control their fans.
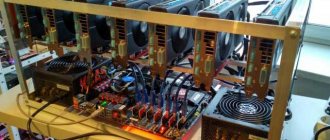
Features of mining on the hiveon.net pool
hiveon.net pool interface
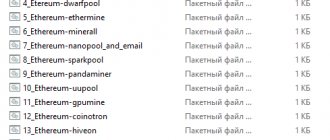
- We carry out all the preliminary steps: register on hiveos.farm, create a worker and interface it with the farm, create a wallet for the cryptocurrency we are interested in (we remind you that only Ethereum, Ethereum Classic and Monero can be mined on this pool), add the public address of the storage to your account.
- Go to the “Flight sheets” subsection, select a coin there (let it be Ethereum again) and a wallet.
- In the pool column, select the hiveon item. This name is already on the list. No addresses or links need to be manually typed. Here we select the server. There are 2 options available: Europe and North America. We are interested in the first one.
- Then we select a mining program (for example, let’s take ETH miner).
- Enter any name for the flight sheet and click on the create button.
- Go to the “Workers” subsection, check the box next to the created rig, click on the rocket at the top and select our flight sheet with the necessary conditions.
- Let's launch it.
- Expected income per day and week.
- Unpaid balance.
- The total number of coins that were paid out during the work on the pool.
- Hashrate indicators.
- Shares: Valid Shares, Stale Shares and Invalid Shares.
- Number of active and inactive workers.
- Graphs of changes in hashrate, shares and worker activity.
- To transfer coins to your wallet, your balance must be 0.1 ETH/ETC/XMR.
- Payments are made daily automatically.
- When making transactions, only the commission of the cryptocurrency network is paid. The pool itself does not charge an additional commission (at least not yet).
To summarize the hiveon.net pool, let’s highlight its pros and cons:
| Advantages | Flaws |
| You don't need to register to start mining. | For now, only 3 cryptocurrencies can be mined on the pool. |
| You can mine cryptocurrency from any operating system. | Some users complain that they have a large number of Stale Shares (late shares), which leads to account blocking. This is often due to a poor Internet connection, but there are complaints that this figure is growing even with a stable high-speed connection. |
| Availability of detailed statistics for each address. | |
| Good conditions for withdrawing coins: not a very high threshold, daily payments, no pool commission. | |
| Availability of Russian-language support service in Telegram chat. | |
| The ability to remotely configure mining from any gadget connected to the network. |
Video instructions for installing and configuring Hive OS:
Neither the system nor the BIOS sees the M.2 SSD
The second reason, quite large and voluminous, is incompatibility at the interface level.
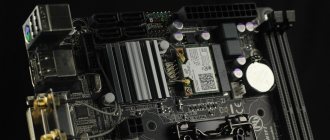
The capabilities of modern motherboards vary quite a lot, both between Intel and AMD in general, and between the different lines of each of them. For example, let's take the description of two random (almost) boards based on Intel Z370 and AMD B350 chipsets.
In the first case (Intel Z370), we see that the board has two M.2 connectors: the first of them is compatible with both NVMe and SATA drives, but the bottom one (in the list) is only with NVMe.
Because of this “selectivity,” it is not uncommon for a user to buy an M.2 SATA SSD, install it in a port, and the drive is nowhere to be found – neither in UEFI nor in the operating system.
The second case (AMD B350) is a little more interesting. In addition to what is described above, there is also a limitation at the level of the installed processor. So, if the system uses an Athlon A-series as a processor, then only SATA M.2 drives are supported, and an attempt to install an NVMe drive will end in a fiasco.
How to burn Hive OS 2.0 for mining to a flash drive
Promotional code for crediting 10 USD to your Hive OS balance: Altcoinlog
- Beta Image is the latest version, which may contain bugs;
- Stable Version - stable and reliable version.
- AMD Vega - intended only for Vega 56/64 rigs
You can download any distribution from the official website directly as an archive or via torrent. To record, you need to use a USB flash drive with a capacity of at least 8 gigabytes or an SSD disk.
The second option is preferable, the flash drive wears out quite quickly after Hive OS, and the removable disk works faster. You must unzip and burn Hive OS to a storage device.
Installing hive OS on a hard drive is possible, but the system can work perfectly straight from a flash drive or SSD drive, provided the device has a sufficient speed.
When creating an image on Windows OS, you will need the Etcher program, which can be downloaded from etcher.io/. It is a very user-friendly open source program that comes in versions for Windows 32/64, macOS and Linux. It provides guaranteed recording quality and no failures due to read errors in subsequent work. Instead, you can use HDD Raw Copy Tool, Win32 Disk Imager, Rufus or similar utilities.
In the Etcher image burning utility, select the system image unzipped after downloading, check the recording path and click the Flash button. It is necessary to understand that all information located on the USB flash drive will be destroyed.
Burning the image will take 10-15 minutes, the process of preparing the flash drive can be monitored in the program window:
After preparing the media, Etcher will check the integrity of the recording:
At the end of the check, the application will display a success message:
This flash drive can now be inserted into a free port of the assembled rig and run it. First, in the BIOS of the motherboard of this computer, you need to set the option to start from a USB flash drive. After turning on the rig, the system will automatically configure the equipment and prompt you to enter a user ID with a password.
To obtain this data, you need to register on the hiveos.farm website (get an account) and create a worker.
Install the latest version of Forge
If you already have the latest version of the client and mods installed on your computer, then the next step is to install the latest version of “Forge” - a special API that makes it easier to create and work with modifications. Update Forge to the latest version, and if the problem continues to appear, move on.
This may help: How to fix the "Could not create the Java Virtual Machine" error.
BIOS settings for motherboards running Hive OS
- Configure PCIe Link Speed on GEN2
- Disable Internal Graphics (unless you need it for your monitor)
- Enable Above 4G Decoding
- Turn off CSM Support
- Make sure the boot priority is set correctly - the storage device containing Hive should come first
- (Optional) Restore AC Power Loss (Power On)
For ASUS B250 Mining Expert, PCIe Link Speed must be configured in two different places
- Advanced\PCH Configuration\PCI Express Configuration -> PCIe Speed -> Gen 2
- Advanced\System Agent (SA) Configuration\PEG Port Configuration -> PCIEX16_1 Link Speed -> Gen 2
And a few more recommendations regarding the B250:
- Some users report better compatibility with Gen 1 instead of Gen 2 on larger rigs
- Some users report improved stability with an empty x16_1 slot
- An updated bios can help solve many problems with the board
How to do this, read the article on setting up the motherboard BIOS for mining.
Content
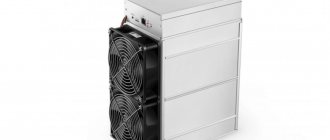
SSD M.2 - compact, fast and affordable drives. And now you have connected a brand new solid state drive, but the computer does not recognize it. Let's figure out why the computer doesn't see the M.2 SSD and how to connect the drive correctly.
The average user is often unaware of the features of M.2 and the platforms designed for them. With the 2.5” SATA SSD, everything was quite simple: the interface imposed certain (albeit rudimentary) restrictions, and all the user needed was to connect two cables and initialize the disk in the system. With M.2 drives, things are a little different.
First, a short excursion: M.2 determines the form factor (2242, 2260, 2280, 22110) and the use of a specific blade connector for connection. But the internal connection interface used is different, and this must be kept in mind. There are only two interfaces: SATA (our favorite, forever alive) and NVMe, also known as NVM Express, uses PCI-e lines.
Before installing the drive into the motherboard, inspect its physical condition. If everything is fine, you can safely install and check its functionality.