AMD Memory Tweak Tool for Linux and Windows is an exciting new tool to change the video memory timing of AMD GPUs, so you no longer have to change and update the GPU BIOS. The AMD Memory Tweak supports GDDR5 and AMD HBM/HBM2 memory-enabled GPUs and should help improve hash rates in memory-intensive algorithms such as Ethash, for example. The AMD Memory Tweak tool is similar to ETHlargementPill for Nvidia GDDR5X based GPUs in its concept and functionality. The software is open source and completely free to use.
OhGodAnETHlargementPill – Mining tablet for Nvidia GTX 1080 and GTX 1080 Ti
What is AMD Memory Tweak?
AMD Memory Tweak is a new open source tool introduced by Eliovp and A. Solodovnikov. This is a tool that allows you to change graphics card memory timings on the fly like ETHlargementPill, but for AMD. This tool is also Vega compatible. Works only from the command line.
AMDMemoryTweakXL - this version has a graphical shell. Works similarly to overclocking software for your typical graphics card, such as MSI Afterburner, EVGA Precision XOC, or Asus GPU Tweak II. However, Eliovp and Solodovnikov's program primarily focuses on the memory aspect, so it has more advanced features, one of which is the ability to adjust memory timings on the fly.
System requirements
- OS: Windows 10/Windows 8/Windows 7/Windows Vista/XP and Linux.
- Driver: at least Radeon Software Adrenalin 19.4.1 (and AMDGPU-Pro for Linux).
- Driver: at least Radeon Software Adrenalin 19.4.1 (and AMDGPU-Pro for Linux).
Supported video cards
The authors haven't provided a compatibility list, but the program should work with a wide range of AMD Radeon graphics cards, ranging from older models with GDDR5 memory to the latest offerings with HBM (High Bandwidth Memory) and HBM2 memory.
Overclocking AMD Radeon Vega 56
At standard settings, any graphics accelerator is unprofitable for mining. The video card needs to be overclocked in mining, otherwise it will waste electricity.
Using MSI Afterburner, you can quickly overclock your video card. The optimal values are selected individually for each video card. For this video card, the optimal kernel settings will be:
- Core Clock +100
- Memory Clock +600
- Power Limit 80
The hash rate increases and the video card becomes profitable. For rx 56 vega overclocking settings, you can also use the WattTool .
How to use AMD Memory Tweak?
Step 2 - Run AMD Memory Tweak
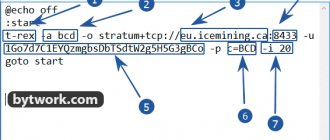
To work with the utility, you need to study the timings of the existing video memory and create a file with the .bat extension with their optimal values for mining.
To find out the current timing values, enter the command in the body file:
WinAMDTweak.exe –current pause
Video memory performance increases as latency decreases. We need to reduce the timing values and apply them using this software. Keep in mind that video memory from different manufacturers (Samsung, Hynix, Micron, Elpida) have individual characteristics for overclocking timings (slings).
Step 3 - Set up timings
For a Vega 56 video card with Hynix video memory, the timings will be as follows:
WinAMDTweak.exe -RAS 24 -RCDRD 19 -RCDWR 4 -RC 35 -RP 13 -RRDS 4 -RRDL 5 -RFC 148 -REF 15600
The launch is carried out using the .bat file you created.
Since timings are applied on the fly, if you reboot you will have to run the command again. To avoid having to do it every time, set up auto-loading of the batch file.
To autorun, place a shortcut to your .bat file in Windows startup. The startup folder in the Windows 10 operating system is located at the following path: C:UsersYour usernameAppDataRoamingMicrosoftWindowsMain menuProgramsStartup
Example for Samsung video memory:
WinAMDTweak.exe -ras 26 -rcdrd 13 -rcdwr 12 -rc 38 -rp 12 -rrds 3 -rrdl 5 -rtp 6 -faw 12 - cwl 8 -wtrs 4 -wtrl 9 -wr 13 -ref 24000 -rfc 239
Attention!
PhoenixMiner and NBMiner miners already have ready-made and built-in timing settings. Read about setting up NBMiner and PhoenixMiner.
What to mine, profitable algorithm
How productive is Ether mining on Vega 56? AMD GPUs are traditionally focused on mining coins using the Ethash algorithm. The hashing speed of a vega 56 video card in Ethereum mining depends on the overclocking potential of a particular model.
On the Ezil.me and Rustpool.xyz you can set up Merged mining of the ETH+ZIL . Merged mining differs from traditional dual mining, which was previously widely practiced on red maps when mining Ethereum. You mine ETH by connecting through one of the specified services to another pool (for example, Ethermine ), and at the same time, the system periodically switches you to the ZIL mining round (every 1.5 hours). Once the round is completed, you will be returned back to ETH mining. Essentially, each merged mining implementation has a subchain and a parent blockchain. A prerequisite for collaboration is the use of the same hashing algorithm. Money is also paid in two coins. As a result, you will receive an additional 10-12% profit.
According to information from mining forums, to increase productivity, vega rx56 cards are loaded with BIOS from the flagship vega rx 64 model . But each owner does this at his own peril and risk, and no one guarantees the success of such experiments.
Cards of this line have a high hashrate based on the Cryptonight algorithm . Before Monero switched to the RandomX algorithm, mining this altcoin was profitable, but this is already in the past. As of June 22, 2020, the first place in mining profitability for vega 56 is the HavenProtocol (XHV) using the CryptoNightHaven algorithm. Conceal brings in slightly less income . Forks of the cryptonite algorithm do not heat graphics adapters to too high temperatures, so it is recommended to switch the rig to mining these tokens during the hot season. Moreover, they occupy the top lines of the rating in online services for calculating mining profitability.
AMD Vega series video cards also performed well when working with the new MimbleWimble POW protocol. Altcoins MWC-CT31 (Cuckatoo31 algorithm) and Grin-CT32 (Cuckatoo32 algorithm) are almost as profitable as the digital coins kryptonite and Ethash.
To assess the market situation as quickly as possible, experts use a mining calculator. Of course, the results they produce are very approximate. The actual hashrate and income may differ by 10-15%, both positive and negative, but it’s still worth paying attention to the data from these sites.
Mining calculators:
- Wattomine.
- Coincalculator.
Most users use the simple Nicehash service, where after installation and a little configuration, the smart program itself finds a profitable algorithm. It is recommended to visit the service https://minerstat.com, here you will find hashrate indicators and a list of profitable crypto coins for most models of video cards and ASICs.
Hashrate on different algorithms
Hashrate figures may vary depending on the video card manufacturer, overclocking settings, operating system and mining software installed on a particular PC. New profitable projects periodically appear on the blockchain platform.
AMD Radeon Vega 56 hashrate table:
| Mining algorithm | Production speed | Core Clock | Memory Clock | Power Limit | Energy consumption |
| Ethash: (Etherum, Ethereum Classic Ubiq, Expanse, Pirl, Ellaism, Metaverse, Callisto) | 36.5 Mh/s | 100 | 600 | 80 | 210W |
| CryptoNightSaber: (BitTube) | 1380 H/s | 100 | 600 | 80 | 200W |
| CryptoNightHeavy: (Haven) | 1380 H/s | 100 | 600 | 80 | 200W |
| ProgPow: (Bitcoin Interest, | 15.5 Mh/s | 100 | 600 | 80 | 250W |
| Zhash: (Bitcoin Gold, Anon, BitcoinZ) | 34 Sol/s | 100 | 600 | 80 | 230W |
| CryptoNightConceal: (Conceal) | 3600 H/s | 100 | 600 | 80 | 250W |
| NeoScrypt: (Halcyon, Dinero, Vivo) | 1600 kh/s | 100 | 600 | 80 | 230W |
| X16R: (Ravencoin, Gravium, HelpTheHomeless, Motion, Nicehash-X16R) | 11 Mh/s | 100 | 600 | 80 | 180W |
| KawPow: (Ravencoin) | 15.5 Mh/s | 100 | 600 | 80 | 250W |
| Cuckatoo31: (MWC-CT31) | 1.2 H/s | 100 | 600 | 80 | 230W |
The owner of an rx vega 56 mining farm must constantly monitor the market in search of the most profitable developments. Unless, of course, he wants to quickly recoup his investment.
AMD Memory Tweak XL
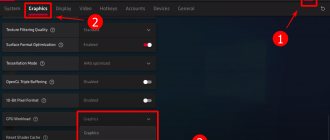
As already mentioned, the XL version, unlike the regular one (CLI), has a graphical interface (GUI):
It allows you to make settings directly in the program window:
It is better to run the software as an administrator.
For Polaris family GPUs you need to add the following parameter:
Setting up amd mem tweak using the example of RX Vega 56
Memory only Samsung!!! Vega 64 (sewn from 56).
Team:
WinAMDTweak.exe -CL 16 -RAS 30 -RCDRD 14 -RCDWR 14 -RC 43 -RP 14s -RRDS 3 -RRDL 5 -RTP 5 -FAW 19 -CWL 7 -WTRS 4 -WTRL 9 -WR 16 -WRRD 1 -RDWR 19 —REF 19500 —MRD 8 —MOD 15 —PD 8 —CKSRE 10 —CKSRX 10 —RFC 236 pause WinAMDTweak.exe —CL 19 —RAS 28 —RCDRD 12 —RCDWR 5 —RC 44 —RP 12 —RRDS 3 —RRDL 3 —RFC 248 —REF 15600 pause
Automatic launch of amdmemorytweak with loading of timings
Automatic launch of amdmemorytweak with loading of timings in Windows is carried out by the following batch file:
Adding the REF 30 parameter gives an increase of up to 5% when mining ether on AMD video cards with GDDR5 memory. In the Claymore Dual miner program, this option is implemented with the -rxboost 1 command. With the help of amdmemorytweak, this option becomes available in any miner, which is useful when mining not only ether, but also Monero, Beam, Green and other coins.
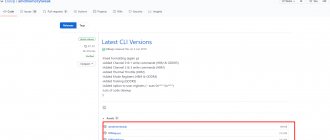
The folder from where this batch file is launched should contain the files EIO.dll, IOMap.sys, IOMap64.sys and WinAMDTweak.exe:
These files can be downloaded from Github (Latest CLI Versions). The EIO.dll file is there at the link.
To change video card memory parameters in the windowed interface, you can use the AMDMemoryTweakXL program.
The console version of amdmemorytweak works more reliably and does not require installation of Microsoft NetFramework. In addition, its autorun can be easily done using a regular body file.
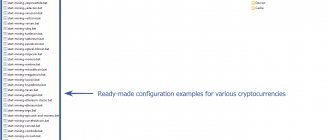
Timings for various video cards
Vega 56 Samsung
WinAMDTweak.exe -i 1 -cl 16 -ras 27 -rcdrd 12 -rcdwr 7 -rfc 180 -pd 5 -cksre 7 -cksrx 7 -mrd 7 -mod 11 -ref 2700 -rdwr 16 -wr 12 -cwl 5 -wtrs 2 —wtrl 6 —rrds 3 —rrdl 4 —rtp 4 —i 1 — card number
Vega 64
WinAMDTweak.exe -i 0,1,2,3,4,5,6,7 -CL 22 -RAS 35 -RCDRD 16 -RCDWR 12 -RCAB 44 -RCPB 44 -RPAB 14 -RPPB 14 -RRDS 3 -RRDL 5 —RTP 5 —FAW 20 —CWL 7 —WTRS 4 —WTRL 9 —WR 16 —RREFD 8 —RDRDDD 3 —RDRDSD 2 —RDRDSC 1 —RDRDSCL 3 —WRWRDD 3 —WRWRSD 2 —WRWRSC 1 —WRWRSCL 3 —WRRD 1 —RDWR 19 —REF 17550 —MRD 8 —MOD 15 —XS 270 —XSMRS 8 —PD 8 —CKSRE 10 —CKSRX 10 —RFCPB 160 —STAG 7 —XP 8 —CPDED 2 —CKE 8 —RDDATA 19 —WRLAT 5 —RDLAT 14 — WRDATA 1 —CKESTAG 2 —RFC 247 —TIMING 0 —ZERORPM False —TDPLIMIT 0 —MAXTEMP 85 pause
This will set all settings on all 8 Vega 64 cards (just change the -i option in the above script to include the number of cards you have) - with one exception, it does not set the core clock speed, core voltage, memory frequency, and memory voltage.
RX 5700
This tool does not work for RX 5700. The developer of this tool opened his own production of 5700-based rigs with his own operating system.
I and GDDR6 video memory
On GDDR6, the -REF 30 parameter is written into the timings when editing the BIOS. It is important to set from 9000 to 16000. Changing timings on the fly for GDDR6 is blocked.
In any case, I will work exactly the same as Vega 56/64. Memory bandwidth is the same. GDDR6 will perform slightly better due to tighter timings compared to HBM. The main result will be energy savings compared to Vega.
Note!
RBE has fully decoded GDDR6 timings. More than 100 different timings in the line. Stability of 60+ MH should be easily achievable.
RX 470/480/570/570X/580/580X/590
For these video cards, use PhoenixMiner timings.
Because with Polaris cards you can use a bios mod or a miner that itself changes the timings.
Teams
Available options for GDDR5 memory:
—CKSRE|—cksre [value] —CKSRX|—cksrx [value] —CKE_PULSE|—cke_pulse [value] —CKE|—cke [value] —SEQ_IDLE|—seq_idle [value] —CL|—cl [value] —W2R |—w2r [value] —R2R|—r2r [value] —CCDL|—ccdl [value] —R2W|—r2w [value] —NOPR|—nopr [value] —NOPW|—nopw [value] —RCDW|— rcdw [value] —RCDWA|—rcdwa [value] —RCDR|—rcdr [value] —RCDRA|—rcdra [value] —RRD|—rrd [value] —RC|—rc [value] —RFC|—rfc [ value] —TRP|—trp [value] —RP_WRA|—rp_wra [value] —RP_RDA|—rp_rda [value] —WDATATR|—wdatatr [value] —T32AW|—t32aw [value] —CRCWL|—crcwl [value] —CRCRL|—crcrl [value] —FAW|—faw [value] —PA2WDATA|—pa2wdata [value] —PA2RDATA|—pa2rdata [value] —RAS|—ras [value] —ACTRD|—actrd [value] —ACTWR |—actwr [value] —RASMACTRD|—rasmactrd [value] —RASMACWTR|—rasmacwtr [value] —RAS2RAS|—ras2ras [value] —RP|—rp [value] —WRPLUSRP|—wrplusrp [value] —BUS_TURN|— bus_turn [value] —REF|—ref [value]
Hive RXboost
The amdmemtweak utility is included in the Hive OS distribution. With the Hive update to v0.6-45, a new option appears in the AMD OC settings. This parameter allows you to apply the so-called rxboost, a tweak that became famous after the release of version 14 of Claymore's Dual ETH Miner, to RX 4xx / 5xx series cards. In other words, this is the same as running amdmemtweak with the -REF option.
If the field is empty (default value), then the option is not applied. To apply a value to all cards, enter one value. If you need to apply for different cards and specify individual values, then enter the values separated by spaces. Here's a short video on how to use this feature:
On July 27, 2022, beta release 1.0 of the AMD Memory Tweak XL program was released. Eliovvp, its Belgian developer, is known among miners for its high-quality mining applications, among which the most popular is amdmemorytweak.
The new GUI program has added the ability to create your own timing database, which makes it much easier to use.
REF 30
Using the -REF parameter, you can achieve gains of up to 5% on algorithms that depend on memory performance. A good place to start for the REF parameter is 30. The command line would look like this:
The -RC and -RFC parameters may also be of interest.
Vega 56 hynix which runs poorly. Part 1. Beginning.
RRDL may not allow you to adjust some timings lower, set it to 3 to be sure, otherwise errors and freezes are possible. This is timing for an increase and not a decrease like the others. I also got 48 Mh/s from unsuccessful HiNixes.
Vega 56 hynix which runs poorly. Part 2. Continued.
If you don’t cut the core so much, but leave it at least at 1150-1200, then with the right timings this can give you another +2 megahash. Consumption will not increase very much. 49 megahash on Hynix is not such a miracle.
What commands can be used in the amdmemorytweak utility?
The following commands can be used in amdmemorytweak:
—gpu|—i [gpu numbers separated by commas] – select the involved video cards;
—current – shows current timings;
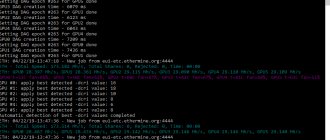
--help – displays a list of available commands. In this case, you need to use a batch file of this type:
Screenshot of a batch file for displaying help in amdmemorytweak:
In the batch file, to optimize timings, you can change the following values for video cards with GDDR5 memory (RX series):
—CL|—cl [value] – latency (CAS to data return latency), reduce with caution;
—W2R|—w2r [value] — Write to read turn;
—R2R|—r2r [value] — Read to read time;
—CCLD|—ccld [value] – number of cycles between writing/reading from bank A to bank B;
—R2W|—r2w [value] — Read to write turn;
—NOPR|—nopr [value] — Extra cycle(s) between successive read bursts;
—NOPW|—nopw [value] — Extra cycle(s) between successive write bursts;
—RCDW|—rcdw [value] – number of cycles from active to write;
—RCDWA|—rcdwa [value] – number of cycles from active to write with auto-precharge;
—RCDR|—rcdr [value] – number of cycles from active to read;
—RCDRA|—rcdra [value] – number of cycles from active to read with auto-precharge
—RRD|—rrd [value] – number of cycles from active bank a to active bank b;
—RC|—rc [value] – number of cycles from active to active/auto refresh;
—RFC|—rfc [value] – auto-update period;
—TRP|—trp [value] — Precharge command period;
—RP_WRA|—rp_wra [value] — from write with auto-precharge to active;
—RP_RDA|—rp_rda [value] — from write with auto-precharge to active;
For HBM2 memory:
Example command line for using the HBM2 memory overclocking utility:
./amdmemtool -i 0,3,5 —faw 12 —RFC 208
An example of using the utility for overclocking GDDR5 memory:
./amdmemtool -i 1,2,4 —RFC 43 —ras2ras 176
Before running the utility for optimizing video cards with GDDR5 memory for the first time, you need to run the miner program to fully load the video card and put it in maximum performance state, and then run the amdmemorytweak batch file with the --current parameter to find out the limit values of the video memory timings. Video cards with HBM2 memory do not require this procedure.
conclusions
Most settings are in real time. However, some of the more demanding memory timings may require a system reboot to apply correctly.
Essentially, a modified BIOS will simply hard-code memory timing, frequency, and voltage. But you can also apply them on the fly using OC and amdmemtweak.
So the video cards still have the stock BIOS version in case of resale.
If you mine on video cards, it is recommended to use PhoenixMiner.
Running the amdmemorytweak utility to increase the hashrate of video cards
This result was achieved in the teamredminer 0.4.3 program with a core frequency of 1150 Mhz and memory of 1100 Mhz. Drivers version 18.6.1 were installed in the system according to the method outlined in the article “Correct installation of GPU drivers for mining.”
When mining ether on Vega 64, a speed of 50-52 mh/s is achieved at a core frequency of 1100 MHz. In this case, a body file of this type is used:
Launching amdmemorytweak to increase the hashrate of video cards with GDDR5 memory is done using commands in a batch file (BAT or CMD file) of this type (for the first three cards):
When using already flashed GDDR5 video cards with overclocking and downvolting in the Phoenix Miner program itself (-cclock 1070 -cvddc 820 -mclock 2010,1950,2010 -mvddc 860), it was not possible to achieve a significant performance increase. The hashrate of the RX470 with these settings is 29.2-29.6 Mh/s, and playing with the timings led to the system freezing. It might be worth trying to change GDDR5 timings on non-flashed cards.
AMD Mem Tweak XL - what many have been waiting for)
- #2
This Beta from March 22, 2019...everything is clear, the program is “dead”.
- #3
This Beta from March 22, 2019...everything is clear, the program is “dead”.
from which “March 22, 2022”? What are you about? the program “came out” an hour ago!
- New bitmap.jpg
25.3 KB · Views: 149
- #4
nothing is clear, but very interesting). I'm waiting for the manual).
- #6
nothing is clear, but very interesting). I'm waiting for the manual).
I don’t have the opportunity to try it yet, but judging by the photo it’s nothing complicated - under the line where you need to insert the strap, there are two buttons Encode and Decode. But initially, the rig needs to be switched to Test Mode
- #7
switch to Test Mode - yes, reboot - yes! I launch again and asks for a fashion test
- #8
I loaded Windows into the mod test, the program window is just white and that’s it. unclear)
- #9
switch to Test Mode - yes, reboot - yes! I launch again and asks for a fashion test
I loaded Windows into the mod test, the program window is just white and that’s it. unclear)
hmm.. strange.. we'll wait then, maybe someone else will write back..
I can try it myself only next week(
- #10
Explain, did I understand correctly that now you can Run the latest Glue, pull out the straps and sew them into the Bios or add them to the body file for Phoenix?
- #11
But before, you couldn’t write straps yourself?
- #12
But before, you couldn’t write straps yourself?
It seems impossible on Vega.
- #13
Explain, did I understand correctly that now you can Run the latest Glue, pull out the straps and sew them into the Bios or add them to the body file for Phoenix?
Yes exactly
But before, you couldn’t write straps yourself?
how?!
- #14
like this))) I wrote for the rx550))) already a year ago))) I posted it here in the profile topic)
there is software for assembling and disassembling straps) you just need to google it) ...
- #15
Can you give me a figure of how many coins (bitochka) will be heavier in your pocket?
- #16
I already have Vega 56s that dig 52 MGH, what more?
- #17
you just have to google it).
where is it?
- #18
I already have Vega 56s that dig 52 MGH, what more?
Share your straps, or what?
- #19
google, what is google
- #20
like this))) I wrote for the rx550))) already a year ago))) I posted it here in the profile topic)
there is software for assembling and disassembling straps) you just need to google it) ...
What you wrote is all nonsense! because what you wrote was not even close to the tREF parameter, which now, at least on the RX series, gives a huge increase!!! I also “wrote”, but I’ll repeat it again - THIS IS NONSENSE, and until today, no matter how many forums I climbed, how many people I communicated with, no one knows how to write down new parameters in the strap! I am 99.9% sure that you also do not know and do not write parameters like tREF into the strap!
Cooling system testing and overclocking
The cooling system was tested using the Time Spy stability test from the Futuremark 3DMark package. The room temperature was in the range of 24-26 °C, the side cover of the case was closed.
With full factory settings, the video card hit the power limit programmed into the BIOS. By the end of the test, the GPU frequency was at 1337 MHz, and the maximum voltage reached 1.0875 V. The HBM2 memory frequency was at around 800 MHz (1600 MHz effective), which corresponds to the passport values.
The GPU temperature did not exceed 75°C, the memory warmed up a little more - up to 77°C. The cooling system coped surprisingly well - initially the speed rose slightly above average, then settled at 2100 rpm. The cooling system delivers 165-180 Watts both quietly and efficiently.
The next stage was to simulate the maximum gaming load. To do this, we used the Firestrike Ultra test with manual settings to leave only the graphics tests - Demo, GT1 and GT2.
And here the situation has changed somewhat - in the first graphics test (GT1), the GPU frequency dropped to 1270 MHz due to a lack of consumption limit. As can be seen from the graph, the GPU consumption was at the level of 170 W.
Voltage surges reached 1.15 V, but most of the time did not exceed 1.02 V. Due to the short duration of the test, the temperature of the graphics processor barely exceeded 70 ° C, but from the graph it becomes clear that the main emphasis was on the performance of the cooling system - heat transfer from the crystal is excellent.
The HBM2 memory temperature rose slightly higher than that of the GPU. But the difference does not exceed 5°C. This is due to the fact that the GPU and memory are located on the same substrate. The rotation of the cooling system fan did not exceed 2400 rpm.
At factory settings, the video card showed the following results in the 3DMark application suite:
Using Wattman, built into the RadeonSoftware Crimson control panel, we began some primitive overclocking - increasing the memory frequency and power limit to the limit. The only thing is that increasing the core frequency did not give anything, because... It all came down to consumption restrictions.
The performance gain is impressive, but it becomes clear that the voltage is clearly excessive for such frequencies
To do this, we reduce the operating voltage for states P6 and P7:
The memory frequency for our sample had to be reduced by 10 MHz relative to the previous experiment, and it reached 940 MHz (1880 MHz effective).
Repeated testing in Firestrike Ultra graphics applications showed an improvement in the frequency performance of our sample - the frequency remained above 1520 MHz throughout the test. With manual fan speed adjustment, the temperature did not exceed 70°C.
The average GPU voltage was around 1 V, and despite such a small value, peak consumption reached 250 W.
The temperature of the HBM2 memory slightly exceeded 70°C, but some confusion arose with the fan speed when manually adjusting it - if during the Demo the speed did not reach 3000, then in the two subsequent tests, even at a lower temperature, the speed rose to 3500 and the noise became loud.
But the performance at this setting cannot fail to impress - the results were higher than with normal overclocking.
To compare performance, we used the MSI GeForce GTX 1080 GAMING X+ 8G .
The non-reference version of the GeForce GTX 1080 was overclocked to 2100 MHz on the graphics core, and the memory frequency was increased from 11000 MHz to 12000 MHz.
The results in 3DMark turned out to be quite high compared to the reference model:
If we compare the results of the overclocked MSI GeForce GTX 1080 GAMING X+ 8G with undervolting on the AMD Radeon RX Vega 56 , the results turn out to be somewhat prosaic:
The GeForce GTX 1080 the biggest lead over the heroine of our review in the Time Spy test - the NVIDIA video card was 21% ahead. But in the Firestrike tests, the advantage is already less pronounced - from 8 to 12%. And here comes the key issue - the consumption of video cards. To do this, in Firestrike Ultra Demo we measured the consumption from the power supply output of the entire system.
The average difference in consumption is 45-50 W. Considering that with the same consumption, some copies of AMD Radeon RX Vega 56 can operate at a frequency of about 1600 MHz - quite a decent result, clearly not what we expected after numerous reviews.