- Popular Hive commands
Mining on Windows is inconvenient, unstable and very often difficult for a beginner. Therefore, mining systems such as HiveOS help you easily launch a farm and get the most convenient interface for control and monitoring.
How to burn HIVE OS 2 0 for mining to a flash drive
Setting up a miner on HIVE OS begins with visiting the official website of the developer. First you need to download the HIVE OS image to your computer. To do this, visit the official website of the operating system, select the GPU section in the “INSTALL” tab and download the ZIP file.
For recording we use the Balena Etcher program. This is a free program that can be downloaded from the official Etcher website. After downloading, install the program on your PC or laptop. Then we perform step-by-step actions:
- Insert the flash drive into the computer connector.
- Launching the Balena Etcher program
- Click “Flash from file” and select the file that we previously downloaded.
- Next, click “Select target” to select the device to record the image. In our case, select the flash drive and click “OK”.
- Click “Flash”, after which the recording of the Hive OS image to the USB flash drive will begin.
Next, we need to connect the system recorded on the flash drive to the Hive personal online account. More about this in the following paragraphs.
Hive OS, installation, configuration
Starting mining on Hive OS is several times faster and more convenient than on Windows, since there is no need to download and update drivers for devices, various programs for mining cryptocurrency, overclocking video cards and monitoring the system, as well as fiddling around with alternately connecting the GPU in motherboard in some cases. Hive OS has all the necessary software and you don’t need to connect cards one by one!
Burning a Hive OS image to a USB flash drive
We will write the system to a flash drive with a capacity of at least 8 gigabytes (I have a 32 GB sample).
Go to the official website hiveos.farm, click the blue button on the right “Download Hive OS” and select “Check other files” from the drop-down list.
In the table that appears, the first two lines are a program for Windows with which we will write the system to a flash drive.
Download two files: HDDRawCopy1.10Portable.exe (we download the portable version so as not to install it on your computer) and hive-0.5-12-20171211.zip 1.91 GB in size.
If the speed of your Internet connection leaves much to be desired, then download the file hive-0.5-12-20171211.zip.torrent via torrent.
After downloading all the files, you should unpack the archive with the system image, for example, to your desktop.
Insert the USB flash drive into a Windows computer and run HDDRawCopy. In the window that opens, select the last item from the bottom “Double-click to open file” and indicate the path to our unpacked Hive OS image, click “Continue”.
In the next program window, select the disk on which the system will be recorded, in our case this is the second USB item. You may have more drives in this dialog box because it displays all the storage devices available on the system. Click “Continue”.
In the window that appears, click the “Start” button and agree to the message about formatting the flash drive in the pop-up window by clicking “Yes”.
We wait until the files are copied to the USB drive. The green status bar will fill and the message “Task complete” will appear in the window, which means “Task completed”.
This completes the process of unpacking the Hive OS system onto a USB flash drive. We remove the media and insert it into the USB port on the motherboard of the rig (farm), which should already be fully assembled - all video cards are connected.
After turning on the computer, all you have to do is wait until the system finishes the automatic setup and asks you to enter the ID of our rig with its password.
For clarity, I use a monitor, which must be connected to a video card inserted into the main PCI express 16 slot (directly or through a riser). You can also monitor the process of starting the system via SSH, but I will talk about this in the next article.
Registration on hiveos.farm, creation of rig and wallet
While the system configuration is being configured, don’t waste precious time, go to the hiveos.farm website and register.
After logging into the control panel, the system will notify you that you need to create your first rig. Click on the “Here” link.
Read also: Static IP address for installing HiveOS In the window that appears, enter: rig name, description and password. Leave the rest of the fields as they are for now and click “Add”.
That's it, our rig is ready, but not yet active. Remember his ID and password, as they will come in handy later.
If you hover your mouse over the password hidden by the asterisks, it will appear!
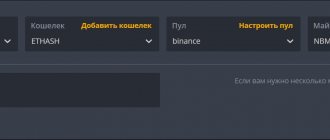
Now let's create a Wallet. In Hive OS, a wallet is not just the wallet address of your coin, it is a config file that specifies miner settings for connecting to pools. Something similar to bat files in Windows, only more functional.
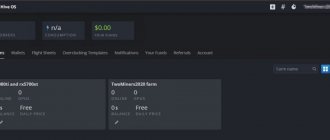
In the upper right corner there is a menu: Reload / Monitor / Stats / Rigs / Wallets.
Let's go to Wallets. By default, the system provides us with several templates with already specified settings.
A detailed article on working with wallets in Hive OS will be here.
Let’s say we need to mine Ethereum, then select the “Etherium 2miners.com” wallet.
The window that opens has several fields:
- Name - name.
- %EWAL% is a field for inserting your address of any coin on the Ethash algorithm.
- %ZWAL% is a field for coin wallets based on the Equihash algorithm.
- %DWAL% - wallets of other algorithms.
Next are tabs with the names of miner programs. There are several of them here - I talked about this in The main advantages of Hive OS. Select the desired miner; for Ethereum, Claymore Dual is activated by default.
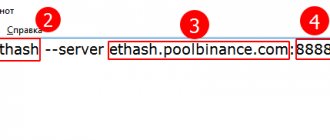
epools.txt template - this field contains settings for the pool. For 2Miners.com the settings look like this: POOL: eth.2miners.com:2020, WALLET: %EWAL%, WORKER: %WORKER_NAME%, PSW: x.
There is nothing complicated here, the values taken from the pool are substituted into the string, these are the address and port. We filled out “%Wallet%” above by inserting our Ethereum wallet address into the field, %WORKER_NAME% is the name of our rig that was assigned to it during creation, in our case rig001. The password “x” is also taken from the pool (you can change it to any one, it doesn’t matter). Click “Ok” to save the settings.
Activating the rig and starting mining
After setting up your wallet, go to the “Rigs” tab in the top menu. Click on its name to open the personal rig control panel. In the “Miner” tab, select Claymore Dual (AMD, Nvidia), select the previously edited “Etherium 2miners.com” wallet from the drop-down list on the right and click on the rocket to apply the settings.
We return to our farm where we have already completed our setup of Hive OS. The Hive logo should appear on the screen and ask for the rig ID. We enter it, then the system will ask for a password, enter it and press “Enter”.
If everything is entered correctly, the system will make a couple of settings and the following message will appear - “Happy mining”.
This means that installation and configuration are complete. The mining process has been launched in accordance with our pre-selected parameters (Claymore+Etherium).
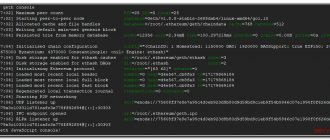
To check the mining process, on the farm, enter after [email protected] :~# (the cursor will blink there) the miner command and press “Enter” - The miner will open.
At this point, you can disconnect the monitor and keyboard from the farm. If you reboot, the system will autostart every time, but you won’t have to enter anything else. Mining will start automatically according to the last settings saved in the Config file.
Read also: Hive OS Quick Installation Guide
Now all system administration can be done through the web interface. To update the data, click the Reload button in the top menu.
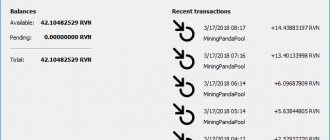
In the Monitor tab you can watch the operation of the system in real time. It displays the number of GPUs, the total hashrate and algorithm, the hashrate for each video card, stability on the timeline, the temperature of the video cards, the wallet used, and the miner program.
The Stats menu tab displays farm operation statistics.
Video card overclocking settings in Hive OS, rig management
As for overclocking video cards and setting fan speeds, this is described in detail here. To go to the overclocking menu, you need to click on the name of the required rig, after which its administration panel will open, with which we are already familiar. Since I have Nvidia cards and no AMD, the “Nvidia OC” button will be active.
When you click on it, a window will open where you can specify an increase in the frequency of the video chip, an increase in memory (for Nvidia cards you need to enter memory parameters multiplied by 2. If in Windows you add 300, then you need to enter 600 here. This is a feature of video drivers on Linux ), fan rotation speed as a percentage and Power Limit (enter the absolute value in watts.)
Riga operation management
Right there, on the administration panel of the selected rig, you can restart, stop, request a log or config of the active miner program, and view information about the wallet used.
Log - is a snapshot of the miner’s working screen. When you click on the “Log” link, a command is sent to the Hive OS server, and from it to your rig, after which the requested data is returned from the rig to the server and to your web interface.
Config - will display the miner program settings that we entered in the wallet.
To completely shut down or reboot the farm, you must use the “Reboot” and “Shutdown” buttons next to which system information and technical characteristics of the computer on which the system is running are displayed (online-offline status, miner status, operating time, name of the motherboard and IP adress) .
Linux Shell Execute - designed for entering Shell commands. By default, the system has several commands for requesting information about the operation of video cards.
Connection using Shellinabox, VNC
To gain access to the rig, there are tools such as Shellinabox and VNC. They will work if the computer from which the connection is made is on the same network as the farm. The first tool does not have a GUI and all commands will need to be entered manually. The second tool is somewhat similar to TeamViewer and provides a graphical interface.
To connect you will need login: user and password: 1 .
TaggedHive OSSettingsinstallation
You might also like
Plans for the development of next generation mining equipment proposed on December 20, 2022
21.12.201816.01.2021
Why is the golos ru blockchain platform not opening? How to access the golos ru website?
06.02.2018
Bitexbook will open new opportunities in the crypto trading industry
18.02.201812.09.2019
Add a comment Cancel reply
Categories
Auto news Crypto analysis Bitcoin Bitcoin 1 Bitcoin 2 Bitcoin 3 Bitcoin 4 Bitcoin 5 Household appliances Video cards. Mining For the Internet Earnings Games Xbox Cryptocurrency Cryptocurrency 3 Cryptocurrency 4 Cryptocurrency 5 Cryptocurrency 6 Cryptocurrency 7 Cryptocurrency 8 Cryptocurrency 9 Crypton news Crypton news 1 Crypton news 2 Crypton news 3 Crypton news 4 Crypton news 5 Crypton news 6 Crypton news 7 Crypton news 9 Crypton news 2 019 Mining Novosibirsk News News 1 News 2 Reviews Programs for PC Smartphone Articles about everything Articles about it WordPress Templates Economy This is interesting
.
Privacy policy
Feedback
Information taken from open Internet sources. The administrator is not responsible for information posted by subscribers Powered by Russia and money.
How to register and create an account and wallet on the HIVEOS farm website
On the main page of Hiveos.farm, click on the “Start For Free” button. After this, a page with a registration form will open. You will need to enter your login, password and email. After clicking the “Register” button, you will receive an email asking you to confirm your registration on the Hiveos portal. We click on the link and try to log into the site using the username and password we just created.
Next, you need to decide which cryptocurrency to mine. For example, let it be Ethereum. We need to get an ether wallet. To do this, you can use an exchange, a mobile wallet like MetaMask or MEW. You can also install a wallet on your PC or purchase a hardware wallet.
So, having received the wallet number, we need to set it in the global account settings. Go to the “Wallets” tab of your Hive OS personal account. Select a coin from the list, in our case ETH. In the address line, insert the wallet number and come up with a name for this wallet. Click create, and now the farm will use this wallet when creating a flight sheet. We can create many wallets. You can select a specific one in the flight sheet settings.
How to choose the right miner in HIVE OS
The type of miner largely depends on the type of video cards installed. For example, there are miners that can only be used for AMD cards - teamredminer, which today is one of the best solutions for “red” cards. For mining on Nvidia there are also a number of the most popular programs, for example T-Rex. There are universal miners that are suitable for graphics chips from AMD and Nvidia. This category includes PhoenixMiner, NBMiner, GMiner, lolMiner and bminer and others.
These miners may differ in the amount of commission that developers of this method receive. This can be from 1 to 2% depending on the coin and program.
How to activate the rig and synchronize the start of mining
In order for the farm to synchronize with your personal account on the Hive website, you need to register several parameters on the flash drive with the operating system. This can be done in two ways. The point is to provide the farm with its unique number and password, with which it can connect to your personal account. And these credentials have nothing in common with those used when registering on the Hive website.
To get this data for synchronization, we need to create a worker in our personal account. For this:
- Click on the plus sign on the top panel and select “add worker”.
- In the new window, enter the name and password for the new farm and click “add”.
- After this, the farm will generate a unique ID and password, which must be written on the flash drive.
As mentioned above, this can be done in two ways:
- The system will generate a file called Rig.conf. This file must be placed in the “root” of the flash drive, having first deleted the rig.config-example.txt file from it.
- The second method is to register the Rig ID and password after launching the flash drive directly on the farm. To do this, connect the flash drive to the farm’s motherboard and launch the rig. We wait until Hive OS loads and the message “Press Enter to continue...” appears. Press Enter on the keyboard and first write the Rig ID, which we received after creating the worker on the site and press Enter. Then the system will ask you to write a password - we also type the password and press Enter. We confirm the operation by typing the letter “Y” and pressing Enter.
Next, the farm will begin connecting to the online account and in a few minutes we will be able to see our farm directly on the Hive website and begin to manage it.
Working with Windows 10
But! Then mining appeared, and I met Windows again. Like many novice miners, when assembling my first rig, I didn’t think much about choosing an operating system. Of course, it was Windows 10. I heard that there are solutions for mining on Linux, but I didn’t even seriously consider them. There were enough questions with hardware, but there was definitely no time for software...
The farm on Win 10 was successfully assembled, configured and tested, and since it was supposed to be installed remotely, Teamviewer was installed, which solved the problem of remote control of the rig.
Following the first rig, the second one was assembled, and Win 10 paired with Teamviewer also settled on it. After testing, the second rig also left for its work shift in a remote location. By this time, I was already beginning to understand what I didn’t like about Win 10.
What I didn't like:
- I was surprised by Win 10's approach to saving system settings. For example, I turned off Windows Defender and the update service, but on one of the rigs the system still constantly downloaded updates, freezing a couple of times, and Defender with enviable regularity tried to “cut off” the Internet to Claymore. To be honest, I'm just too lazy to deal with this. When I saw the “experienced” recommendations for setting up Win 10 in the rig, I immediately became sad.
- A couple of times Teamviewer could not connect to a remote machine, which simply refused authorization. At the same time, the rig itself, judging by the pool readings, was “digging” regularly. The lack of remote control option really bothered me!
- To quickly change the miner or algorithm, I had to go to each rig separately and restart the miner there with the necessary parameters. True, this problem is successfully solved by the method described on the Two Bitcoins website a couple of days ago.
Here everyone will add to this list and decide how important these points are for him.
But, in fairness, I must say what I liked:
- The speed of the system is definitely pleasing, although the big merit here is not so much Win 10 itself, but the SSD drive.
- Managing card overclocking using Afterburner. This is really convenient, especially if you save several presets for different algorithms in advance.
- The ability to download the official version from the Microsoft website, which copes with its “farming” affairs perfectly without registration.”
Overclocking AMD and Nvidia video cards main mistakes
There is one significant difference in overclocking AMD and Nvidia video cards - for the former, you need to set not only the frequencies of the graphics core and memory, but also their voltage. This makes overclocking somewhat difficult and requires more time for the most competent and energy-efficient settings. For Nvidia video cards, it is enough to set the frequency parameters of the core and memory and the level of power consumption. Therefore, setting up “green” video cards is much faster.
Another common mistake is the forgotten Power Limit parameter. The system defaults to zero. This means that when mining is started, video cards will consume the maximum possible amount of electricity. This leads to rapid overheating of the equipment. Therefore, the first thing we do is set a power consumption limit.
For AMD cards, instead of the Power Limit value, we set the correct voltage for the core and video memory. Forums where users share settings for stable operation of specific video card models will help you determine what voltage to set.
You need to accelerate smoothly. Ideally, you can work for the first half hour without overclocking, having previously set only the Power Limit. After making sure that the farm is working properly, you can start experimenting.
Also, during overclocking, do not forget to set the fan speed. By default, the blades rotate in automatic mode. But if you want to ensure stable cooling of all elements of the video card, then you can stop at a certain rotation speed of the coolers, indicating a percentage of the maximum number of revolutions.
How to control a rig - basic nuances after setup
Control can also be done through a browser or an application on your phone. The browser version for mobile devices is as convenient as possible and can compete with the application in this parameter.
Using your personal account, you can make any changes to the operation of farms:
- change wallets;
- change acceleration;
- switch to another pool;
- update the system on disk;
- change the mining program;
- save overclocking profiles;
- create multiple flight sheets.
Security Settings
To protect against unauthorized access to your equipment, you must enable two-factor authentication. This means that when you try to log into the farm, you will first receive an email with a one-time password, which you will need to enter on the site after entering the main password and login.
Thus, in order to gain access to the farm, an attacker will first need to gain access to your mail. And this is almost impossible to do if you follow basic internet safety principles.
How to update the kernel on HIVE OS
To access new HIVE OS features, you must periodically update your operating system. This can be done without losing all settings, including overclocking, wallets and other settings.
To launch a HIVE update, you only need to make one click. We go directly to our created worker. At the bottom of the page there is a number of blocks that indicate the main system parameters - free RAM, CPU temperature, total consumption and operating system version. It is in the “OC VERSION” block that you need to click on the orange arrow and confirm the update. After some time, the system will be updated and in the “OS VERSION” window we will see the updated version.
Before updating, you need to disable mining if it is running.
Popular Hive commands
To use the Hive quick command set, you need to open the console, which resembles a regular MS DOS window. To do this, on the top panel of the web interface, click on the “remote access icon” and select “Hive Shell start”. We wait a while for the Hive Shell link to load. Next, click on the white icon next to Hive Shell in the system events line. A window will open in which you can enter any commands. Now let's look at the most popular of them:
- firstrun -f — enter a different rig ID and password to connect the farm to another account;
- sreboot - perform a reboot;
- selfupgrade - updating Hive OS - is equivalent to what we did in the previous paragraph on updating the system in the web interface;
- sreboot shutdown - shutdown;
- miner — opens a window with the miner running;
- miner start or miner stop — start or stop the miner.
There are also many other commands designed for more advanced users.
How to work with Hive OS
Starting to assemble the third rig, I wondered about possible alternatives to Win 10 and, following a tip from Alexey Rubin from the chat, whose article about the Ledger hardware wallet is on the site, I turned my attention to the Miners Hive OS project.
The system is a Linux assembly based on the Ubuntu distribution, which immediately after deployment offers its users a number of tasty goodies:
- Possibility of remote monitoring and management of the rig via the website hifeos.farm.
- Built-in hashrate watchdog, which overloads the miner or the entire rig when the hashrate drops. By the way, hardware watchdogs are also supported, including the popular solution from open-dev.ru.
- Support for a large number of miners for AMD, NVIDIA video cards and even for CPU.
- Ability to launch and work from any flash drive with a capacity of at least 8 GB.
Installing the operating system on ASIC
To connect the ASIC to the web interface, you first need to flash the device, but there are some restrictions for devices:
Antminer 9 series - never update firmware newer than June 10, 2019;
Antminer 17 series - never update firmware later than December 1, 2022.
Newer versions have modification protection. For each ASIC, hive developers have developed separate firmware that will allow you to connect the device to your account.
After flashing the ASIC firmware, open the device’s web interface and in the Hive OS Client tab you need to enter FARM_HASH, which is generated when creating a new worker in your Hive personal account. You can also update the firmware using the BTC Tools program. Scan the network so that the program finds all ASICs connected to it and flash the desired devices using the prepared firmware files on the hiveos.farm website.
More details about installing Hive on each ASIC model can be found on the official website of the developers.
Popular problems and solutions
One of the popular problems among beginners is the difficulty in synchronizing their personal account and the disk on which the operating system is recorded. An inexperienced user immediately tries to start his farm after burning Hive to disk. As a result, he cannot understand why he does not see his farm in his personal account. To avoid such mistakes, carefully read the paragraph above about synchronizing and activating the rig with your online account.
Another mistake is using insufficient RAM. The minimum amount of RAM for stable operation of HIVE OS is 4 GB. But the developer recommends installing 8 GB when you plan to use more than 8-10 video cards. The system can work with less than 4 GB of RAM, but it may be completely full for some time. This will lead to periodic freezing and rebooting of the farm.
Content
- Working with Windows 10
- How to work with Hive OS
- Installing and configuring Hive OS
- How to set up wallets and connect Hive OS miners
- Bottom line
As a child, I really loved looking out the window.
Especially out the window of a moving train. I liked it so much that I thought when I grew up I would definitely come up with a job for myself so that I could look out the window. I grew up, but I didn’t give up my dream. When computers came into my life, they were still dominated by msdos, and I remember what a revelation the semi-axis was for me - OS/2 from IBM. But then Windows came and killed everything, and the half-axis from IBM and the desire to look through the “windows”. As a result, I found salvation for myself in MacOS and forgot about “windows” for many years.
Main pros and cons of the platform
- easy launch and setup;
- intuitive interface;
- a decent set of coins and supported miners;
- regular updates;
- farm management using a mobile application;
- custom firmware for ASICs.
Compared to RaveOS, the HiveOS system has more functionality, but for some users such an abundance of functions will be redundant and may even be confusing. But all the basic functions are in place and easy to learn.
The only significant drawback is the possible failure of the media if you are working from a flash drive. Therefore, it is recommended to use an SSD or HDD for maximum reliability and stability.
Bottom line
Installing Hive OS on a rig is easy and very convenient to manage. In case of any difficulties, Hive OS has a support chat in Telegram where you can get prompt help on starting, setting up or configuring the system.
PS It remains to talk about the price. Yes, the system is not free. More precisely, up to 3 rigs you can use Hive OS completely free of charge, but starting from the fourth rig, the developer asks for payment of $3 for each rig, including the first three. That is, for 3 rigs you pay nothing, but for 4 rigs you already need to pay $12 per month. Is it a lot or a little? In my opinion, this is a fair price for a system that is developing dynamically. For example, just the other day they added graphical statistics on rigs. If this is expensive for you and you want to automate for free, read the article for 2 Bitcoins.
PPS Thanks to the ability to work from a flash drive, we save on an SSD or hard drive, which, you see, is nice.
Source: 2bitcoins.ru