Without certain settings in the BIOS, it may be impossible to mine on the motherboard. These settings are especially critical if you install Linus mining systems like Rave OS or Hive OS. They either may not boot after a reboot, but there will be reboots, or the motherboard will not see all cards connected to the PCI-Express ports.
Even if you are going to mine on Windows, there may be problems identifying multiple cards. How to set up BIOS? All these problems can be solved by correctly setting the BIOS of the motherboard. For example, we will use a board from MSI on the B450 chipset.
Haven't chosen a pool yet? We recommend Binance Pool as the most reliable, convenient and profitable pool. How to mine on Binance Pool, read on the website.
Why does a miner need to configure the BIOS?
BIOS are low-level hardware parameters that help configure components for stable and productive operation.
At the factory, the manufacturer optimally configures the BIOS for the “average” user. But mining is different from everyday use, which means it may require special configuration.
If this is not taken care of, miners may crash or become unstable, and in some cases, the entire computer may even shut down or reboot. Farm failures mean loss of income, nerves and headaches. In this article we will tell you what settings should be changed in order to achieve the most stable earnings????
Let's get started, please! ????
The BIOS setup procedure may seem complicated, but if you follow our tips, everything will work out!
Go to BIOS
There are two ways to go to the BIOS menu:
Press Del or F2 while turning on the computer. As a rule, the desired key is displayed on the screen.
On Windows 10, the first method does not always work. In that case, try this:
Go to the Start menu -> Shutdown;
Hold Shift and click Reboot;
You will see a menu with a blue background;
Go to Diagnostics -> Advanced Settings -> UEFI Firmware Settings;
The computer should automatically boot into BIOS.
Some BIOS require you to enable Advanced Mode to access all settings.
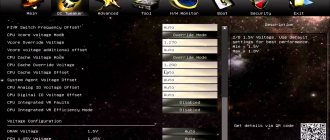
Enable "Above 4G Decoding"
Without enabling Above 4G Decoding, the DaggerHashimoto algorithm may not work, so set it to Enabled.
What does this setting do? Before the processor processes the data received from the video card, it is stored in RAM. Above 4G Decoding allows you to use more than 4 gigabytes of RAM in data exchange mode.
If you have less than 4 gigabytes of RAM, Above 4G Decoding does not need to be enabled, otherwise it may lead to incorrect display of the image on the screen.
Reduce PCI Express slot speed
The higher the speed of PCI Express, the lower its stability.
Unlike games, almost no data is transferred over the bus during mining. The video card sends small packets - balls - to the miner just once every couple of seconds, so we can reduce the throughput of the PCI Express slot without compromising profitability.
Set the PCI-e x16 Speed setting to gen1.
If you're gaming or using the card for work, it's worth testing performance after lowering PCI-e bandwidth
Disable the built-in video card
The built-in video card is not used in mining, but constantly conflicts with the dedicated card during mining. To free up resources for mining tasks, disable the integrated graphics. To do this, you need to specify the Internal Graphics setting value - 0 MB or Disabled.
If you are using the built-in video card for image output, it is better to leave the value between 32 MB and 64 MB
Setting up BIOS and Windows for mining
How to properly configure the motherboard BIOS for cryptocurrency mining?
For normal operation of your GPU mining farm, you will need to disable all unnecessary functions in the BIOS, namely:
- In BIOS, disable USB 3.0 ports and sound
- Adjust CPU cooler speed (default 100%), need to be set to "Auto"
- Switch PCIe slot speed from Auto to Gen1
- To ensure that the GPU farm starts quickly after reboots and there are no error checks in “Standard SMOS Features”, switch the “Halt on” item to “No Errors”
- It is also better to disable the HDD SMART Capability feature, as it slightly reduces system performance. To disable SMART technology, select “Disabled”
- To automatically start the mining farm after the mains voltage is restored and power is supplied, enable the “AC Back” function by selecting the “Power On” or “Full-On” value
Payback
The payback period for a device depends on the price of a specific model, the hashrate of the farm as a whole, and the cryptocurrency chosen for mining. The total payback of the farm is calculated as follows:
- Multiply the available performance (hashrate) by the time it takes to create a block.
- Divide the resulting number by the block reward.
- Divide the result by the power of the equipment.
- Multiply by 3600 to get actual hours.
- Subtract electricity costs (tariff*kWh).
This way you can find out how much the motherboard will pay for itself together with other components of the rig.
Windows settings for mining
Here are the main recommended settings of the Windows operating system for mining. And also, what is better in this case, install Windows 7 or 10.
For mining, it is better to install Windows 7 64 bit; it consumes less video card resources when loading, since there is no launch of the “metro” interface. In addition, Windows updates are normally disabled, which in the top ten are then automatically turned on after a month anyway. In Windows 10, you can also use third-party programs to disable the update service. Better yet, install a special Windows 10 LTSB distribution.
Setting up BIOS for cryptocurrency mining
BIOS is software for properly configuring computer components. Using BIOS, you can organize stable and productive PC operation. However, component manufacturers prefer to configure the BIOS for “average” users, and since not all PC owners are involved in cryptocurrency mining, it is necessary to set the correct configuration. Incorrect BIOS settings mean constant interruptions in the operation of the miner or even the computer rebooting on its own.
In this article we will tell you how to configure the BIOS to achieve the most stable and profitable cryptocurrency mining.
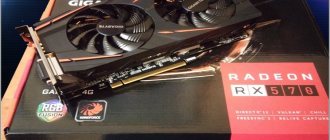
Firmware for AMD Radeon GPU
The process of flashing the BIOS of an AMD Radeon video card for mining requires attention and the availability of the necessary programs. It is important to be aware of the risks when changing BIOS timings. All manipulations take place at the miner’s own risk. After making a decision, you need to prepare the following programs:
- ATIFlash is software for flashing graphics processors from AMD. With its help, new software is uploaded.
- The Polaris BIOS Editor program is software that allows you to adjust BIOS timings.
- Atikmdag Patcher is software for optimizing GPU performance after flashing. The software's job is to remove errors.
Further algorithm of actions:
- Download and install ATIFlash.
- Saving the original GPU BIOS. Next, one or more copies are made (it is recommended to save under different names).
- Download and install Polaris BIOS Editor.
- Opening the BIOS for editing.
- Making changes to the timings of each GPU. In the latest versions of the program, the selection of suitable parameters occurs automatically. If the mining speed decreases after flashing the BIOS, the settings will have to be made manually.
- Saving the entered parameters.
- Launch ATIFlash, select card and firmware. Click on Program.
- After the firmware is completed, a PC reboot is required.
After work, the following problems are possible: the system does not see the graphics processor, error number 43 appears, or the necessary drivers are not installed. In such cases, Atikmdag Patcher will come in handy. The program is downloaded, installed, then loaded into the system and fixes problems. All software must be run as administrator.
How to set up BIOS?
Following our recommendations, the BIOS setup process will be simple and fast. So let's get started:
- In the first seconds of starting the computer, press and hold the F2 button to directly enter the BIOS.
- Go to “Setting” and turn on “Above 4G Decoding”. If you plan to mine Ethereum, then without this option nothing will work.
Actually the question is asked: Why is “Above 4G Decoding” needed at all?
The answer is simple: your processor processes the data received from the video card, which is then stored in RAM. Using this option, you can use more than 4 GB of RAM in data exchange mode. In turn, if you have less than 4 GB of RAM, then you do not need to enable the Above 4G Decoding option.
- Next, you need to reduce the speed of the PCI-E slot. The lower the speed, the higher the stability. The thing is that during cryptocurrency mining, data is practically not transferred over the bus, with the exception of sending balls once every 2-3 seconds. Therefore, it makes sense to lower the PCI-E speed without sacrificing profitability. To do this, in the PCI-e x16 Speed section, set the value gen1. If you combine mining with games, you can set gen2.
- We disable the integrated video card, which is not used in mining, but regularly conflicts with the main (discrete) video card during cryptocurrency mining. To disable it, set Internal Graphics to 0 MB or click on Disabled.
Attention! If for some reason Windows 10 starts to work incorrectly, then you can reset the BIOS to factory settings! To do this, open the BIOS and select the Load Setup Defaults option.
Good luck!
Let us remind you that we recently told you how to choose a hard drive for a mining farm and how much RAM you need in mining.
Source
Energy consumption
For example, we will consider the ASRock Z97 Extreme 4 mining motherboard. This is what its power consumption looks like:
- with inactivity - 40.4 W;
- Cinebench 11.5 CPU load - 105.7 W;
- Prime95 load - 115 W.
When integrated elements are turned off, consumption drops by 0.5–1%.
ASRock motherboards feature fairly low power consumption. This is especially noticeable in idle mode: the devices are more economical than analogues from other manufacturers.
Asus prime z270-p motherboard for mining
The asus prime z270-p motherboard is capable of connecting up to 8 video cards simultaneously, where 6 cards will be connected via a 2xPCI-E x16 riser, 4xPCI-E x1 and 2 cards via an M.2 riser.
| Socket | Memory | Number of M.2 slots | Slot type M.2 | Expansion slots |
| LGA1151 | DDR4 DIMM, 2133-3866 MHz 4 memory slots | 2 | Socket 3, M Key, 2242/2260/2280 | 2xPCI-E x16, 4xPCI-E x1 |
The asus prime z270-p motherboard is capable of connecting up to 8 video cards simultaneously, where 6 cards will be connected via a 2xPCI-E x16 riser, 4xPCI-E x1 and 2 cards via an M.2 riser
The disadvantage of this board is that you will not be able to power so many cards if one of them is directly installed in the motherboard. A video card installed in the motherboard blocks access to connecting the riser to the nearby PCI-E x1 connector.
For a rig of 6-8 cards, all video cards must be mounted on risers.
Comparison with competitors
A small table comparing motherboards from ASRock and their competitors:
| Model | Form factor | PCI-express inputs | Supported processors |
| ASRock H81 ProBTC R 2.0 | ATX | 1x (x16), 5x (x1) | LGA1150 |
| ASRock B250 Pro 4 | ATX | 1x (x16), 1x (x4), 3x (x1) | LGA1151 |
| Biostar TB350 BTC | ATX | 1x (x16), 5x (x1) | AM 4 |
| ASUS H81M-plus | mATX | 1x (x16), 3x (x1) | LGA1150 |
| MSI 970A G 43 | ATX | 2x (x16), 2x (x1) + 2x PCI | AM 3+ |
How to setup
All settings must be made with 1 video card inserted into the PCI-e slot of the motherboard.
First, follow the link to the official Asus website https://www.asus.com/ru/Motherboards/PRIME-Z270-P/HelpDesk_Download/ and download the drivers: Lan, Utilities, Chipset, Bios (select the latest version).
Install all drivers (except BIOS). We dump the BIOS onto a formatted flash drive in Fat-32 format. If this is not possible, you can update the existing BIOS in the motherboard settings using a wi-fi or lan connection.
We reboot, go into the BIOS, press the F7 key -> tab -> asus ez flash 3 utility -> then select “install from a drive” (or search and install via the Internet) -> find a flash drive in the left corner, in devices -> select it -> select the firmware file “PRIME-Z270-P-ASUS-...” -> and press “YES” twice -> after reinstalling and rebooting, press F1, go into the BIOS -> press F10 “Save & exit” and press “Yes” "
Next, we set the necessary settings for optimal operation of a farm with 6 - 8 video cards (with one video card connected to the motherboard):
- Go to Bios
- Mode → Advance → System Agent Configuration. We enter the Above 4G Decoding section and select Enabled. This function allows the motherboard to see more than 4 video cards.
This scheme will help you run 6 video cards through a PCI-e riser.
If you want to install 8 video cards via the M2 connector, you need to do additional steps in the BIOS:
advanced -> onboard devices configuration -> M.2_1 Configuration -> select PCI-E
Useful, but not mandatory, actions that can be performed for better farm efficiency:
- Advanced/ apm configuration/ restore ac power loss/ select “power on”. This allows the system to turn on automatically after turning on the unit.
- Advanced/ onboard devices configuration/ hd audio controller/ select “disabled”. Will allow you to load the system less by turning off audio for smoother operation with 6-8 video cards.
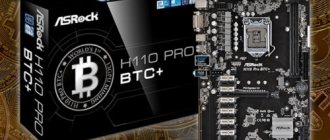
ASRock H110 Pro BTC+ Bitcoin
- On the Advanced tab, open the Chipset Configuration folder
- Set Primary Graphics Adapter to OnBoard (default PCIE2)
- 7 parameters PCIE1 Link speed, PCIE2 Link speed, PCIE3 Link speed, PCIE4 Link speed, PCIE5 Link speed, PCIE6 Link speed, PCIE7 Link speed set to Gen2 (default is Auto). It is worth noting that there are 7 parameters, and 13 slots. Therefore, one PCIE parameter is set for 1-2 slots.
- OnBoard HD Audio value set to Disabled (default is Auto)
- Restore on AC/Power Loss parameter set to Power On (default is Power Off)
- On the Advanced tab, open the Storage Configuration folder
- Hard Disk SMART value set to Disabled (disabled by default)
- On the Advanced tab, open the USB Configuration folder
- Set Intel USB3.0 Mode to Disabled (enabled by default)
- On the H/W Monitor tab, open the USB Configuration folder
- CPU Fan 1 & Settings value set to Standard Mode (default is Standard Mode)
- On the Exit tab
- Click Save Changes and Exit. Then Ok to save.
If the system does not see 1 video card?
Check if you have tightly connected all the cables and the riser (with the system completely turned off) Try swapping the positions of the riser in the PCI-e connector (with the system completely turned off) Check in the BIOS if you have set all the parameters correctly
After all the settings with the BIOS, we connect 1 video card. We install drivers for each (It is best to download the driver from the official website).
Download the miner. Install msi afterburner after downloading the program from the official website. We check the visibility of all video cards in afterburner, set the overclock, launch the batch file (miner).