- What is a batch file for mining?
- How to make a batch file for mining?
- How to register a batch file for mining
- Principles of creating but files for a miner Batch file for mining ether under Ethereum
- How to set up a body file for Phoenix Miner
- How to set up a batch file for cia mining
- How to register a binance pool body file
- How to set up mining for nicehash
- Setting up a bat file for mining in ergo
- Setting up kawpow raveneoin for mining via but
- How to make a batch file for mining in monero
- Running with config
- Ergo zil
- Memtweek, how to adjust performance and intensity
- Overclocking and undervolting video cards
- The program crashes or does not start
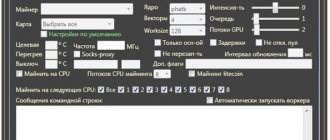
Settings
To set up a batch file, we need to enter 5 commands one by one:
- miner.exe is the name of the program to be launched. This file must be located in the same folder as the batch file itself.
- ethash — specify the algorithm for mining.
- ethash.poolbinance.com - specify the pool. This example uses Binance Pool. Read: How to mine on Binance Pool
- 8888 — specify the port from the pool. It can be found in the same place as the pool address.
- username1 - simply change username1 to your Binance account name.
the Gminer batch file will look like
for eth:
miner.exe --algo ethash --server ethash.poolbinance.com:8888 --user username1
Setting up for NiceHash
For a nice hash, the batch file will look like this:
And the transcript:
- kawpow - specify the mining algorithm
- kawpow.eu-west.nicehash.com - specify the server
- 3385 - write the port
- 3LZhp4g3m7YWqR4hAPrZsKWbyo7hRBmqvy - and wallet. Important! To mine using NiceHash, you need to specify the BTC wallet, not the coin you are mining.
Ready example:
miner.exe —algo kawpow —server kawpow.eu-west.nicehash.com:3385 —user 3LZhp4g3m7YWqR4hAPrZsKWbyo7hRBmqvy
How to make a batch file for mining?
To do this, first of all, we will need to complete several preparation steps.
- Step 1: Check PC Specifications:
- Operating system - minimum Windows 7 64-bit
- Video cards from 4 GB
- Stable network connection
- Step 2: Install the latest driver from your video card manufacturer. After installation, the device must be rebooted.
- Step 3. Create an Ethereum wallet.
- Dual Ethereum software to mine ether.
- Step Select a mining pool.
To create a but file, you need to go to Claymore's Dual Ethereum Miner program and find a batch file, open it, edit it, and save it.
Tfan - fan control
-tfan - specify a list of target temperatures for the fan, separated by spaces (0 - ignore), only supported by Windows (for example: -tfan 64 0 69).
-tfan_min - space-separated list of minimum fan speed (0 - ignore) for the -tfan option, supported only by Windows (for example: -tfan 30 0 35).
-tfan_max - space-separated list of maximum fan speed (0 - ignore) for the -tfan option, supported only by Windows (for example: -tfan 89 0 79).
Launching programs for mining and hashrating
After installation, we configure the program to work by creating a batch file for mining. This type of setting is typical for all programs for this purpose.
The hashrate is affected by the number of miners in the network. If there are a lot of them and blocks are found more often, then the complexity of the tasks increases. If there are few miners, the network makes changes in the opposite direction, carrying out a downgrade. However, if user statistics are constantly growing, the program is being further developed and the hashrate remains virtually unchanged with the increase in participants.
Running with config
To run via config, you need to find two files in the program: config.but and config.ini.
In the config.but file we enter two commands:
- Nanominer.exe – information about which program needs to be launched.
- Config_eth.ini – path to the second config.
In the config_eth.ini file, change the wallet data to your own, specify the walker name – sped_test.
Using bat files to deploy applications
During my working life I had to face one problem. There is a product that runs under Windows and consists of several components - a kernel, a protocol, a bridge and a delivery channel. Some components are written in JAVA, some in C++. Delivery channels can be from one to twenty. Each component uses its own database (the DBMS is MS SQL Server). For components written in JAVA, the database structure is created automatically; for components written in C++, the structure must be created manually using a SQL script. Each component must operate as a service in the system. All this stuff must be thoroughly tested. For each test, it is necessary to recreate the database and system services. Having done this task once, I wondered how this process could be automated as much as possible (the actions are not complicated, but routine). The solution should be simple and not require installation of any software. Therefore, the choice immediately fell on the ancient, but time-tested script file in the built-in command language - Bat. At the same time, let's check what bat scripts are still capable of. We will try to log all our actions using the script. To do this, set the name of the log file:
@set LOGFILE=»log.%DATE%_%TIME:~0.2%-%TIME:~3.2%-%TIME:~6.2%.txt»
We will get a file similar to this as an output: log.14.02.2012_10-41-42.txt However, if you like to work early in the morning or late at night, then it may turn out like this: log.14.02.2012_ 1-03-28.txt C I will be happy to consider your suggestions on how to fix this.
UPD.
Thanks to everyone, especially user DJnK for the more elegant solution:
for /f "tokens=1-4 delims=: " %%a in ('echo %time:~0.8%') do set mytime=%%a_%%b_%%c
We set the choice of action in the body file, which will be passed to it as the first parameter
@rem INSTALL or REMOVE set ACTION=%1
Set the string to connect to the database:
@rem Format: either just IP @rem If neither the -U nor the -P option is specified, sqlcmd attempts to connect using Microsoft Windows authentication mode. @rem This uses the Windows user account that ran the sqlcmd program. set url_db="(local)"
Next, we set specific parameters for each component. Whether we need to work with the component or not (y or n) we will set from the parameters
@rem Fill in these parameters, y - if we create a global database for the kernel @set WorkWhisKernel=%2 @set KernelDbName=Kernel @set KernelUserName=Kernel @set KernelUserPassw=Kernel @rem Recovery model for the database. Values available: FULL | BULK_LOGGED | SIMPLE @set KernelRecovery_mode=SIMPLE @rem Fill in these parameters, y - if we create a database for the channel @set WorkWhisChannel=%3 @set ChannelDbName=Channel @set ChannelDbCount=10 @set ChannelUserName=Channel @set ChannelUserPassw=Channel @rem Recovery model for the base. Values available: FULL | BULK_LOGGED | SIMPLE @set ChannelRecovery_mode=SIMPLE @rem Use the “_” sign to separate the database name and its number. For example test_1 or test1 @set Use_underline=y @rem Database version for Channel @set ChannelVersion=mssql.Channel_5.4.3.2 @rem Fill in these parameters, y - if we create a database for Bridge @set WorkWhisBridge=%4 @set BridgeDbName =Bridge @set BridgeUserName=Bridge @set BridgeUserPassw=Bridge @rem Recovery model for the database. Values available: FULL | BULK_LOGGED | SIMPLE @set BridgeRecovery_mode=SIMPLE @rem Database version for Bridge @set BridgeVersion=mssql.Bridge_1.1.3
Next, depending on the type of action with the base (INSTALL or REMOVE), as well as whether we need to work with this component, we will perform certain actions. For convenience, actions on the database are included in separate SQL scripts. We will work through the sqlcmd utility. If MSSQL Server is not installed on your machine, then sqlcmd can be downloaded and used as part of the SQL Server Express Utility distribution.
if "%WorkWhisI_k%" == "y" ( if "%ACTION%" == "INSTALL" ( @rem Create a global database for the Kernel and the user and its sqlcmd -S %url_db% -i Kernel.sql >> %LOGFILE % ) if “%ACTION%” == “REMOVE” ( @rem Remove the informer_kernel database and its user sqlcmd -S %url_db% -i KernelDel.sql >> %LOGFILE% ) )
As you can see, everything is very simple here. However, there is a small problem, namely how to pass the names of the database, user, etc. in SQL script called via sqlcmd? In fact, everything is very simple:
—Create a login for the database CREATE LOGIN $(KernelUserName) WITH PASSWORD = '$(KernelUserPassw)', CHECK_POLICY=OFF; GO —Create the USE master database; CREATE DATABASE $(KernelDbName); GO —Set the database recovery mode ALTER DATABASE $(KernelDbName) SET RECOVERY $(KernelRecovery_mode) GO —Create a user for the database USE $(KernelDbName); CREATE USER $(KernelUserName) FOR LOGIN $(KernelUserName) WITH DEFAULT_SCHEMA = dbo; GO —Assign a role for the user USE $(KernelDbName); EXEC sp_addrolemember 'db_owner', '$(KernelUserName)' GO
There will be similar lines for the Bridge component. But for the Channel components we will have, say, ten. So let's add a simple loop:
for /L %%i in (1,1,%ChannelDbCount%) do ( if "%Use_underline%" == "y" ( @set ChannelDbNameCounter=%ChannelDbName%_%%i ) else ( @set ChannelDbNameCounter=%ChannelDbName %%%i ) %ChannelDbNameCounter% @rem Create a database cp_service sqlcmd -S %url_db% -i Channel.sql >> %LOGFILE% @rem Create a database structure for cp_service sqlcmd -S %url_db% -i %ChannelVersion%.sql > > %LOGFILE% )
Next, we install the services of our components in the system (I will give an example only for the Channel components):
@rem Number of Channels SET ChannelDbCount=10 @rem Launch type SET run_type=demand @rem Dependencies on services (separated by / (forward slash)) SET depend=MSSQLSERVER for /L %%i in (1,1,%ChannelDbCount%) do ( @rem install the Channel service. To install the component as a service, use its internal implementation ruby Channel%%i.exe —install @rem for the service we install 3 reboots with an interval of 1 minute. If a fatal error occurs sc failure Channel%%i reset = 240 actions= restart/60000/restart/60000/restart/600000 @rem service startup type and dependencies sc config Channel%%i start= %run_type% depend= %depend% ) Start the installed services: for /L %%i in (1,1,%ChannelDbCount%) do ( sc start Channel%%i )
I will not provide the code for stopping and deleting services, because... it's identical.
Now let’s put together everything we wrote about earlier. Running the product deployment script with parameters install.bat yyy
@rem We launch our main script with parameters for creating databases DbManage.bat INSTALL %1 %2 %3 @rem We install services InstallServices.bat @rem We launch all services StartServices.bat
Running the product removal script with parameters install.bat yyy
@rem We stop the services if they are running StopServices.bat @rem We make a pause so that all services have time to stop @rem This method may not work in non-server Windows timeout /t 10 @rem We delete old services RemoveServices.bat @rem We start the main one script with parameters for removal start DbManage.bat REMOVE %1 %2 %3
As a result, we got all the desired actions, which were written about at the beginning of this opus, completed with a minimum amount of effort, namely by launching a regular batch file with several parameters. The implementation is certainly not ideal, but it performs its functions. The good old “body files” are still capable of something, although it’s time to switch to PoverShell. However, there are also difficulties there, in particular with certificates and signing scripts.
In general, as they say, there is no ideal solution.
First steps
To write, it is enough to have rights in the system that allow you to create and save files. As for running ready-made scripts, to execute them you need to set the permission for a specific user and the operating system itself. The second case implies that the OS sometimes blocks batch files, since executable files are often malware.
You may need to enable the display of file extensions. I’ll tell you how to do this using Windows 10 as an example:
- Go to the “Control Panel”.
- Select the “Explorer Options” section.
- In the window that opens, go to the “View” tab.
- Scroll down until you find the line “Hide extensions for known file types.”
- If there is a checkmark there, remove it and click “OK”.
Under no circumstances should you run such files from the system if they were downloaded from an unknown or suspicious resource. Also, you should not add code if it is not clear for what purpose it was written. Using "batniks" you can assign encryption of all information on a PC, as well as rename and even completely erase the hard drive without the user's knowledge.
Dual mining
The peculiarity of this type of mining is that with parallel processing of algorithms, you can earn a couple of coins.
To configure, you need to install a mining program. After that, you should make sure that the network uses Ethash, then select another cryptocurrency and pool, configure the launch of parallel mining through the config.
Ergo zil
By using the main coin for mining and periodically switching to zil, you can double your income. To do this, you should install the Nanominer program and configure the configuration file for the pool for split mining.
Ravencoin 2miners zilliqa ezil me
The Ezil.me pool allows the Ethereum Classic miner to double his earnings using the ZILLIGA cryptocurrency. Company employees configure the software themselves; miners, in turn, only need to connect to the pool.
Token combination options
The first coin is most often Ethereum, but another compatible altcoin can be used. For example, Ether Classic, Expanse, Musicoin, Ubiq and other lesser-known cryptocurrencies that correspond to this algorithm.
As the second cryptocurrency, the following were mined: Decred, Siacoin, LBRY Credits, as well as less common cryptocurrencies with Pascal, Blake2s algorithms (for example, Verge, NevaCoin, Tajcoin) and Keccak (SmartCash, MaxCoin and others). When mining new, little-known coins, you need to understand that in the future there may be problems with their sale due to the lack of support on most cryptocurrency exchanges.
The most profitable coin for mining at a particular point in time can be tracked using the Whattomine service.
Sparkpool example
EthDcrMiner64.exe -epool eu.sparkpool.com:3333 -ewal 0x9147460980c93629e775783148591b7d0a0cbf2d -eworker rig1 -epsw x -mode 1 -r 1 -dbg -1 -mport 0 -etha 0 -retrydelay 3 -ftime 55 -t t 70 -ttli 79 - tstop 82 -fanmin 30 pause
The Claymore project represents the latest versions of the software (fixes all errors and bugs of previous versions)! Therefore, if you have an old version, we strongly advise you to download the latest version of Claymore's using the links below, since with each release of a new version, Ether mining becomes more profitable !
Which pool to choose?
Mining pools are special servers configured to mine various cryptocurrencies, such as Ethereum. Servers distribute the tasks of finding blocks of coins (hash) between the capacities of separately connected computers of network participants. The percentage of the reward received is calculated in proportion to the share of capacity that each pool participant shares with the server.
Miners distinguish pools by the following points:
- reliability - the operating time of the pool in the mining services market;
- decentralization - lack of access by the administration to participants’ funds;
- cost savings - minimal fees for participation and withdrawal of rewards;
- the presence of a large number of servers in different countries, which minimizes the risk of simultaneous stopping of mining.
Command Line Commands and Arguments
- -h, help – help
- -v, version – information about the program version
- -c, config – use a configuration file in json format instead of a command line parameter
- -a, algo – select algorithm
- -o, url – your pool address
- -u, user – wallet
Memtweek, how to adjust performance and intensity
Setting up requires running as an administrator to be able to change timings. We change the timings in accordance with the following indications:
- 0 – no changes made
- 1 – slight improvement in memory
- From 3 to 10 – significant improvement in memory.
These readings should be changed gradually, observing the mining operation.
Reebot, reboot job
The standard settings set the system to automatically restart when errors are detected. The system user himself can specify the minimum hashrate values for restarting. You can also set the restars parameter, it indicates the number of times the miner should be restarted before restarting the walker.
Auto update on and off
This function has the values “true” and “false”. When set to True, the system will be automatically updated.
Managing mining remotely
Remote access is needed to ensure stable operation of the mining system. Such management is possible only if there is a stable Internet and uninterrupted operation of equipment.
watchdog task
It automatically reboots the farm. To install it, you need to connect the device wires to the Reset and Power pads on the motherboard, install the drivers and place the control program in startup. In the settings, we specify tracking of Internet connections by the browser you use.
Solo mining
Mining coins using your own resources, without the help of other participants. If your PC's performance is low, it is recommended to mine MOAK coins. By mining these coins you have a better chance of staying in the black.
For those whose PC is equipped with powerful equipment, there is no such recommendation, your chances are much higher and you should focus on other indications when choosing coins.
CPU options
Using the cpuThreads option, you enter the number of parallel CPU threads used for mining. By default, all threads are used.