The era of 4 GB video cards from AMD and Nvidia, which have served us faithfully for a long time in mining Ethereum, is coming to an end. Unfortunately, these video cards, namely (AMD: 470, 480, 570, 580; Nvidia 1050 Ti, 1650, etc.) 4 GB can no longer mine ETH - one of the most profitable GPU coins!
But is everything so bad? Does it make sense to keep/buy these cards and what to mine besides ETH? We will answer these and other questions further in the article, and also tell you how to mine Ethereum even on 4 GB video cards.
Read more about How to mine Ethereum on video cards in Windows
Why mining on video cards with 4 GB will become unprofitable
When mining cryptocurrencies, complex mathematical operations are performed, the results of which are recorded in a single registry. A file with a copy of the registry is stored in each miner’s video card memory.
Each video card has a limited amount of video memory used for loading textures and models. When mining, the video card memory stores the results of mathematical operations in internal memory.
Once a file size limit is reached, such as 4 GB, it can no longer fit in the video card's memory, which is limited to 4 GB of DDR3, GDDR4 or GDDR5. This registry is called a “DAG file”. In order for the video card to continue mining crypt without errors, it needs to have a copy of the DAG file in memory.
Setting up Ethereum mining.
Next, I will tell you in detail how to set up Ether mining on different operating systems and on the best miner programs (in my opinion). And the first thing you need to do is create (register) an ETH wallet.
How to create a wallet for Ethereum (Ethereum/ETH).
Due to the fact that the Ethereum network is currently overloaded, the transaction fee has become too high, so using a cold or hot wallet that works directly with the blockchain is impractical, you will simply lose a lot of money when withdrawing funds through exchangers to the card.
Exit: use the Binance exchange to create an ETH wallet to which the extracted funds will be received; moreover, the deposit size has no minimum restrictions. And as I mentioned earlier, you can withdraw Ether without commissions. Total benefit.
First, you need to register an account on the Binance exchange itself.
Then go to the “Wallet” section – “Fiat and spot”.
In the list, use the search to find the ETH coin and click on “enter”. A page will open with the wallet address for Ether.
In the ERC20 column, copy the address, it will be needed for further configuration of mining.
How to mine Ether on Windows. Setting up Phoenixminer.
Why mine Ethereum on Windows? There are several reasons:
- You have one extra video card that is not included in one of the four free rigs for HiveOS, and there is no point in enabling Billing for all farms because of one video card.
- You only have one video card in your gaming computer; there is no point in installing HiveOS, because the minimum payout on the proprietary pool is 0.1 ETH, so you will have to wait several months. Although you can use Binance Pool, where payments are made once a day, you will have to use Billing under HiveOS.
- You have a video card from the new Nvidia series, where a mining lock is installed from the factory, which limits the hashrate. And so far there is a solution only with special drivers for Windows, which Nvidia removed from the site, but they leaked to the network. Read more in the article RTX 3060 12 GB Ethereum mining. How to increase hashrate? and there will be a complete setup for your case.
- You have GTX 1080 and higher video cards, in which the tablet (pill) for increasing hashrate works better under Windows, not under Linux.
The first thing you need to do after registering an ETH wallet is naturally to install drivers for your video card. If you have AMD, download the Blockchain driver from the official website, fortunately the first link in search engines will be in first place. If you have Nvidia without hashrate limitation, then download the latest version of the driver, also from the official website.
Next, download Poenixminer 5.5c (password from the archive “miningfaq” ). We find there the Bat-file for the pool you need and make changes to it by entering the wallet address, and also come up with a name for the worker, which we will use to track the statistics of the rig or computer.
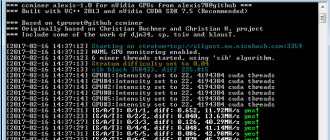
Here is an example of my batch file for the Phoenix miner for the Binance pool and wallet:
PhoenixMiner.exe -pool stratum+tcp://ethash.poolbinance.com:1800 -wal 0xf4bb3744716ef33e47c98091ccd2d74a21e07835 -worker ETHferm1.001 -epsw 123456 -asm 2 -dbg -1 -allpools 1 -mode 1 pause
Statistics on the pool will appear in 10-20 minutes.
Important parameters when setting up a Phoenixminer batch file.
- -pool is responsible for the address and port of the pool.
- -wal Here we enter the ETH address of the wallet from Binance.
- -worker we enter the worker here, on the Binance pool they will show you after creation, so copy and paste it.
- -epsw This parameter is responsible for the password for the worker, again on the Binance pool you are offered a simple generated password, in any other case you can leave the value “x”.
You can add one more parameter to this config at the end of the line separated by a space “ -tt 70 “. He will be responsible for ensuring that the video card maintains a temperature of 70 degrees under load, and the miner will control the speed of the fans on the GPU radiator.
My Phoenixminer config for the HiveON pool:
PhoenixMiner.exe -pool eu-eth.hiveon.net:4444 -wal 0xf4bb3744716ef33e47c98091ccd2d74a21e07835 -worker 1080 -epsw x -mode 1 -Rmode 1 -log 0 -mport 0 -etha 0 -retrydelay 1 -ftime 55 -tstop 89 -fan min 30 -coin eth pause
I use a work computer for a heap of farms that mine under HiveOS.
If you have an Nvidia GTX 1080 or higher, then before starting the miner, you must run a pill that will increase the hashrate on the Dagger-Hashimoto algorithm.
(password from the archive “ miningfaq ”).
Setting up Ethereum mining under HiveOS.
If you have several video cards in the farm, then it would be more logical to use the HiveOS operating system and Phoenixminer due to its great functionality and stability. In addition, there is a convenient Web interface and a mobile application for configuration and monitoring.
First of all, you need to register an account in the HiveOS service. Don't forget to enter the promo code “ miningfaq ” to receive $10 per farm account.
Next, you need to download the latest current HiveOS distribution in “ *.img ” format. After which it can be written to a flash drive, SSD or hard drive using the BalenaEtcher () program.
The program interface is simple, first select the image, then the disk or flash drive that needs to be flashed with Hive, and start the recording process.
After which you need to go to the HiveOS Web interface and create a rig; if you entered a promotional code, a rig with a bonus balance will already be created.
By clicking on the plus sign at the top, you can add a new farm if you are on the main page of the dashboard.
Now you need to go into the rig further along the menu hierarchy by clicking on it in the list, and create a worker, which we will configure for Ether mining under HiveOS.
Fill in all the empty fields in the window that appears.
Next, you need to add the ETH wallet address to HiveOS. (For example, the one you created on the Binance exchange)
To do this, return to the main page of the dashboard and go to the wallets section and click on the “Add wallet” button.
The next step will be to create the so-called Flight Sheet, which we will launch in our worker so that mining can begin.
We indicate the coin that we will mine (in our case it is ETH), then select the wallet to which the mined funds will be received, indicate the Hiveon pool and select your region in the dialog box. In the “Miner” column, it is best to indicate PhoenixMiner, because it is considered the best in stability and saving money in case of glitches, because it can restore the solutions found after the farm is rebooted due to a glitch or freeze.
Now you need to log into the farm to your account. This can be done in two ways, one of which is: download the rig.conf and put it in the root of the flash drive with HiveOS.
If the flash drive is not displayed in the system, then try changing the drive letter using Partition Wizard Server or through the control panel.
But the rig may glitch and not load the data from the config file, in this case you will have to connect the monitor and keyboard, and connect manually by entering the rig ID and password. During boot, HiveOS will automatically detect video cards and load the necessary driver for them.
Once your rig is online, you can start mining. To do this, you need to go from the dashboard to the rig, then select the worker from above and go to the flight sheets section.
Now we just click on the rocket icon, and the miner launch process will begin, after which the DAG file will be loaded into the RAM of the video cards, and after a while the hashrate indicators will be displayed.
Overclocking HiveOS video cards.
If you have an AMD RX 400 or 500 series, then you need to flash them under Windows using Polaris Bios Editor and ATI WIN Flash, although the main thing is to change the RAM timings for Ethereum mining, and you can overwrite the Bios itself with the standard tool in Hive OS.
Read more about video card firmware in this section.
Next is overclocking and downvolting in HiveOS. Click on this icon opposite the list of video cards in Riga.
In the window that appears, you can enter overclocking values suitable for your video card (core frequency, memory frequency, power consumption, etc.).
You can also select values for fine-tuning your video cards on the “Popular presets” tab; they are left by the same miners in the HiveOS database.
But the essence is the same, to achieve maximum profit (benefit) with minimal power consumption and low GPU temperatures. For AMD, this is usually a core downvolt, a memory overclock (after changing the timings). For Nvidia This is Power Limit, core overclocking and memory overclocking. Everything is selected at random for each video card. I myself try to make the maximum downvolt in order to get silence and stable operation of the farm.
HiveOS fan settings.
The fan speed can be set separately for each video card, but the value will be static. HiveOS has an excellent AUTO FAN function, which allows you to set a target temperature for video cards, and the system itself will automatically adjust the fan speed, as well as take any action if it overheats.
Personally, I indicate the critical temperature - 83 degrees, the target temperature for the core - 69 degrees, for memory - 73. Everything works quietly and efficiently, the main thing is to service your video cards on time so that there is no unnecessary noise and overheating. Once a year, change the thermal paste and blow out the radiator.
But the best option is competent downvolting.
Setting up Watchdog in HiveOS.
The watchdog functionality helps monitor the stability of mining. If there are errors or glitches in the video cards of the farm or miner, it will take some action: reboot the miner or system.
Set the sliders to “on” in the columns “Reboot when GPU error” and “Do not reboot when internet is lost.” Specify the minimum hashrate of your video cards; if its value is lower, then Watchdog will be activated. Set the miner restart time to 5 minutes, and the rig restart time to 6 minutes. Otherwise, when loading the dag file for a long time, watchdog will mistakenly think that the rig has some problems, and you just have a slow drive and processor (or an Internet connection).
You can stop and restart the miner manually; look for the pickaxe icon at the top.
View statistics on pools.
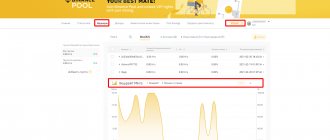
If you mine on the Hiveon pool, then you can go to monitoring statistics either in the HiveOS WEB interface, or go to the pool’s home page and enter the address of your ETH wallet.
When mining on the Binance pool, statistics are checked directly in the pool section on the exchange itself.
What is a DAG file in mining
The DAG file is used when the miner is launched and is loaded directly into the video card memory. Thanks to it, the process of mining cryptocurrency takes place: video cards select solutions for new blocks, announce them on the blockchain and receive a reward for the mined blocks.
The dag file also performs a security function - the file stores data about valid and invalid blocks that cannot be attached to the blockchain. Essentially, the file is a copy of the current blockchain data, in its different variations, stored on miners’ devices.
The DAG file size increases by 8 megabytes every 30 thousand blocks mined. A simple calculation shows that with the growing popularity of Ethereum mining and the number of miners involved, the Doug file should grow until it reaches its maximum size.
How to mine ERGO
ERGO is the youngest coin on our list. An unpretentious mining algorithm allows you to mine even cards with only 3 GB of video memory.
Miner Ergo
This coin was able to quickly attract almost a quarter of the miners from the ETC algorithm - mainly cards with 3 GB and 4 GB of video memory.
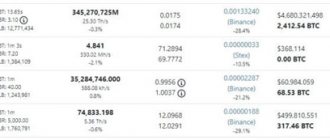
Ergo price chart for the year
- Mining algorithm: Autolykos2 (Cold