Most novice miners are interested in the question of how to set up ASIC on Antpool BitMain. This manual provides step-by-step instructions for connecting to the pool, registration features, creating workers and subsequent configuration of miners.
Advantages of Antpool for cryptocurrency mining.
To connect the ASIC to the antuple, you only need to complete a few steps. This is the advantage of mining on pools, as opposed to your own pools, which you can also run if you are the owner of 1000 ASIC units and are confident that you will mine much more on your own than when mining with the community.
Registration on antpool.com
In order to connect your AIs to the pool from Bitmain, you need to go through the registration process on the official website antpool.com. To do this, on the website in the upper right part of the screen, click on the icon with the image of a man and select “Registration”.
The site will redirect you to the registration page account.bitmain.com, where you must enter a valid email address, password, captcha and agree to the terms of service. After entering all the data, click on the “Create Account” button.
To confirm your email, you will receive an email with a link to authenticate your email. By clicking on the link, the system will inform you that registration was successful. After this, you can log in to the site in your personal account, where mining settings for most classic cryptocurrencies will become available to you.
The best ASICs of 2022: profitability, payback, balance of cost and performance
The main parameter for choosing a device from an economic point of view is the payback time. That is, the miner invests a certain amount, launches the device and waits for it to pay off, and then for it to make a profit, so the balance of cost and performance is important here. Let's look at the profitability of the devices that were the most popular at the end of 2022.
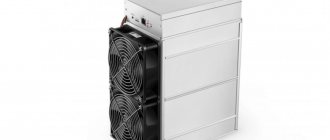
ANTMINER L3+
An excellent option for professional mining of crypto coins, the issue price is 330 thousand rubles . With a hashrate of 504 MH/s, the average monthly profitability is 47 thousand rubles; this miner pays for itself in an average of seven months, and then gives a net profit (of course, minus the cost of electricity).
ANTMINER S9
Produced in the laboratories of Bitmain, one of the leading manufacturers of mining devices, hashrate 14 TH/s. The model is quite compact, which is a plus when creating a farm. At a cost of 200 thousand rubles, it brings in approximately 23.5 thousand rubles monthly, payback is approximately eight to nine months.
Setting up ASIC antminer s9, antminer L3 for the pool (other ASICs from Bitmain have the same settings)
Before you start setting up ASICs, you need to create workers by first selecting the crypt that you will mine on the pool. Let's assume that you will be mining Bitcoin. To do this, select Bitcoin in the upper left corner by clicking on it with the mouse.
The system will take you to the appropriate section, where you can then see statistics - how many workers are in the network, and you can also find out how many have been mined over the entire time, yesterday and today.
In order to see the indicators for each ASIC, it is best to configure each ASIC with its own worker, thereby you will know exactly how much money each ASIC mined.
It is advisable that the ASICs do not overexert themselves and do not show a hashrate higher than 10% of the maximum declared, otherwise there is a high risk of the miner failing.
Bottom line!
Asic miners do not require a lot of time, unlike systems based on video cards for which the software needs to be updated regularly, but they still cost an order of magnitude more. With stable operation, such a system will pay for itself in at least three months.
Author of the article, financial expert
Dmitry Tachkov
Hello, I am the author of this article. I have a higher education. Qualified investor. Finance and credit specialist. Worked in commercial banks of the Russian Federation for more than 3 years. I have been writing about finance for more than 5 years. Please rate my article, this will help improve it.
about the author
Useless
25
Interesting
93
Helped
75
How to create a worker on a pool
To create a worker, just follow the “Worker” link and click on the “Create Worker” button
Enter your name. We recommend entering a serial number so as not to get confused with each of them later and number the ASICs in the same order in order to know exactly which ASIC is responsible for mining the worker.
Next, in the settings, you can select the mining option PPS+ or SOLO or ZZDTA. We do not recommend using the SOLO option, because the likelihood that you will find the next cell is extremely low, and you will spend a lot of money on electricity, premises and the miner itself.
Popular equipment manufacturers
There are many different manufacturers of miners on the modern market. Among the popular ones:
- BITMAIN;
- Canaan;
- Ebang;
- Innosilicon;
- Whatminer.
The choice of one manufacturer or another depends on the ultimate goal of cryptocurrency mining.
How to connect ASIC to Antpool: setting up a miner
Before setting up ASIC on Antpool, the user must connect it to the Internet using a cable. To do this, you can use a router or modem. Then, to configure the device itself, you need to find out its IP address. This is easy to do via your modem. Usually, to enter the admin panel, you can simply enter 192.168.0.1 in the address bar - after which a panel will open for you to enter your login and password. By default, all modems have a login and password: admin/admin
Next, go to the “Devices” tab and find your miners there.
Once you have been able to find out the IP address of the device, you need to configure it on Antpool. To do this, enter the miner’s IP in the address bar of the browser and go to its web interface using your login and password. By default, you must enter the word “root” in both fields to gain access.
In the window that appears, go to the “Miner Configuration” tab and select “General Settings”. Special fields will appear on the screen that must be filled in for the subsequent operation of the ASIC.
In order to configure the ASIC for Bitcoin mining, you need to enter the following server addresses:
stratum.antpool.com:3333
Registration on antpool stratum.antpool.com:443 stratum.antpool.com:25
In the second line, indicate the name of the worker. The third line with the password can be left untouched; it will not be useful.
Next, save the settings and restart the miner. In about an hour you will see the miner on the pool.
The main thing is that after you set everything up, monitor the temperature and number of errors in the chips at least once a day, as this will guarantee the stability of the ASIC. If the chip temperature exceeds 80-85 degrees, then consider additional cooling to prevent the chip from overheating and further failure.
The same goes for the number of errors. If you see that there are a lot of errors, then reduce the ASIC overclock to optimal.
When choosing a mining option, it is worth considering that in two of them, Bitmain takes a commission
PPS+: 4% Commission fees +2% Tx Fee PPLNS: 0 SOLO: 1%
A brief history of Bitcoin cryptocurrency mining.
Bitcoin appeared in 2009 along with mining, i.e. Mining and Bitcoin are an integral part of all technology. The first miners mined Bitcoin using a regular computer that had an Intel or AMD x86 processor. With the growing popularity of cryptocurrencies, enthusiasts adapted video cards for this purpose, which coped with the mining task several times faster than the CPU. At this stage, there is a sharp increase in the hashrate of the entire network by about 10 times in 1 month. Because a typical central processor sorted hashes at a speed of 20MH/s (20 million hashes per second), then an average budget video card of that time was already around 200Mh/s.
In 2012, FPGA chips are used for these purposes, which can be programmed independently to perform a specific task. But due to the high cost, high complexity of configuration and low availability, such solutions were used extremely rarely.
In 2013, FPGAs were replaced by other chips - ASICs, which were initially designed for a specific task. Which is why such solutions have the greatest efficiency per watt, because... all the unnecessary elements that are found in central processors, video cards and FPGAs are simply absent here. The performance increase compared to video cards is another order of magnitude. Because The first ASICs, with the same power consumption as video cards, sorted through hashes 10-20 times faster. A typical ASIC miner in 2013 had a performance of 10GH/s. But this was just the beginning, because... With each new generation of ASICs, the hashrate of these devices, due to various optimizations and a reduction in the manufacturing process of the ASICs themselves, increased several times. The progress of development of ASIC miners has brought the speed of hash search of one ASIC miner to 100TH/s, which equals 100,000GH/s. Those. in 7 years, the productivity of ASIC miners has increased 1000 times. For comparison, video cards have increased their hashrate by only 3-4 times over the past 7 years. For example, the Nvidia Geforce RTX 2080Ti video card produces only 2.6GH/s when mining Bitcoin, which is less than even the very first ASIC miners from 2013.
What is the peculiarity of “solo” mining as part of Antpool?
This mining algorithm is for those who like risk. This is a kind of lottery in which you can win a big prize, but you can also “fly through”.
The essence of the method is that the block found by your “worker” does not go to all your “colleagues” little by little, but only to you alone (minus 1%). True, you are left with nothing, if those participants who prefer traditional reward methods are lucky. But PPLNS users will be rewarded in any case; the service takes on certain risks and undertakes to pay adherents of the traditional regime their share, even if several links of the blockchain chain in a row are found alone.
In order to start working “solo”, just set this payment method in your account settings. In case you are lucky with the block calculation, you will receive a message from the server.
What’s good about this mode is its ready-made settings. You don’t need to tinker with interface settings, monitoring, mining structure and similar things that take time and effort. Everything is already set up and your concern is to receive the well-deserved 99% on your wallet and enjoy life.
But remember we talked about the lottery? It’s good if you remember, because before you go on a “single voyage”, you must take into account that in the lottery, as a rule, only a few win, and the rest of the players simply lose money. After all, there is no guarantee that you will be lucky. This may not happen either in 5 or 25 years, and you will have to constantly spend money on equipment maintenance.
By the way, if you really want to try your luck, then you don’t have to switch all your cars to “solo” mode, one or two are enough, and leave the rest on PPLNS. For each “worker” you can choose your own profit calculation method.
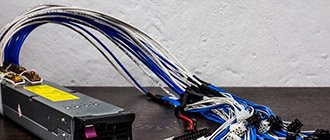
Step-by-step instruction
First of all, you need to connect the power supply to the ASIC itself. We urge you to make sure in advance that the power of the unit is suitable for your device. Remember that if there is insufficient power, the device will not start, and if there is too much power, the device will simply fail. Of course, sometimes the power supply is already included in the kit, but if you need to buy it yourself, then be careful.
Also, when selecting a block, check the number of connections. Please note that if there are too few of them, or you plan to overclock the ASIC in the future, it is better to buy several blocks at once. When connecting, do not forget about an important rule - we do not use more than 1 power supply for one board. And another point that is important to remember: the control board is connected at the very end.
The next step is to connect the power cord to the power supply, and to the ASIC itself - a network cable. By the way, you can connect to the Internet via a modem or router. If you did everything correctly, then after a few minutes the fans will work at full capacity. In this way, the device will be cleaned of dust that has accumulated in it during storage or during transportation.
Install custom firmware
If possible, be sure to “equip” your devices with custom firmware. With its help, you can improve the factory power consumption and hashrate indicators, so you will spend less and earn more. And this is not the only advantage of custom firmware.
For example, using the Hiveon ASIC firmware, you can do the following:
- Increase hashrate;
- Reduce energy consumption;
- Accelerate worn-out ASIC chips;
- Protect equipment from viruses (and even “treat” already infected devices);
- Use all the functions of the Hive OS system for free: mass management of ASICs, monitoring of hashrate, power consumption, temperature, statuses, errors, setting access levels to the farm, 24/7 support, and so on.
When it comes to increasing hashrate and reducing power consumption, the Hiveon ASIC firmware provides three possible scenarios:
- Increase the hashrate and leave power consumption at the factory level;
- Reduce power consumption and leave the hashrate at the factory level;
- Maximize the hashrate, but the power consumption will also increase.
The profitability of Hiveon firmware depends on the specific device model, hashrate and cost of electricity. Let's give an example with Antminer T17E (53 TH/s) and the cost of 1 kilowatt of electricity is 4 rubles. At stock values, the Hiveon ASIC firmware will earn about 400 rubles (~$5) more per month than the factory one. And when overclocked, the difference will be more than 2200 rubles (~$29) per month.
Temperature and cooling
The optimal operating temperature for ASICs is 70-80 degrees. The smaller the room and the worse it is ventilated, the hotter they will be. This is due to the fact that ASICs consume a large amount of electricity, which means they give it back in the form of heat.
It also happens that just 1 ASIC can heat up to 80-90 degrees. This is already a critical temperature, although many experts claim that the operating temperature of such equipment can reach up to 110 degrees; at temperatures above this, parts will begin to melt.
Therefore, it is best to try to keep the operating temperature in the range of 70 to 85 degrees.
There are several ways to cool ASICs:
- Ventilate the room . If possible, keep a window open to cool the room.
- Use regular fans . They will blow off the residual hot air from the ASICs, making it cooler. Fans should be directed directly at the ASICs.
- The third method is the most budget-friendly and produces almost no results, but some home miners resort to it. Place bowls of water and ice around the room : the ice will evaporate and the cold air will cool the apartment a little.
- Using humidifiers . Since ASICs dry out the air, a humidifier will return freshness to the room and cool it a little. Remember that they cannot be used next to ASICs!
- The fifth method is expensive, but at the same time the most effective in terms of cooling - air conditioning .
- Make a hood in a room or room . This method is also very effective, but also expensive.
ASIC cooling
Innosilicon A6+ LTCMaster
In this tutorial we will be using the Innosilicon A6+ LTCMaster, a very powerful ASIC miner that uses the Scrypt algorithm for LTC mining.
ASIC stands for Application Specific Integrated Circuit and this means that these devices are made for the sole purpose of mining a specific coin, making them very efficient.
This is why you cannot mine Litecoin on video cards!
In our opinion, cheap ASIC miners have an advantage: if and when cryptocurrency prices skyrocket, the profitability of cheaper miners will skyrocket. This way, within one bull market cycle, you will quickly get ROI.
NiceHash
For the second pool we are going to use NiceHash and receive money in Bitcoin.
An important strategy is to use multiple pools. Thus, the likelihood of both pools being turned off at the same time (and also of your ASIC being idle and losing money) is much less.
Setting up NiceHash
- Go to the NiceHash ASIC page.
- At the bottom, in the drop-down menu “SELECT ALGORI.
- In the “SELECT LOCATION” section, select your region or the one closest to you.
- Click the "Generate Address" button.
- The URL should look something like this: stratum+tcp://scrypt.eu.nicehash.com:3333
- Copy the URL and paste it into the second pool in the “Configuration” tab of ASIC.
Example:
- URL
: stratum+tcp://scrypt.eu.nicehash.com:3333 - WORKER
: 3HHG3zpxP4AmbKDR9iRy1c2bqAb4WKhNwm.mya6 - PASSWORD
: x
Note.
For WORKER, use the Bitcoin address you want to transfer BTC to, and worker is any name with a (.) sign in between, as in the example.
For the third and last pool URL we will use the Nicehash USA server:
- URL
: stratum+tcp://scrypt.usa.nicehash.com:3333 - WORKER
: 3HHG3zpxP4AmbKDR9iRy1c2bqAb4WKhNwm.myL3 - PASSWORD
: x
Click "Save and Apply" in the bottom right corner of the "Miner Configuration" tab and you'll be ready to start mining on your A6+!
FAQ
How long does it take to mine Litecoin?
As of 2022, 64,733,818 Litecoins have been mined, and 84,000,000 coins are planned for mining.
Is mining Litecoin profitable?
Yes. If you have the right setup (i.e. low electricity costs and a cool environment), it will still be profitable to mine Litecoin. To find out if you can mine LTC profitably, use the Litecoin mining calculator.
How long will it take to mine 1 Litecoin?
Using A6++ with a difficulty factor of 13,667,659.27727, it will take you 45 days to mine 1 Litecoin.