The rapid popularization of mining has led to developers starting to produce specialized hardware for this area. The Gigabyte H110-D3A motherboard is a clear example of such equipment. This is the “core”, which is considered one of the most popular options for mining farms in the budget segment.
A lot of time has passed since the release of the Gigabyte H110-D3A on the market and almost all top manufacturers have released their motherboards designed for mining. Should we consider the model from Gigabyte in the 3rd and 4th quarters of 2022 as the optimal choice, or can the board no longer boast the same success that it gained at the start of sales? In this article we will look at all the technical features of the Gigabyte H110-D3A board, as well as its relevance at the moment.
Specifications
The GIGABYTE GA-h210-D3A version was released specifically for miners. Resource element base, new fiberglass technologies, powerful cooling are selected for long-term operation under increased loads and tested under real mining conditions (according to the manufacturer).
Specification of GA-h210-D3A:
| GPU buses | PCIe 3.0 1×16, 5×1 slots |
| GPU (socket 1151) | Intel i3+, Pentium, Celeron 6th and 7th generation |
| RAM | 2 x DDR4, DIMM, 32 GB (max) |
| LAN | Realtek GbE LAN (10/100/1000 Mbit) |
| Discs | 4 x SATA 6 Gb/s |
| USB (chipset) | USB3.1 Gen1 (4 pcs., 2 on the rear side, 2 on a separate panel), USB2.0 (6 pcs., 2 on the rear side, 4 on a separate panel) |
| Nutrition | ATX-24, ATX12V-8 |
| Ports internal | USB3.1 Gen1, PCIe pwr (2), proc. fan, sys. fans (3), SATA (4), M.2 (Socket 3), Audio, S/PDIF Out, , CMOSrs, TPM |
| External ports | USB 3.1 Gen1 (2 pcs.), D-Sub, Audio (3iom), COM, PS/2 (kb, mouse), LPT, RJ-45 |
| BIOS | 2xROM 64 Mbit, DualBIOS, PnP 1.0a, DMI 2.7, WfM 2.0, SM BIOS 2.7, ACPI 5.0 |
| Dimensions | 305 x 190, ATX |
The D3A model has an attractive price among its competitors on the h210 chipset, comparable to the price of the popular ASRock on the younger version of the H81 chipset and socket 1150 (H81-PRO-BTC-R2.0). The new version of ASRrock h210 PRO BTC costs almost twice as much.
Motherboards for mining on the h210 chipset:
| Equipment | Number of video cards | Approximate price, rub. |
| GIGABYTE GA-h210-D3A | 6+ | 5760 |
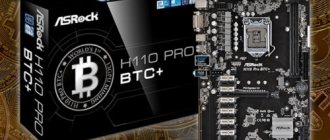
| ASRock h210 PRO BTC+ Bitcoin | 13+ | 10 800 |
| MSI h210 PC Mate | 4+ | 4200 |
Review
GIGABYTE 100 Series motherboards support the latest 6th Gen Intel® Core™ processors, a 14nm desktop processor with improved performance, power consumption and DDR4 memory support, delivering cutting-edge features and extreme performance for the best PC build of your life.
Main features
- 6 PCIe Slots Perfect for Mining
- Compatible with 6th and 7th generation Intel® Core™ processors
- Dual channel support for DDR4, 2 DIMM slots
- High Bandwidth M.2 Connector
- HD audio subsystem (8 channels, high-quality audio capacitors)
- Anti-noise screen, LED tracing of the audio subsystem zone
- Realtek GbE LAN with cFosSpeed Internet Accelerator Software
- GIGABYTE UEFI DualBIOS™ Technology
- A set of proprietary APP Center applications (EasyTune™ and Cloud Station™ utilities)
M.2 storage connector
GIGABYTE M.2 solution provides significantly higher storage performance and supports SATA interface for M.2 SSD devices.
Fast USB 3.1 Gen 1 Solution
With high throughput up to 5 Gb/s, the user receives a 10-fold increase in speed compared to USB 2.0. Additionally, backward compatibility with USB 2.0 allows you to continue using USB 2.0 devices.
Exclusive built-in audio design
Provides high-quality audio detail and expansion to create the most realistic sound effects for professional gamers.
- Anti-noise screen, LED tracing of the audio subsystem zone
- High-End Audio Components
Realtek® GbE LAN Controller and cFosSpeed Internet Accelerator Utility
Using the cFosSpeed application, which operates in conjunction with the Realtek® Gbe LAN controller, you can control network traffic, reduce latency and reduce response time to requests, in order to ensure minimal response time in conditions of high load on the local network. In standby mode, the Realtek GbE controller consumes significantly less power compared to similar solutions from other manufacturers.
cFosSpeed Internet Accelerator Software
Humidity protection, new generation printed circuit boards
Humidity negatively affects the life of your PC. It is known that the moisture content in the air varies depending on the season. Environmental humidity is not an issue for GIGABYTE Ultra Durable™ motherboards because the new generation fiberglass used in GIGABYTE PCBs is highly moisture resistant. Progressive technology for the production of printed circuit boards involves the use of a fundamentally new fiberglass as a base, in which the distance between the fibers is reduced and the weave knots are denser. This makes it much more difficult for moisture to penetrate the inner layers than on a traditional PCB design. The proposed solution provides more reliable protection of the product from short circuits and malfunctions caused by dampness.
ESD protection for GbE LAN and USB ports
GIGABYTE motherboards have raised the bar for your system's security by providing enhanced Electrostatic Discharge (ESD) protection for the Ethernet LAN and USB ports that are most at risk from ESD failures. Each LAN and USB port is paired with a special protective filter that can withstand serious electrostatic discharge, which protects the system from power surges and during thunderstorms.
High temperature protected Lower RDS(on) MOSFETs
GIGABYTE motherboards use Low RDS(on) MOSFETs which reduce power loss due to unnecessary residual heat generation. All of this adds up to measurable energy savings that benefit both end users and the environment without impacting system performance.
Patented GIGABYTE DualBIOS™ (UEFI) technology
GIGABYTE Ultra Durable™ motherboards feature the unique GIGABYTE DualBIOS™ technology, designed to secure one of the most important components of the motherboard - the BIOS. As part of DualBIOS™ technology, GIGABYTE motherboards have two BIOS chips - a main one and a backup one. This tandem reliably protects the BIOS microcode from virus attacks, hardware failures caused by failure of PC components, incorrect user actions during overclocking, as well as from power surges during the BIOS update process.
APP Center
The GIGABYTE App Center gives you instant access to proprietary GIGABYTE apps to help you get the most out of your motherboard. The intuitive user interface of GIGABYTE App Center allows you to launch all GIGABYTE applications installed on your system.
Easy Tune™ utility
Take your PC to the next level of performance with easy-to-learn proprietary GIGABYTE features.
Cloud Station™ utility
GIGABYTE Cloud Station™ consists of several unique GIGABYTE applications that allow your smartphone/tablet to communicate, share resources, and control your desktop PCs wirelessly.
Pros and cons of mining
The advantages of GIGABYTE-h210-D3A include design features due to its focus on mining:
- high moisture resistance, dense textolite;
- increased protection against interference;
- resource element base (solid-state capacitors, Hi-End components);
- economical Lower RDS(on) MOSFETs, with reduced heat generation;
- two ROM chips, a backup one allows you to save the BIOS;
- several graphics processors (+2, up to 8 GPUs) can be additionally connected via PCIe M.2 expansion slots;
- reasonable price (MSI h210 PC Mate is cheaper than D3A by about $25, but is designed for mining on 4 GPUs).
The disadvantages of D3A include some difficulties when connecting video cards. When starting, the system does not see the sixth card on the default BIOS, it works stably only on 5. The topic was discussed in detail on the MiningClub forum. — the problem started in a thread dated November 20, 2022. Users with the “Experienced” status quickly found a solution to support 6+ video cards in the form of the following algorithm of actions:
- Install Windows on one video card.
- Set in BIOS: Max Speed - Gen2 (MIT tab); 4G Decoding - enable (Peripherals tab); Mining mode — disable (Peripherals tab); VT-d - enable (Chipset tab).
- Connect other cards.
- Do not connect the monitor to the internal output, use the VGA connector.
Forum members note in D3A that the mining client is unstable when connected via Wi-Fi - the Internet immediately disappears. After a LAN connection the problem disappears.
Another disadvantage is the high cost of processors on the Intel socket. AMD versions are cheaper by an average of 40%, and a used one can be purchased for 1000 rubles.
New Gigabyte GA-H110-D3A motherboard, designed specifically for mining
Probably many of you have not heard about the Gigabyte GA-H110-D3A motherboard, designed for mining rigs with 6 GPUs. The reason is that Gigabyte does not market this product as a mining motherboard.
Gigabyte is a bit late with the GA-H110-D3A on the GPU front of mining motherboards, although the motherboard has modern specifications. This, however, does not mean that the company did not offer other higher-end products that are suitable for use in cryptocurrency mining (in fact, there are quite a few of them). (But the GA-H110-D3A is new to us and we are going to try it out and share our experience soon).
The great thing about the Gigabyte GA-H110-D3A is that it comes at an attractive price and has all the features you need to build a 6 GPU mining rig. This is a basic motherboard with 6 PCI-E slots that should be durable, reliable and cost effective, but add-ons may be needed to make it work.
The motherboard is equipped with an M.2 slot, allowing you to use an SSD and save extra space and cables, especially power cables, as this can be an issue in some situations. There are a couple more things that make the product more attractive in terms of marketing. What you'll probably gain a little from, though, is USB 3.1 Gen1 support and high-quality onboard audio (Realtek Gigabit LAN with cFosSpeed Internet application accelerator software).
Some of the additional features can be really useful, such as Humidity Protection Glass Fabric PCB (for moisture protection), High ESD Ethernet & USB Port Protection (for ESD protection) or High Temperature Protection Lower RDS(on) MOSFETs Design (to protect semiconductor elements from high temperatures), since often mining rigs do not operate in the best conditions.
Gigabyte has an interesting mining microsite that focuses on the H110-D3A motherboard, but also has useful information on the company's other products that can be used for mining. The most interesting part is probably the table that lists 12 different Gigabyte motherboards with information about which BIOS version should be used when mining and how many GPUs can be used for a particular model.
Please note that there are motherboards that require the use of an additional M.2-PCI-E adapter to achieve the specified number of GPUs. For example, the Z170-Gaming K3 is one of the boards for 6-GPU setups that didn't have support for more than six graphics cards until BIOS F22. But now Gigabyte says that the graphics card can run using an optional M.2-PCI-E adapter if you use BIOS version F23a.
There are even some 9-GPU motherboards with dual M.2 adapters, such as the Z170X-Gaming 5 and Z170X-Gaming 6, although in reality you may have problems using all 9 graphics cards with Windows, for example.
The latest news on the cryptocurrency market and mining:
In the new 3D shooter “MASD GAMES” you can play and earn thanks to NFTs
Bitcoin price is growing amid the publication of the “consumer price index” in the United States
According to the inactivity flow indicator, the “bottom” for the price of Bitcoin has already been passed
Bitcoin is here to stay as 24% of US residents already own it
25% of companies are ready to accept cryptocurrency as a means of payment
The following two tabs change content below.
- Author of the material
- Latest news from the world of cryptocurrencies
Mining-Cryptocurrency.ru
The material was prepared by the editors of the website “Mining Cryptocurrency”, consisting of: Editor-in-Chief - Anton Sizov, Journalists - Igor Losev, Vitaly Voronov, Dmitry Markov, Elena Karpina. We provide the most up-to-date information about the cryptocurrency market, mining and blockchain technology. Disclaimer: all materials on the website Mining-Cryptocurrency.ru are for informational purposes only and do not constitute a trading recommendation or a public offer to purchase any cryptocurrencies or carry out any other investments and financial transactions.
News Mining-Cryptocurrency.ru (go to all news feed)
- In the new 3D shooter “MASD GAMES” you can play and earn thanks to NFTs - 01/13/2022
- Instructions: How can a beginner buy Bitcoin on a crypto exchange for rubles? — 01/13/2022
- NFA appealed to the Central Bank of the Russian Federation with a request to legalize investments in cryptocurrency - 01/12/2022
- Tinkoff bought a stake in the Swiss crypto exchange for international expansion - 01/12/2022
- The ex-head of Twitter created the “Bitcoin Legal Defense Fund” to develop the ecosystem - 01/12/2022
Mining
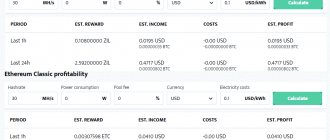
Payback
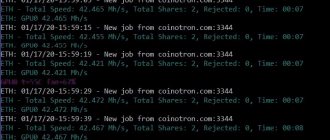
The main indicator of the payback of mining equipment is the number and performance of video cards. The optimal proven solution is a 6 GPU farm. Popular among miners (with high performance) are the GTX 1070 cards from NVIDIA (32.3 MH/s Ethereum) and RX470 (24.5 MH/s Ethereum) from AMD (memory 8 GB, setting for mining).
Example of equipment for a 6 GPU mining farm with a GIGABYTE GA h210 D3A motherboard:
- GeForce GTX 1070 8 Gb 6 x $520 = $3120;
- risers VER005 PCI Express Riser Card USB 3.0 6×6 = $36;
- power supply 2xCorsair TX750M 80 Plus Gold 750 W = $258;
- GIGABYTE GA-h210-D3A = $95;
- processor Intel Core i5-7600K box = $200;
- RAM DDR3 4Gb Kingston = $40;
- HD WD Black WD5000LPLX 500 GB = $50.
The total cost of equipment for the h210-D3A will be $3800. The share of the motherboard (with processor) in the cost of the entire farm is 6.1%, the share of video cards is 82.1%. With an estimated income of $40 per month from a video card, the payback will be 16 months.
Example of 4 GPU farm equipment with MSI h210 PC Mate motherboard:
- AMD Radeon RX470 8 Gb 4 x $400 = $1600;
- risers VER005 PCI Express Riser Card USB 3.0 2 x $6 = $12;
- power supply 2xCorsair TX650M 80 Plus Gold 650 W = $180;
- MSI h210 PC Mate = $70;
- Intel Core i3 8100 box processor = $190;
- RAM DDR3 4GB Kingston = $40;
- HD WD Black WD5000LPLX 500 GB = $50.
The total cost of the equipment is $2142. The share of the motherboard (with processor) is 12.1%, the share of video cards is 74.7%. With an estimated income of $30 per month from a video card, the payback will be 18 months.
GIGABYTE GA-h210-D3A allows you to assemble a more productive and faster payback farm, but the board will also cost more (77%) due to the cost of video cards. If you use the economical RX470 in the first option, the cost of the D3A farm will be $3079 (43%) with a payback period of 17 months.
The influence of the motherboard on the farm's payback is weak due to its insignificant share in the total cost of the equipment.
Where can I buy
You can buy GIGABYTE H110-D3A Bitcoin Edition (ideal für Mining) on computeruniverse for €25.13 (1,800 rubles). The cost of a motherboard in Russia starts from 3,000 rubles. Well-known stores, for example, Citylink sells the device for 3,200 rubles, Regard for 3,600 rubles and online trade for 3,400 rubles. When ordering on computeruniverse.net, do not forget to use the discount coupon: FWANUVT (How to use?). It is most profitable to pay for the purchase at the Central Bank rate using the Corn Card. Payment with cards from banks such as Alfabank, VTB24, Sberbank, and especially Yandex and Qiwi faces costs in the form of 3-5% additional interest for currency conversion.
Does ASRock h210 give advantages in cryptocurrency mining?
Advantages of ASRock h210 PRO BTC+ Bitcoin:
- high density of PCB;
- high voltage protection;
- high load tolerance (tested on Bitcoin mining);
- 13 PCI-e slots for connecting 13 GPUs.
- built-in M.2 slot (you can connect a fourteenth video card, but malfunctioning slots are rarely used in mining).
The ASRock H81 version, which has proven itself among miners, creates a positive reputation for the brand in terms of reliability. The first three points are structural and can hardly be considered competitive - all profile boards have similar advantages, including the GIGABYTE GA-h210-D3A.
A large number of connections seems attractive. The question arises: what is better - one farm with 13 GPUs or traditional two with 6 GPUs? The advantages of 13 GPUs include savings on a second motherboard, processor, and memory; the disadvantages are the questionable possibility of stable operation of Windows 10 on a large number of video cards. The manufacturer recommends installing GPUs from different manufacturers 5+8 (AMD, NVIDIA) due to compatibility with Windows 10. The release of new drivers removes the “8 cards from the same manufacturer” limitation, but miners attribute poor compatibility with Windows to the disadvantages of the h210 PRO BTC+.
Example of farm equipment for 13 GPUs with ASRock h210 PRO BTC+ Bitcoin motherboard:
- GeForce GTX 1070 8 GB 6 x $520 = $3120;
- AMD Radeon RX470 8 GB 5 x $400 = $2000;
- processor Intel Core i5-7600K box = $200;
- SUPERMICRO 1400 power supply without PICO PSU = $95:
- SUPERMICRO 1400 with PICO PSU (for powering the board and disk) = $115;
- risers VER005 PCI Express Riser Card USB 3.0 13 x $6 = $78;
- ASRock h210 PRO = $165;
- RAM DDR3 4GB Kingston = $40;
- SSD Kingston A400 480 GB = $107.
The total cost is $5920, the share of video cards is 86.5%. The payback period for an income of $35 per video card will be 13 months.
The advantages of using a mining rig with 13 GPUs include faster payback; the disadvantages are the need to use cards from different manufacturers and poor (according to users) compatibility with Windows. A traditional and proven approach is to design a 6 GPU farm.
Is it worth buying Gigabyte H110-D3A for mining?
There is no clear answer to this question. If you decide to build a budget farm that will include a GTX 1050 Ti, RX 570 or other cards in the economy segment, then purchasing the Gigabyte H110-D3A would be a good decision. As a rule, budget farms rarely buy more than 5-6 video cards, so this board fits perfectly both at a favorable price and in terms of its characteristics. If you plan to buy an RX 580 or GTX 1060 (6) for a farm, then it is most likely better to pay attention to slightly more expensive models that can provide more advantages. Saving an extra $20 is unlikely to do anything. If you are planning cards of the GTX 1080 level and higher for your farm, then it is better not to consider purchasing the H110-D3A model.
It is important to understand that there are completely different farms, including where the GTX 1080 is chosen for the Gigabyte H110-D3A. However, they should be assessed only from the point of view of the rationality of financial spending and obtaining the corresponding benefits. Purchasing one of the cheapest, albeit very successful motherboards, in combination with expensive video cards, the cost of which is many times higher, will look illogical. Therefore, the choice should be left to personal preferences, budget and the number of planned video cards for the farm.
Instructions for setting up mining
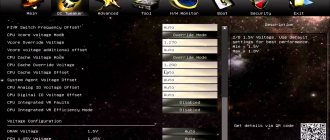
Settings for a motherboard with an h210 chipset for mining include BIOS settings and OS settings.
BIOS settings for GIGABYTE GA-h210-D3A:
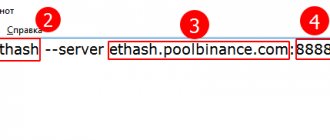
- Update the BIOS to the latest version, special for mining (currently F25a). You can download the application from the official source.
- Reboot the system, call BIOS Setup, check the installation of the update.
- Activate mining mode, enable Mining Mode in the Peripherals tab.
- Translate CSM for UEFI OS to Disasse
- In the MIT (“Other”) tab, set Max Speed to Gen2 (default is Auto).
- In the Peripherals Initial Display Output tab, switch to IGFX (PCI-e 1 Slot by default).
- If necessary, activate Above 4G Decoding - Enabled.
- In the Chipset tab, set Internal Graphics to Enabled (Auto by default).
- Install the OS in legacy BIOS compatibility mode (UEFI).
- Prevent automatic OS updates in Control Panel.
Windows 10 64-bit Prof settings on h210-D3A:
- Disable the Internet.
- Install the High Performance power option. In the plan settings and additional settings, click to expand the drop-down lists and select “Never”.
- Set the video memory swap file to the total amount of video memory in the farm (20,000 MB, minimum 16 GB required).
- If necessary, update drivers.
- After configuring Windows settings, you need to restart your computer (PC).
- Connect video cards one at a time.
When using boards from other manufacturers (ASRock h210 PRO BTC, MSI h210 PC Mate), BIOS settings for mining are set in accordance with the documentation requirements.
Source
Customer Reviews
Buyers in their reviews noted the very low price of the motherboard (one of the cheapest motherboards of the ATX form factor for Socket 1151), high-quality and durable slots.
You can install up to 7 video cards on the motherboard, which is a real godsend for a miner at this price! (For the seventh card, you need to use an adapter to M.2) Among the shortcomings, the reviews noted the close location of the RAM connectors, due to which certain inconveniences arise when installing a processor cooler (it must be installed after the RAM strips). Buyers also complained about the inconvenient location of the 8 pin power supply, which is located on top of the motherboard. As one buyer wrote, the user is faced with a choice: “either install power, but then it’s inconvenient to install a tower in the case, or install a tower, but then somehow cram in the 8 pin "
Also, buyers noted the very low-cost configuration of the motherboard kit: 2 sata cables, pieces of paper, cheap cardboard, but at such a price it would be a sin to find fault with such trifles.
Perfect for Skylake CPU - Build for Any Budget Dec 11, 2015 [Verified Purchase] Style: GA-H110M-A If you want to use a Skylake CPU in your PC build but don't want to overclock, this is the motherboard for you.
I just built a gaming PC for my family. I knew I wanted to install the new Skylake processor (released just a few months ago at the time of this writing). However, I didn't want the added cost of parts, extra heat, and potential instability to come with overclocking. There is no need for additional features, just simple and reliable assembly. If you get a board with the Z170 chipset but don't intend to overclock, you're paying extra for features you won't use. Why pay for the best chipset if you don't overclock? Why pay for 4 DIMMs if you're only going to use 2 (or 1)? Why pay for those extra PCI slots and Crossfire/SLI compatibility when you're using a single graphics card? Keep it simple, keep it cheap, and save your money.
I paired this with an i5-6500, Radeon R9 380, one 8GB DDR4 RAM (2133 MT/s) and even had a remaining slot to add a PCI Wifi adapter. It works like a champ without any problems. This board gave me everything I needed to run a full Skylake game at an amazing price.
A buyer from Amazon who was very pleased with the purchase of an older modification of the GA-H110M-A motherboard discussed in the review
Easy to set up for mining Sep 21, 2017 [Genuine Purchase] Style: GA-H110-D3 Very easy to set up for mining. There was literally a “mining” mode in the bios that changed most of the settings for you. Within an hour my system was running with 6 video cards. Be sure to connect the monitor via the VGA output of the board. The Gigabyte website has helpful instructions on setting up the BIOS and configuring the OS.
Don't waste your time on other popular motherboards that require a lot of letter reading to install, you will waste a ton of time debugging, setting up, etc. The problem is that people end up buying gaming boards that are not suitable for mining. Then your OS will simply crash as it will have PCIE problems with 3-6 GPUs.
So, I highly recommend purchasing the GA-H110-D3, which is designed specifically for mining. It's cheaper anyway! You are on this page to save money, right?
A review from a satisfied buyer of the motherboard on Amazon, who recommended it for purchase to those who don’t want to bother with setup: install 6 video cards and start earning cryptocurrency with a shovel!
Poor customer service for everyone May 30, 2018 I purchased this motherboard. When I received it I tried to use it. But it didn't work at all. When you turn on the power, the CPU fan and PSU fan spin for a few seconds and then stop. This lasts a few seconds. There are no problems with the power supply and processor. This is a motherboard problem.
Tried to contact GIGABYTE. They only have online contact through registration and form submission. But I didn't receive any response from them. I looked for a contact phone number or email address, but found nothing.
Very bad support service.
An Amazon customer who left a negative review received a non-working motherboard and was unable to get a response from Gigabyte support.
ASRock H81 PRO BTC R2.0
- On the Advanced tab, open the Chipset Configuration folder
- Set Primary Graphics Adapter to OnBoard (default PCI Express)
- PCIE2 speed parameter set to Gen2 (default is Auto)
- OnBoard HD Audio value set to Disabled (default is Auto)
- Restore on AC/Power Loss parameter set to Power On (default is Power Off)
- On the Advanced tab, open the Storage Configuration folder
- Hard Disk SMART value set to Disabled (disabled by default)
- On the Advanced tab, open the USB Configuration folder
- Set Intel USB3.0 Mode to Disabled (enabled by default)
- On the H/W Monitor tab, open the USB Configuration folder
- CPU Fan 1 & Settings value set to Standard Mode (default is Standard Mode)
- On the Exit tab
- Click Save Changes and Exit. Then Ok to save.
ASRock h210 Pro BTC+ Bitcoin
- On the Advanced tab, open the Chipset Configuration folder
- Set Primary Graphics Adapter to OnBoard (default PCIE2)
- 7 parameters PCIE1 speed, PCIE2 speed, PCIE3 speed, PCIE4 speed, PCIE5 speed, PCIE6 speed, PCIE7 speed set to Gen2 (default is Auto). It is worth noting that there are 7 parameters, and 13 slots. Therefore, one PCIE parameter is set for 1-2 slots.
- OnBoard HD Audio value set to Disabled (default is Auto)
- Restore on AC/Power Loss parameter set to Power On (default is Power Off)
- On the Advanced tab, open the Storage Configuration folder
- Hard Disk SMART value set to Disabled (disabled by default)
- On the Advanced tab, open the USB Configuration folder
- Set Intel USB3.0 Mode to Disabled (enabled by default)
- On the H/W Monitor tab, open the USB Configuration folder
- CPU Fan 1 & Settings value set to Standard Mode (default is Standard Mode)
- On the Exit tab
- Click Save Changes and Exit. Then Ok to save.
ASUS Prime H270-PLUS
- Press F7.
- On the Advanced tab, open the System Agent (SA) Configuration folder
- set VT-d value to Enabled (disabled by default)
- Set the Above 4G Decoding parameter to Enable (the default is Disable).
- On the Advanced tab, in the open System Agent (SA) Configuration folder, open the DMI/OPI Configuration folder
- DMI Max Speed value set to Gen3 (default is Auto)
- On the Advanced tab in the System Agent (SA) Configuration folder, open the PEG Port Configuration folder
- PCIEX16_1 value set to Gen3 (default is Auto)
- On the Advanced tab, open the PCH Configuration folder. In it open the PCI Express Configuration folder
- PCIe Speed value set to Gen3 (default is Auto)
- On the Advanced tab, open the APM Configuration folder.
- Restore AC Power Loss value set to Power On (default is Power Off)
- On the Advanced tab, open the OnBoard Devices Configuration folder.
- HD Audio Controller parameter set to Disable (enable by default)
- set M.2_1 Configuration and M.2_2 Configuration values to PCIE (default is Auto)
- Press F10. Then Ok to save.
ASUS Prime Z270-A
Almost the same settings as ASUS Prime H270-PLUS, but there are differences. The appearance is the same.
- Press F7.
- On the Advanced tab, open the System Agent (SA) Configuration folder
- set VT-d value to Enabled (disabled by default)
- On the Advanced tab, in the open System Agent (SA) Configuration folder, open the DMI/OPI Configuration folder
- DMI Max Speed value set to Gen3 (default is Auto)
- On the Advanced tab in the System Agent (SA) Configuration folder, open the PEG Port Configuration folder
- PCIEX16_1 value and PCIEX16_1 set to Gen3 (default is Auto)
- On the Advanced tab, open the PCH Configuration folder. In it open the PCI Express Configuration folder
- PCIe Speed value set to Gen3 (default is Auto)
- On the Advanced tab, open the APM Configuration folder.
- Restore AC Power Loss value set to Power On (default is Power Off)
- On the Advanced tab, open the OnBoard Devices Configuration folder.
- HD Audio Controller parameter set to Disable (enable by default)
- set M.2_1 Configuration and M.2_2 Configuration values to PCIE (default is Auto)
- On the Boot tab
- Set the Above 4G Decoding parameter to Enable (the default is Disable).
- Set the Setup mode parameter to Advanced Mode (the default is EZ Mode).
- Press F10. Then Ok to save.
Why does a miner need to configure the BIOS?
BIOS are low-level hardware parameters that help configure components for stable and productive operation.
At the factory, the manufacturer optimally configures the BIOS for the “average” user. But mining is different from everyday use, which means it may require special configuration.
If this is not taken care of, miners may crash or become unstable, and in some cases, the entire computer may even shut down or reboot. Farm failures mean loss of income, nerves and headaches. In this article we will tell you what settings should be changed in order to achieve the most stable earnings????
Biostar TB85
- On the Advanced tab, open the ACPI Settings folder
- Restore on AC Power Loss parameter set to Power on (Power off by default) - in one of the BIOS versions
- Enable Hebernation value set to Disable (enable by default)
- On the Advanced tab, open the CPU Settings and rmations folder
- Set Inter Virtualization value to Disabled (default is Disabled)
- On the Advanced tab, open the Super IO Configuration folder
- Restore on AC Power Loss parameter set to Power on (Power off by default) - in one of the BIOS versions
- On the Chipset tab, open the System Agent (SA) Configuration folder
- Azalia value (in another BIOS version Azalia audio codec) set to Disable (enable by default)
- Set the Primary display parameter to Internal (the default is Auto)
- On the Save&Exit tab, click Save Changes and Reset. Then YES to save.
Biostar TB250-BTC and Biostar TB250-BTC PRO
- On the Advanced tab, open the ACPI Settings folder
- Restore on AC Power Loss parameter set to Power on (Power off by default) - in one of the BIOS versions
- On the Chipset tab, set the Mining mode parameter to Above 6x VGA (the default is Above 6x VGA)
- On the Chipset tab, open the PCH-IO Configuration folder
- HD Audio value set to Disable (default is Disable)
- open the PCI Express Configuration folder 7 parameters PCIe1 speed, PCIe2 speed, PCIe3 speed, PCIe4 speed, PCIe5 speed, PCIe6 speed, PCIe7 speed set Gen1 (the default is Gen1).
- On the Chipset tab, open the System Agent (SA) Configuration folder
- Set the Primary display parameter to Internal (the default is Auto)
- set VT-d value to Enable (enable by default)
- PEX16_1 Max Speed parameter set to Gen1 (default is Gen1)
- On the Save&Exit tab, click Save Changes and Reset. Then YES to save.
Source