Technical basics of choosing a mining farm
In order to assemble a mining farm, you first need to decide on the following indicators:
- Video card manufacturer (AMD or Nvidia)
- Budget
- Choosing the video card itself
- Selecting components for assembling a farm
- Farm location
- Electricity
Let's consider all these points in more detail.
READ
Income (payback) of all video cards in mining. Choose the best video card in terms of fast payback!
Video card manufacturers
Let's start the review in order with choosing a video card manufacturer (AMD or Nvidia), yes, you need to start from this point, and not the budget, since the price category of these manufacturers is different.
In addition, video cards from these manufacturers are better tailored to one or another algorithm (cryptocurrencies are mined using different algorithms).
For example, Ethereum (ETH) is best mined on AMD video cards, since the card’s memory is primarily used to mine ether. Another advantage is its price: several times cheaper than the price of Nvidia cards, with almost the same amount of memory.
However, in 2022, with the release of the new 30 line of video cards from Nvidia, Ethereum mining has also become very profitable on Nvidia.
And a coin like Ravencoin is better mined on Nvidia video cards, since the processor frequency is an important component there (the Nvidia graphics processor is much more powerful than the AMD processor). Despite the high cost of Nvidia video cards, there are more coins for which it is best suited for mining than coins that are better mined on AMD.
Simply put, AMD video cards are excellent at mining algorithm coins - Ethash (the algorithm of Ethereum and many other coins created on its platform).
And Nvidia video cards are excellent at mining coins using algorithms such as Cuckatoo31, MTP, Cuckaroo29s, as well as Ether itself (especially new lines of cards) and many others.
Of course, you can mine any coins on both Nvidia and AMD, but this is not entirely advisable.
Any cryptocurrency calculator, when inserting any video card like AMD into it, will first offer coins of the Ethash algorithm, and then algorithms such as KawPow (and others), since the first will bring more coins, which means the equipment will pay off faster. The same goes for Nvidia cards.
Having decided on the choice of coin, pricing policy and directly with the video card manufacturer itself, we move on to the next point.
Let us remind you that on our website there is an article where all video cards are described in terms of their payback!
Budget
Once the video card manufacturer has been selected, you need to calculate the budget. Having this or that amount, you need to calculate how many video cards you can buy.
Important! When calculating your budget, do not forget to take into account not only the cost of video cards, but also the cost of the system itself (motherboard, processor, RAM, hard drive (or SSD), power supply). All this will also cost a decent amount, since, for example, it is better not to skimp on a power supply and buy a high-quality one, because it will power expensive equipment - video cards (you can find out how to choose a power supply here.)
Costs you will have to incur when assembling a mining rig:
- The first and most expensive - video cards
- System. Purchase: processor, motherboard, RAM, hard drive.
- Power unit. It is advisable to purchase with a minimum certificate of 80+ Bronze.
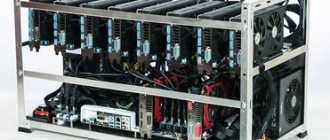
- Riser (if you buy more than 1 video card). They are needed to connect several video cards to the PCI-e x1 expansion slots on the motherboard.
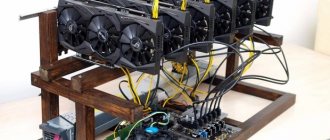
- Frame for the farm (if the farm is made from more than one card). It is needed so that the cards stand steadily and are easily blown with air.
Selecting a video card
After you have decided on the pricing policy, move on to the next point.
Selecting the video card itself - that is, its model. As in any market, the more modern (newer) the product, the higher its price. It’s the same with video cards: the newer the model and the better the cooling system it has, the more expensive it is. The latest models are always more expensive, but most often they are more efficient and produce (mine) more coins.
Here's an example:
In April 2022, a farm of 6 Nvidia 3080 video cards per day will generate $45.95 using the Ethash algorithm:
And 6 6800XT video cards from AMD will bring $32.24 per day using the same Ethash algorithm:
So that you can understand in real time how much a particular video card (or several video cards) brings, use a special online service - whattomine. Whattomine is an online calculator that shows how much cryptocurrency and money you will receive from a particular video card (screenshots above from whattomine).
You also need to understand an important thing: you should not save and buy a bunch of cheap video cards (so that you have a large mining rig), for example, such as: 1050 TI, 1060 3 GB, RX 470 (570, 580) 4 GB and so on Further.
Of course, such cards cost 3 times less than the latest model cards (or more powerful cards), but they also bring in several times less. It is not logical to assemble such farms at home, because if you want to mine more coins, then you will need 3 times more such cards than more powerful cards (for example, 2080 TI), which means more occupied space in the apartment and more noise.
It is important to understand and not be confused, we mean buying very weak cards. If, for example, you can cheaply buy quite profitable (not very powerful cards), such as the 1660 Super, then of course it is better to take several of these cards than 1-2 expensive 2080 TI (or another), since you will be able to use them faster pay off and make a profit faster! Remember, there is no point in saving and buying weak cards that are already obsolete and which experienced miners are trying to get rid of and sell to “hamsters”!
It is worth noting that the complexity of cryptocurrency mining is growing almost every day. This means that very old video cards for mining become weaker (bring less profit), since difficulty affects the mining of cryptocurrency, which means that a weak, old model of video card will bring even fewer coins over time, which will quickly lead it to the fact that it will produce less than the cost of electricity, unlike a powerful, modern video card.
Below in the screenshot you can see the increase in the complexity of the most popular cryptocurrency (which is mined on video cards) - Ethereum!
Once the video card model has been selected, you should be very careful in choosing the company that assembles video cards (Asus, MSI, Palit, Gigabyte and many others).
Note that Nvidia and AMD create only graphics chips, and the assembly of the video card itself in the form we are familiar with is given to intermediaries such as Asus, MSI, Palit and many others. They, in turn, cool the video card and add their own design.
Why is it worth approaching this choice carefully? Because cooling a video card is the most important thing you need to look at when choosing it, since it will work in your farm 24/7 (non-stop), and accordingly, the cards will heat up. Modern cards consume a lot of electricity, which means they emit a lot of heat, and so that they don’t “burn out,” they need high-quality cooling!
With poor cooling (and without additional ventilation in the room where the farm is located), the video card can overheat and go into protection (turn off), moreover, this will stop the entire process of cryptocurrency mining (mining) until you start it again, This will also cause some damage to the video card.
READ
Video card temperature during mining. What is the normal temperature of the card?
We also recommend watching the video from our YouTube channel: is the video card temperature of 80 degrees normal? What is the normal temperature of the card?
Good cooling of the card means large radiators, a lot of copper pipes and large coolers (preferably 3), but there are cases when only 2 coolers cope with the cooling task perfectly.
However, you must understand that it is very difficult to visually understand whether a video card copes well with thermal loads or not, because there are cases when a card has 3 coolers, a bunch of copper heat pipes, but the card is still a “stove”.
Therefore, before purchasing this or that card, be sure to look at the tests and thermal images of the card on our website or others!
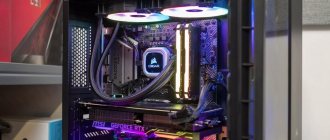
Selection of system components
After the final choice of video card, you need to select and buy a good system (components).
The system for assembling the farm is no different from the system that is assembled for ordinary computers.
For the farm you will need:
- Motherboard
- CPU
- RAM
- Hard drive or SSD
- power unit
- Raiser
Let's look at these points in more detail.
We recommend watching the video from our YouTube channel: Mining components: how to choose? What is needed for a mining farm? What can you save on?
Motherboard
When choosing a motherboard, you should pay attention to the number of PCI-e x16 and x1 outputs. The ideal ratio is a total of 6 slots. You can take less, but if you plan to buy additional video cards in the future, then it is better to take it immediately with a reserve, since then, in addition to a new motherboard, you will have to buy a new power supply, processor and everything else.
When choosing a motherboard, pay attention to its settings.
The easiest motherboard for mining to set up is the ASRock H81 Pro BTC r2.0. There are many other motherboards that are not difficult to configure. And there are also those that even an experienced user will get confused in setting up.
READ
Best Motherboard for Mining: List
Why should you pay attention to this? Because many motherboards will not start with more than two video cards connected without additional settings in the BIOS (Uefi), without dancing with a tambourine.
CPU
Next comes the processor. Depending on the LGA of the motherboard, buy the most budget processor (the processor is selected by socket).
For example, the most budget Intel Celeron G3930 2 core (socket 1151) is suitable for the Asus Prime z270-p (LGA1151) motherboard. In simple words, the processor socket must match the LGA of the motherboard.
Remember, there is no point in overpaying for a CPU, it doesn’t affect anything, buy the cheapest one! Well, if you want to mine cryptocurrency on a processor, for example, such as Monero, then we advise you to buy only processors from AMD, since Intel is less profitable for this type of mining.
Watch the video from our YouTube channel: profitability from mining on a processor, is it worth mining on a CPU?
RAM
RAM. After selecting the processor, select the RAM. Depending on the motherboard and its technology, RAM (DDR-3, DDR-4 or other), support for a certain type of memory. We buy 4 gigabytes of the cheapest RAM. You should not overpay for the brand and buy more memory, it will not particularly affect the mining of cryptocurrencies.
However, more and more coin algorithms have begun to appear that require more RAM (RAM is not important for Ethereum), so to be on the safe side, if you mine other cryptocurrencies in the future, you can take more RAM.
Hard drive or SSD.
It’s worth noting here that if you have nothing else on your farm (except for the operating system, the miner itself and programs), then a hard drive (or SSD) will do, even with a memory capacity of 60 gigabytes or more (but it’s better to take 128 GB, which I would like to immediately download miners for different algorithms, programs, and so on). Also, for some algorithms you will have to increase the paging file.
About 10 GB will be spent on the system, a couple of gigabytes on various overclocking programs and miners (special programs for mining cryptocurrencies).
What is better to choose: SSD or hard drive (HDD) for a farm? The answer to this question is very simple.
It is best to use SSD drives, as they will install the operating system much faster; the farm will start in a matter of seconds (since the operating system itself will be almost empty after installation and not cluttered with various programs). Also, if you reinstall the system, you will spend less time, which means you will start mining (extracting cryptocurrency) faster.
The programs themselves will install and launch much faster.
A hard drive is also not a bad option (You will get more memory for the same money as a 60/128 GB SSD), but it will:
- Significantly slower
- Take up a lot of extra space in the truss frame
There is no clear rule here that it is better for you to decide.
power unit
And finally, let's move on to the last, but most important point (after video cards) - the power supply.
It’s worth noting right away that for a farm with a large number of video cards, you will most likely need 2 power supplies to power the entire farm. Here you can find out how to run 2 power supplies.
So, how to choose a power supply?
- Certificate
- Unit power
- Number of wires
The certificate is an important component when choosing a block.
READ
Guide to choosing a power supply
When choosing a certificate, make sure that it is at least “80 + Bronze”. Also check with the original block manufacturer (OEM).
Why is it so important to pay attention to this? Since the unit will power not only the system, but also the video cards themselves (expensive equipment), you should approach its selection with special care. When purchasing, pay attention to its functions and whether the block will go into protection in the event of a power surge (otherwise, it can burn the cards; it’s better for the block to burn itself and go into protection than expensive cards).
Certificates are responsible for power outages (and much more). The higher the certificate, the lower the current drawdown.
Remember that the block is the heart of your verma, through which electricity passes, powering the most expensive thing in the farm - the video cards! Don’t skimp on the block, don’t make the following mistakes:
A good block will die on its own, but will not drag down the video cards with it! A bad block will die itself and drag the entire system with it!
Unit power
Depending on the total total power consumed by the video cards, it is worth choosing a power supply (1 or 2 depending on the number of cards and the energy they consume). Plus, don’t forget that the system also consumes electricity ~ 120 Watts.
The power supply should always have at least 80 watts in reserve for stable operation. If overloaded, the unit may simply not be able to withstand it and go into protection, while a bad one (cheap, without a certificate) and even worse, may burn out. This is another reason why you shouldn’t skimp on the unit.
Number of wires
Always count how many PCI-e, Molex and SATA wires are in the block.
After counting the number of cards, find a block with the ideal number of PCI-e wires for you.
For example, if a card consumes more than 250 Watts, then for safety reasons it must be powered by two separate PCI-e wires. That is, if you have 4 video cards of such power, then you need 8 wires.
In the same situation, but with the power consumption of cards less than 250 Watts, for 4 video cards you will need 4 PCI-e wires.
SATA and Molex are the wires that will power the riser. Do not forget that 1 sata wire is used to power the hard drive.
It is best to power the riser via Molex, but in almost all blocks there are very few of them (usually 2-3 wires). If there are not enough molex wires, then power it via sata.
To do this, you need either a SATA riser or a regular Molex riser, since they always come with an adapter to a sat.
If in any case you cannot connect everything with 1 unit, then you should buy and power the farm with 2 power supplies.
Assembling a farm for 5,6,7,8 cards occurs in the same way as described above. The only thing that is different is that you will need to find a motherboard that supports 8 PCI-e wires. Also, most likely, to power such a farm you will need 2 power supplies, since there will not be enough wires for one unit.
Farm location
The choice of location for the farm should be approached with special attention: your apartment or some kind of warehouse. The second option is much simpler, so let’s take a closer look at the first.
You should be careful when choosing the location of the farm in an apartment, since the apartment is most often warm (and stuffy in the summer) - this means that the video cards will be hot.
In this case, the cards need to be blown with additional fans and the room must be frequently ventilated, or even better, keep the window open, since the cards, consuming electricity, push it out of themselves in the form of heat. The more cards, the greater the electricity consumption, and therefore the greater the heat generation.
A closet or small enclosed space is not suitable for the location of the farm, since the cards will again be hot.
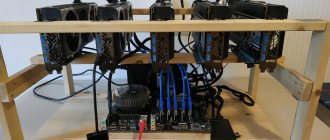
It is ideal to place the cards in a well-ventilated room (preferably not in the bedroom), as there will be a strong hum from the farm (from the video card fans and additional airflow). Ideally, it is best to place the farm on a small frame on the floor for better ventilation.
If you save space, you can assemble a large frame, but in this case it will be necessary to install additional cooling (for example, fans), since such a frame allows you to place many closely spaced cards, they, in turn, emit heat and warm each other.
Electricity
Since video cards consume a large amount of electricity, you should immediately find out what kind of wiring is in your room and how much electricity is allocated to it.
- Copper wiring is excellent wiring and can withstand heavy loads with ease.
- Aluminum wiring - most often distributed in the old stock. It is worse than copper and harder to cope with heavy loads.
If your room has aluminum wiring, then it is best to run a copper wire from the panel to the truss. This operation will allow you to withstand the load from the truss, but will not give a good performance in other respects, since aluminum wiring will most likely also go to the panel.
Depending on the amount of electricity allocated to the room, for example 15 sq.m., do not use all 15 from one outlet, as it simply will not hold up. If you want to install several farms in one room, then it is best to run an additional copper wire from the panel and make an additional outlet. Otherwise, you will constantly have traffic jams knocked out.
After you have selected all the equipment, all that remains is to buy it. Next, we’ll look at how to build a mining farm from scratch.
Cryptocurrency wallets
A cryptocurrency wallet is a separate class of components for mining. They do not directly participate in the operation of the farm, but serve to access the altcoins available to the user. Information about them is stored directly in a decentralized blockchain, while a “wallet” is a set of public and private numbers that provide access to data. One of the most reliable options is the so-called “cold” wallet for cryptocurrencies - a device the size of a flash drive on which all the required codes are stored.
A good cold-type crypto wallet has several levels of protection and is able to safely work with any computer with Internet access. However, it does not transmit codes to the device, which makes it difficult to steal data. Wallets can be designed for one or more cryptocurrencies.
In the MineShop online store you can buy all the necessary accessories and components for mining. We will help you choose them, tell you how to assemble a productive farm, and provide free technical support to every buyer.
Conclusion from MiningShop: The class of components for mining is very wide - it includes items necessary for the operation of the farm, modules that make interaction with it more comfortable, as well as wallets for the mined cryptocurrency. Correct selection is impossible without understanding for what purposes this or that accessory is needed, so it is better for beginners to consult with professionals.
Farm assembly diagram
After the equipment has been purchased, we proceed directly to the assembly of the farm itself.
First, we take the motherboard, RAM and processor.
We insert the RAM and processor into the corresponding slots of the mother card.
Next, take the power supply and connect it to the motherboard. To do this we need 2 wires from the power supply:
- Motherboard power
- Processor power supply (on almost all modern units, the word “CPU” is written near the connectors (edges of the wire)
We insert the wire powering the motherboard tightly into it. We check if there are any cracks. If there are any, insert the cable more tightly.
Next, take the processor cable from the power supply and insert it into the motherboard.
The motherboard is connected, now you need to power the hard drive or SSD. To do this, you will need 2 wires: one SATA from the power supply, and a second SATA wire from the motherboard (included with the motherboard).
The wire that comes with the motherboard looks like the picture below (may be a different color, most often black)
The wire for the hard drive from the power supply looks like the picture below.
Now these two wires need to be connected to the hard drive. The wire from the power supply must be inserted into the unit itself and directly into the hard drive.
The wire that came with the motherboard is inserted into the hard drive at one end and into the motherboard at the other.
On the motherboard, the hard drive connector is called SATA.
The hard drive is connected and the system is powered up. All that remains is to connect the video cards.
We insert the first video card into the large PCI-e x16 slot of the motherboard.
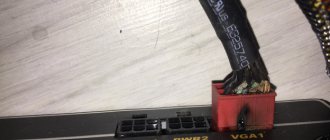
Now you need to supply power to the video card. To do this, take a PCI-e cable from the power supply, insert one end into the unit, and the other into the power supply of the video card (into the connectors). This type of cable is most often written “PCI-e”.
Pay attention to the power consumption of video cards.
If cards consume more than 250 watts, then according to safety regulations they must be powered by two different PSI-e wires. And if the power consumption is less than 250 Watts, but there are 2 power outputs (2 connectors) on the card, then 1 double wire is enough (technical name - PSI-e (6+2)+(6+2))
The card connected to the power supply looks something like the picture below.
Now you need to power the remaining cards; most likely they will all be installed on the riser.
We insert adapters from risers into the remaining PSI-ex16 and x1 slots, as in the picture below.
Now you need to insert power into the riser itself - wires from the unit, Molex or SATA. In order not to confuse those who are not well versed in this, the picture below shows the difference between SATA and Molex wires.
Having firmly inserted the power cable (SATA or Molex) into the riser, insert the wires of the USB cable (which were previously inserted into the motherboard). It will look like the picture below.
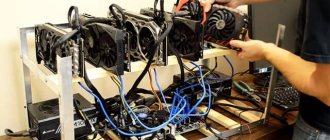
Now all that remains is to insert the video card, already powered by the power supply, into the riser. This procedure is no different from inserting a card into the PCI-e slot of the motherboard, since the slot in the riser is identical to the slot in the motherboard. It will turn out like in the picture below.
That's it, the farm is assembled, now you need to turn it on and connect the monitor.
For the first time, be sure to connect the monitor to the main (first) video card located on the motherboard itself. To turn on the farm, switch the button on the power supply from 0 to 1.
Now the most interesting thing, because there is no button to turn on the computer (farm), like on a standard PC we are used to. In order to turn on the farm, you need to find the following inscription on the motherboard (it will be next to the needle-shaped outputs) “+PLED” “+PWRBIN”.
Having found these inscriptions, take a metal object (for example, scissors) and clamp the two outer needles. Hold the metal object for no more than 1-2 seconds, the system will instantly turn on, the video card cooler and power supply will start working.
The farm is assembled and completely ready for work. Now all that remains is to configure the video cards and install the miner itself - a program for mining cryptocurrency.
Software and Setup
Today, probably every schoolchild can assemble a computer for mining cryptocurrency. The process itself represents an elementary connection of the necessary parts and wires. However, setting up may require the services of a specialist.
- Experienced miners first recommend installing the operating system. Windows 10 is best suited for this, which you can download from the link.
- In some cases, overclocking or tuning the video card will be required. This is a rather responsible process, which means it requires a specialist.
- After installing and configuring everything you need, you can start working. At the next stage, special programs will be needed. Their name depends on the type of cryptocurrency chosen and its quantity. Various websites or third-party mining services offer downloads of such software.
Important! When assembling the best computer for mining, you should not forget about its payback. Sometimes the thirst for the latest equipment leads to large and targeted expenses.
Why are miners needed in the blockchain system?
Functions of miners in the blockchain network:
- creation of chain architecture in the blockchain;
- verification and confirmation of transactions;
- ensuring streaming emission of cryptocurrencies.
The essence of mining is to calculate mathematical problems, the solution of which is a hashcode that creates the structure of blockchains. For finding a unique hashcode, the miner receives a reward. Data is recorded in blocks and becomes available to participants.
The peculiarity is the absence of a centralized server; calculations are performed by the computers of network users based on a single algorithm, which depends on the specific currency.
Algorithms for calculating cryptocurrencies:
- Ethash (DaggerHashimoto) - for Ethereum mining. Most farms on video cards work on this algorithm. Demanding on memory speed.
- Equihash - for Zcash currency. Suitable for GPU mining.
- Decred - to replace Blake256, for Decred mining. In Claymore's Dual Miner application, it is often used in conjunction with Ethash.
- SHA256 is the Bitcoin algorithm. Mainly applicable for large-scale ASIC mining, GPU power is not enough.
- Scrypt is the Litecoin algorithm. With the advent of Scrypt ASICs, the algorithm became inaccessible to most miners.
- X11 - for Dash currency.
- CryptoNight is the Monero algorithm. Used for CPU mining.
- X11Gost is a fork (Russian equivalent) of the Dash currency. It is based on the GOST R 34.11-2012 hashcode.
An example of a standard rig configuration
Example of farm components for 4 GPUs:
- AMD Radeon RX 470 8 GB 4 x $400 = $1600;
- risers Molex ver.006 USB PCI-e 1x-16x 2 x $6 = $12;
- power supply 2 x Corsair TX650M 80 Plus Gold 650 W = $180;
- MSI H110 PC Mate = $70;
- Intel Core i3 8100 Box processor = $190;
- RAM DDR3 4 GB Kingston = $40;
- HD WD Black WD5000LPLX 500 GB = $50.
The total cost of the equipment is $2142, payback is 18 months.
Example of components for a 6 GPU mining rig:
- GeForce GTX 1070 8 GB 6 x $520 = $3120;
- risers Molex ver.006 USB PCI-e 1x-16x 6 x 6 = $36;
- power supply 2 x Corsair TX750M 80 Plus Gold 750 W = $258;
- GIGABYTE GA H110 D3A = $95;
- processor Intel Core i5-7600K box = $200;
- RAM DDR3 4 GB Kingston = $40;
- HD WD Black WD5000LPLX 500 GB = $50.
The total cost of the equipment is $3800, payback is 16 months.
Example of farm components for 13 GPUs:
- GeForce GTX 1070 8 GB 6 x $520 = $3120;
- AMD Radeon RX470 8 Gb 5 x $400 = $2000;
- processor Intel Core i5-7600K box = $200;
- SUPERMICRO 1400 power supply without PICO PSU = $95:
- SUPERMICRO 1400 with PICO PSU (for board and disk) = $115;
- risers Molex ver.006 USB PCI-e 1x-16x 13 x $6 = $78;
- ASRock H110 PRO = $165;
- RAM DDR3 4 GB Kingston = $40;
- SSD Kingston A400 480 GB = $107.
The total cost is $5920, the payback period for components is 13 months.
Step-by-step instruction
Among the projects that help you make money without large investments, the Kryptex website stands out, renting the computing power of PC users. Three steps are enough to earn money:
- Registration, installation of the mining program. The Kryptex program is loaded into the PC memory and evaluates the power of the equipment. The user is provided with data on profitability.
- Launch the application. The Kryptex executable runs in the background, in parallel with the user's daily tasks.
- Withdrawal of received income. Money transfer is carried out in Bitcoin or Russian rubles to electronic wallets or bank cards. The minimum payment threshold is only 50 rubles.
Similar functions are provided by the NiceHash mining farm rental service, which allows you to earn a stable income at minimal cost.
What to mine - bitcoins or litecoins
The algorithms for calculating hashes of different cryptocurrencies differ, which affects the choice of farm equipment. ASIC mines cryptocurrency, the calculation of hashes of which does not use RAM and requires high-speed processors. This includes Bitcoin, Litecoin and other coins that use the SHA-256 , Scrypt and similar algorithms.
Given current mining difficulty and exchange rates, Bitcoin is the most profitable coin that can be mined on an ASIC. If you are going to invest in an ASIC farm, it is better to spend your money on devices that mine bitcoins. The only drawback of ASIC is its narrow specialization. They can only serve one crypto algorithm. If the difficulty of production increases or the exchange rate changes, they cannot be switched to another currency. Therefore, GPU farms are popular because they are more flexible.
Which coin is better to mine on video cards?
GPU mining farms use products from two companies: AMD and Nvidia. Due to differences in architecture, the efficiency of devices on different algorithms differs. AMD video cards show good results when working with Ethereum, and with the help of Nvidia, you can earn the most money by mining Zcash. Dual mining is also popular - simultaneous mining of two coins on one video card. For example, together with Ethereum, you can mine Decret without a drop in hashrate.