Recently, more and more newcomers are interested in cryptocurrency exchanges. When trading, it is important to use the right tools to avoid losing your money, especially if you have no experience in this matter. One of these tools is Stop Limit. It allows you not to lose money when the cryptocurrency falls in price very quickly.
In this article, we will look at how to set a stop loss on Binance and how to use this tool on this exchange for convenient cryptocurrency trading. Let's start with the basics.
How Stop Limit works on Binance
There are three transaction options on the exchange - Market , Limit and Stop Limit . Market type transaction sells or buys the number of coins you need at the current market price. A more interesting point is Limit . It allows you to set a limit from which to start buying or selling. To understand the stop limit on the binance exchange, you need to understand the usual Limit.
Let's look at an example. Let’s say the market value of NEO is now $46. For example, I think that the coin will rise to 150 and at this price I want to sell it to take a profit.
Then I set Limit to sell at 150 USD. Once the coin price reaches this level or higher, my coins will be automatically sold.
Another option is that you are looking for a profitable entry point for a purchase. For example, you analyzed the chart and think that the price of NEO will fall to 30 USD and at this price you need to buy it. Then you place a limit order to buy at 30 USD and as soon as the price drops to this value or lower, the coins are bought.
This is a regular Limit, it is immediately posted on the exchange as soon as you submit an application. This is its main disadvantage, which is corrected in the Stop Limit option. In essence, this is the same limit, only the order is placed on the exchange not immediately after registration, but when the price reaches the required value. You can use Stop Limit to hide your orders from other users for the time being or to sell coins in case of an unexpected drop.
Let's look at an example, let's say you bought NEO at 46 USD and expect the coin to rise, but there is a chance that the price will fall to 35-30 or even lower. Then you set Stop Limit for selling with the following parameters:
- Stop: 35
- Limit: 33
In which your transaction appears on the exchange when the price drops to 35 and coins are sold at 35, if there are no longer anyone willing to buy at 35, then at 34 and 33, but not lower, since the Limit on the minimum sale price is triggered. If you placed such a trade without a stop limit, in the usual way, then your coins would be bought immediately at the current market price, since the exchange algorithm works this way. But we need to sell these coins only if there is a risk that they will fall in price, otherwise we expect them to rise.
Another example of using a stop limit on Binance is buying coins. You can use this limit to buy coins only if their price breaks through certain levels or simply to hide your plans to buy coins. You, of course, can place orders to buy coins at a price higher than they are, but I don’t see any practical sense in this. Now let's talk about how to use Stop Limit on Binance.
What is a stop order and what does Binance stop loss refer to?
Stop orders are conditional orders triggered under a certain condition. Usually this condition is the completion of a transaction or the displacement of the order queue to a certain price. Stops on Binance can be divided into two categories: closing a position or unrelated to an open position.
Stops that close a position are stop-loss and take profit, which are familiar to all traders. Linked orders do not have a volume parameter because they are placed in the volume of the open position. This is convenient because you don’t need to waste time setting the volume. If 17 lots are open, then these instruments will close 17 lots at the moment they are triggered and reset the position to zero.
Unrelated (pending orders) are often called "pending" by traders. There are 4 types of delays on Binance: buy-stop, sell-stop, buy-limit and sell-limit. These orders are placed in CScalp with the volume specified by the trader and do not depend in any way on the open position.
Stops are not visible to the entire market in the order book until they are triggered. Other traders don't know where your stops are placed.
How to place stops on Binance - types of orders
Stop-loss – an order to close a previously open position. Its main goal is to limit losses on existing positions. Stop-loss can only be placed if there is an open position. It can be hosted either on the exchange server or locally in CScalp. The user can select in the settings where this application will be placed. By default, stop-loss is placed on the CScalp side.
If stop-loss is placed on the exchange server, then when triggered, the exchange will close the position with a market order. The position will be closed guaranteed. If stop-loss is on the CScalp side, then when triggered the terminal will close the limit order position. It will be sent to the edge of the glass. This usually results in the position being closed immediately.
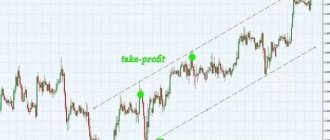
Take-profit – an application for fixing profit on a previously open position. The main goal of take-profit is to close positions with a profit when a given price is reached. Take-profit can only be placed if there is an open position. Take-profit can be placed both on the exchange server and locally in CScalp. The location of the application can be selected in the settings. By default, take-profit is placed on the CScalp side.
If take-profit is placed on the exchange server, then when triggered, the exchange will close the position with a market order. The position will be closed guaranteed. When placing take-profit on the CScalp side, the terminal will close the position with a limit order when triggered. With standard settings, a limit order will be sent to the edge of the order book. This usually results in the position being closed immediately.
"Delays"
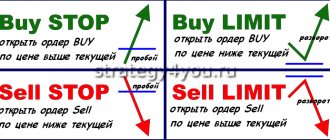
There are 4 types of stop orders or “pending” orders unrelated to a position on Binance:
- buy-stop – to buy, placed in the sellers’ zone (will make a purchase if the price rises to the specified level);
- sell-stop – for sale, placed in the buyers’ zone (will make a sale if the price drops to the specified level);
- buy-limit – for purchase, placed in the buyer’s zone (will make a purchase if the price drops to the specified level);
- sell-limit – for sale, placed in the sellers’ zone (will make a sale if the price rises to the specified level).
Pending stops are always set on the exchange server side and are triggered only when the transaction is completed at a given price. If orders in the order book reached the “pending” level, but there were no transactions, then “pending” will not work.
When triggered, “delays” turn into limit orders.
They are priced at the “set aside” price plus casting distance. The casting distance is adjusted in the settings. In the standard settings, the casting range is set to 0. This means that the “delay” will turn into a limit order at the price of the edge of the “glass” and will actually open a position on the market (at the best price in the “glass”). The casting distance is indicated in the original price increment. If the original price step is 1 cent, then a limit order will be placed at the “delay” price + 1 cent. Scaling does not affect the price of the placed limit order. Important: “Delays” when the connection is broken or CScalp is closed remain active, since they are located on the exchange server.
How to use stop limit on Binance
To open the trading window, log in to your account, then select Trade , then Classic :
Next, select the desired cryptocurrency pair in the right column:
Scroll down a bit. Below the chart there will be two forms (Buy) Buy coin_name and ( Sell) Sell coin_name. Since the sale is more interesting, let's look at it first. There are three tabs above the forms, go to the Stop Limit :
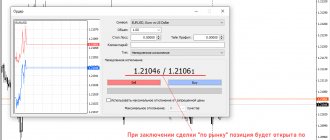
The form now contains three fields:
- Stop — the price at which the order will be placed on the exchange;
- Limit — the price at which the coin will be sold;
- Amount — number of coins for sale;
- Total - how much you will receive as a result;
Let's take the same example that we looked at above. we bought NEO at 46 and are waiting for the cryptocurrency to grow, but we do not want to lose money if it falls below 35. Therefore, we set the price in the Stop to 35, and in the Limit field to 33:
Then click the Sell NEO and the order will appear at the bottom.
Let's look at another purchasing option. For example, you think that NEO will grow if the coin breaks the level of 100, then set the Stop field to 100, the Limit field to 105. As soon as the coin grows to 100, you will buy it at a price from 100 to 105 and the coin will continue to grow, if, of course, you were right in your assumptions.
Now you know how the stop limit works on binance.
How to put a stop on Binance or any other exchange in theory
Stop limit trading is possible on almost all modern crypto exchanges. To start trading according to this scheme, you need to find the buy/sell block (usually it is located on the main page of the platform). There, in one of the trading options, a stop limit will be indicated (in Russian or English letters, depending on the supported localization). On many exchanges, buying/selling using a pending order includes 3 components:
- Stop - this column contains the value, after reaching which the order is sent to the market. Until the rate reaches the specified level, the order will not be sent to the exchange.
- Limit - the desired price for buying or selling a digital asset.
- Amount - the number of coins you want to purchase. The number can be entered manually or indicated as a percentage of the total deposit.
After entering all the data, just click on the “Buy” or “Sell” button. Next, you need to wait until market conditions begin to meet the parameters you set. It may happen that the necessary conditions do not occur at all. For example, you want to buy ETH for $2,000, and the price does not drop below 2,500. While the funds for which you want to purchase ETH are in a pending order, they cannot be disposed of. But what if favorable conditions appear in another trading pair, but there is no free money? In this case, you can cancel the pending order. This is done by clicking the appropriate button in your personal account or in the list of personal orders.
Why do traders need this tool?
Traders use the stop loss function after studying price levels, trends and emerging indicators. It works for the most efficient trading when implementing short-term or medium-term speculative ideas.
If the owner of a cryptocurrency asset chooses the right moment to form an order, he will be able to hold his position and not lose too much money. The instrument is especially popular among traders who use leverage, where the loss of every dollar is critical.
The function is also used by traders when conducting transactions that involve fundamental analysis. Technical data perfectly complements the information background, and a stop loss guarantees the preservation of finances.
When is it better to use a stop limit?
The Stop Limit feature is a great tool for managing the risks associated with trading one of the most volatile markets. Correct use of this function allows you to avoid both real and conditional financial losses. The latter are associated with the non-sale of an asset at a high cost at a resistance level.
For the last reason, experienced traders use the tool specifically for selling. With the help of Stop Limit, they can not sit in front of a computer monitor all day long and wait for the rate to rise, but simply predict the price limit for an asset and place an order.
You can use the same tool to buy cryptocurrency when its price is at its minimum. Proper management of the function will help you sell quickly and pay off wisely.
Interface and indicators for trading
Let's start getting acquainted with the set of functions of the Binance platform. The spot trading panel is available in three options:
- Classical;
- Advanced;
- Margin.
These tabs are very similar, but differ in functionality. The advanced mode allows professional traders to build various technical analysis patterns directly on the rate chart, and in the “Margin” mode you can trade with leverage. Otherwise, each option is almost identical, the same Japanese candles, trading glasses, orders, and so on.
On the left, under the exchange logo, we see the name of the trading pair, the current price, the change over the last day, the minimum and maximum threshold for a given period of time and the total trading volume.
If you work through a browser, then to change a trading pair, you need to hover your mouse over its name and select the desired option in the drop-down menu. It’s a little more convenient to do this in the application, since all the options are available in the left column.
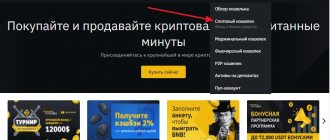
The pair selection panel is divided into several tabs:
- BNB;
- BTC;
- ALTS;
- FIAT;
- Zones.
The first tab contains pairs made with the Binance Coin cryptocurrency, the next column displays pairs with Bitcoin. The ALTS tab contains pairs with ETH, XRP, TRX coins. The FIAT section displays pairs with stablecoins and national currencies.
The zone tab displays pairs supported by additional platform services. To make it easier to search again, it is recommended to mark the desired pair by clicking on the star to the right of the name.
The next element is a graph displaying fluctuations in the rate of the selected crypto pair. Setting options available:
- Base;
- tradingview;
- Depth diagram.
It is best to use Traidingview, it shows the direction of the market movement more clearly. But in order to see the overall balance of supply and demand, it is recommended to periodically switch to the depth chart, since only orders close to the current market price are displayed in the order book.
The chart is customizable in different time ranges, and Japanese candlesticks allow you to monitor rate changes during the selected time frame. Candlestick rectangles usually have long or short shadows, indicating the rate fluctuation boundary. They are colored red or green, depending on the downward or upward trend. If the red candle price fell during the selected interval, if the green price rose.
Below is a graph of trading volume, and the numbers in the frame help to create a graph of the MACD indicator; it is used for technical analysis; it is not necessary to use it when trading using signals. There are 12 analysis tools available in the drop-down menu of technical indicators. You can activate them one by one to look at the rate fluctuation graph from different angles.
The next element is stock glasses. They display in ascending order of price all issued but not yet executed orders. Seller requests are shown in red, and buyer requests are shown in green. Based on them, you can see the best buying and selling prices at the current moment, corresponding to your transaction volume. But if you work according to signals, then you don’t have to pay attention to them either.
At the bottom, under the order book, the last executed transactions are displayed, and on the right there is a form for filling out an order. It consists of the “ Buy ” and “ Sell ” buttons; the active button will be colored in the corresponding color. “Buy” is in green, and “Sell” is in red. Below them are tabs for switching order type (Limit, Market, StopLimit), price, number of coins and final transaction amount.
At the very bottom is a button to confirm the order; it is also always highlighted in a color corresponding to the nature of the transaction (buy or sell). The orders you placed, the history of placed orders and completed transactions, as well as the total balance of your deposit are displayed in the field under the rate chart.
Well, now you know everything about the interface of the trading section. It should be added that the web version of the “Margin” section is designed a little differently, where the application form is located under the rate chart.
When trading using signals, first of all pay attention to the chart. Large green candles with a long upward shadow signal a rapid rise in price, and, accordingly, long red candles with downward shadows clearly indicate a fall in the rate. But the market is often unpredictable and can turn in the opposite direction at any moment. And therefore, it is important to know how Stop Loss and Take Profit are set up on Binance.
Why do you need Take Profit?
Take profit is the extreme price for closing a position if events develop as you expected. That is, you sell as expensive as possible or buy as cheaply as possible, fixing potential profit.
Take profit for buying and selling
You can set Take Profit both in OCO, in the price column, and in Limit and Stop-Limit orders. Set the best closing price in your opinion for the position and place an order.
Advantages and disadvantages
Setting a stop limit is very convenient, since in this case there is no need to continuously monitor the price. The trader does not waste his time, does not lose money in case of sudden price fluctuations (and sometimes significantly increases his profits), and has the opportunity to simultaneously work with several trading pairs.
But there are also unforeseen situations, for example, when experienced players outbid the orders of beginners or when there is a gap in pricing and the order is not executed. Also, do not forget about the possibility of short-term correction (the situation is especially unpleasant when setting protective stop limits).
In this case, the tokens are sold at a disadvantageous price with minimal loss, and after a short period of time the rate stabilizes and continues to grow.
Example : buying Bitcoin for $11,700, setting a stop limit at $11,600. If the price fluctuates to $11,599, the transaction will be closed with a loss of $100. But after a while the cost will increase again, reaching $11,720. However, the order is executed and instead of a small profit, the trader will suffer losses.