Most software for mining digital currencies is developed for the 64-bit operating system Windows 7|10. Detailed instructions for installing and configuring miners are also designed to work with Microsoft products.
For unknown reasons, significantly less attention is paid to mining on Linux. Ordinary users do not take into account the extremely low stability of the Windows OS, which negatively affects the process of cryptocurrency mining.
Let's take a step-by-step look at what is required to mine coins on Ubuntu or other Linux builds. 2022 should be a turning point; many miners will soon abandon Microsoft products due to their low performance.
Mining on Linux or Windows?
Both mining on Linux and Windows have their advantages and disadvantages. The first option may seem problematic to those users who have not previously worked on an open source OS. Indeed, you need to read a lot of guides and instructions to get the hang of it.
However, there is an incentive to try it: increased income. Linux has a Mint build that is aimed specifically at mining virtual coins. This distribution is freely available; anyone can download it absolutely free of charge and legally.
There should be no problems mastering the interface; it is quite similar to the Windows one. Previously, in older versions of Linux, there were problems finding drivers - but this is a long time ago, modern builds include driver packages for all popular devices, including AMD and NVIDIA video cards.
Conclusion – mining on Linux is definitely worth a try. As a last resort, you can always go back to Windows (see our article about setting up Windows for mining - link to).
Mining on Linux - pros and cons
Mining on Linux has only one drawback - the initial complexity of setting up and connecting the farm, but there are enough advantages:
- Quick OS installation. It is also possible to launch the distribution from a flash drive without installation at all. At the same time, when the flash drive is transferred to another computer, all settings are saved. Drivers are included in the distribution by default.
- Reliability and stability. The operating system does not freeze and almost never requires a reboot. That is why it is also often used on server equipment.
- Convenience. The most optimized and high-quality software is developed on Linux.
- Ample opportunities for overclocking equipment - adjusting the frequency of the memory and core of video cards, the timing of their operation.
- Linux is capable of supporting higher power farms than Windows. Thus, it can make the most of up to eight GPUs on one motherboard.
- High hashrate thanks to Mint build optimization for mining.
Finally, Linux is free and requires no purchase or activation. There are paid ready-made assemblies, but in any case they will be several times cheaper than Windows.
Prospects
Ambiguous. On the one hand, Linux offers flexibility of settings and even the creation of an operating system tailored for mining from scratch, which Win and Mac cannot boast of. The required tool can be found at Linux from Scratch.
On the other hand, Microsoft takes into account the experience of its colleagues represented in the opensource segment and is gradually strengthening its influence in the new market.
Linux's weakness is the fragmentation and small size of the community. It doesn't have the benefit of a wide (Windows) or paying (Mac) audience. This means a lack of attention from developers and a lag behind trends.
The controversy surrounding the founder of the family, Linus Torvalds, and the attempts of key developers to figure out which of them best meets the newfangled LGBT-SJW-BLM standards also do not contribute to the development of the project.
Linux: assembly for mining - which one to choose
Let's consider the question of which Linux build is best to choose for mining. Today on the Internet you can find many ready-made assemblies, usually based on Ubuntu, which are installed and managed as simply as possible. However, they differ for the most part only in design, assortment of software and drivers. The most famous options:
- Linux Mint. The most famous Linux desktop distribution for mining, used by millions of people. It works out of the box with full multimedia support, provides an excellent software manager, is easy to maintain, and has a robust architecture. In addition, the developers listen to the community and regularly make useful changes.
- HiveOS. Also a fairly well-known build based on Ubuntu. It is shareware, but even in the free version you can freely support and monitor up to three rigs.
- ethOS. Commercially distributed LiveCD distribution ($39 per license). You can deploy it to a flash drive or other external media. An Android app helps you track the mining process.
- nvOC and rxOC. Almost identical versions of Ubuntu with pre-installed drivers, miners and settings, only the first is intended for Nvidia cards, and the second is for AMD. After installation, the user only needs to edit the configuration file, where they indicate the pool address and wallet number to receive income.
One common feature of all these fees is that the user does not have the ability to fully control the system, since it is developed by other participants. This is a minus in terms of security, although if you choose from proven assemblies, there should be no problems.
GPU
Once you have created your pool and wallet, you can finally start mining. You will mine using Ethminer, which uses your GPU for mining. The command you use to run your mining will tell you which pool you are using.
Earlier, we already talked about what equipment is best to choose for mining Bitcoin and Ethereum .
Your command may be slightly different depending on your pool, but it will look something like below.
$ ethminer -G -F your.poolurl.com:port/0xYOUR WALLET.COMPUTER NAME --farm-recheck 200
The -G flag specifies the GPU . -F allows you to tell a pool that you are part of that pool. You must give the pool your wallet address so that it can credit you for your work and pay you. Most pools monitor computer activity, so that's included as well. The computer name is an alias, so it doesn't need to specify the hostname or anything like that.
Features of settings
The main feature of setting up Linux for mining is that the user can get the latest and most efficient version of the software by installing the miner from the repository, if it is not pre-installed by the developer. Drivers for all modern top-end graphics cards are usually already built into the distribution, but if you plan to use outdated or rare equipment, you can download from the official website of the developers and manually install a proprietary driver package.
As for the settings of the miner itself, detailed instructions for them are usually available on the website of the selected mining pool. As an example, let's look at setting up Ethereum mining on Linux:
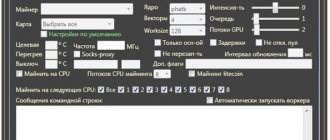
- Download a mining program (for example, Claymore-Dual-Miner).
- Go to the configuration file, write in it the worker name and password, as well as the connection address to the selected pool. The fields User, Pass, Server, Port are used for this purpose.
- Start the process by entering the text command ./miner.
The software automatically reads all the necessary data from the configuration file. In a similar way, you can start mining other currencies, only the software and its parameters change.
HIVE OS saves the configurations and that’s it, you can start working!
I issue the miner command, thus checking whether the rig is working. If yes, you can turn off the monitor or close the terminal. The process of earning cryptocurrencies can be controlled on the hiveos.farm web resource. You can control mining from it. I return to the site, I want to see what I have configured. On the monitoring page we immediately see data on all connected RIGs. If you need to change parameters or switch the miner, just go to the required RIG. You can view the temperature, cooler rotation speed and current mathematical operations performed by video cards. All information is indicated in the rig control panel.
To be honest, Linux makes it possible to overclock video cards no worse than Windows. I boldly click on the green NVIDIA OC button and define the acceleration format for each video card (you can do it for the entire list at once).
Important! Don't forget to look at the memory overclocking rates.
+1400 – Linkus indicator, which must be divided by 2. Win 10 – +1400 Linux = +700. Don’t bother yourself with the question of why exactly these indicators are, it’s all about the Nvidia drivers. I just advise you to take these indicators into account. Also, as a note, I will say the following: the limit here is indicated not as a percentage, but in quantities - Watt. Video cards overclock super, I get a hashrate similar to Dagger Hashimoto. There are a lot of advantages, the only downside, but not particularly significant for me, is that it is impossible to use several presets for algorithms. I hope this will become possible in future releases. So, we have completed overclocking the speed of video cards, I suggest you look at the adjacent TUNING tab:
In this tab you can set special parameters for launching the miner on a specific farm. The settings are the same as for wallets, but have higher priority. For example, if you disable several video cards that use their own miner. Hive can't do that.
Let's look at an example. There are 5 1060 video cards and a couple of 1070 cards in Riga. You can send the first 5 to Ethereum, and the remaining two to Bitcoin. I don't need that kind of freedom yet. So I’ll close the tab and go back to the rig control panel. The right side of the screen informs you about the current state of the system. There is uptime, time, miner, kernel version, memory on a flash card or hard drive, IP address rig. Remote access to and using OpenVPN is also configured here. Sometimes the rig needs to be rebooted or turned off. Two emergency buttons are provided. Red – reboot the rig. Gray – disabling the rig. Everything is working.
The experiment was successful, now you can safely move on to the most important points
Looking below, we see a field with MINER selectors and a WALLET field. Remember, these selectors are the most important on the page. It is under them that the treasured “Loot” button is hidden.
Select the required miner on the left, wallet on the right. Next, press the key with the rocket and start – “to the moon”!
To change a pool or miner, select the miner and/or wallet you are interested in from the drop-down list.
Under the field with the choice of miner there are several more important buttons, using which you can stop or restart the miner, view its current config or log. Even lower you will see the Linux Shell field. There are other commands. I don't touch them, I don't need it.
This concludes my introduction to the control panel. Rest assured, it will be more interesting to study it on your own profile.
Pool selection
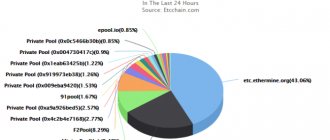
Choosing a pool for mining is a mandatory step, since it is in the pool that each miner receives a stable, constant income. Let's look at the best mining pools for today and tell you what to look for when choosing:
- Hiveon. Coins: Ethereum, Ethereum Classic. There are no commissions - neither for transactions nor for the operation of the pool. PPS+ payment scheme. There are servers in the Russian Federation, North America, Europe, and Asia. Payments are made daily upon reaching the threshold of 0.1 ETH or 1 ETC. Users of the Hive OS operating system have the opportunity to pay for the license in the form of a 3% commission.
- Ethermine. Coin: Ethereum. Pool commission 1%. There are no transaction fees. PPLNS payment scheme. There are servers in the USA, Asia, and Europe. Payments are made daily with a minimum threshold. You can mine cryptocurrency anonymously.
- SparkPool. Coins: Ethereum, GRIN_32, GRIN_29, Nervos, BEAM. Pool commission 1%. PPS+ payment scheme. Payments are daily. There are servers in the USA, Asia, and Europe.
- F2POOL. Coins: Ethereum, Bitcoin Cash, Bitcoin Satoshi Version, Litecoin, Ethereum Classic, GRIN_32, GRIN_29, Dash, Decred, Monero, ZCoin and over 30 more currencies. The payout scheme is PPS+ or PPS, depending on the coin. Commission 1-5%. Payments are daily.
When choosing a suitable pool, the main thing you need to pay attention to is the list of supported coins. Among them should be the one you chose to earn money. Next, look at the commission fees and payout distribution model. It’s great if the pool takes care of paying for transactions. Finally, where are the servers located? The closer they are to your place of residence, the lower the ping and the more stable the profit.
You can read more about this topic in the article about mining pools (link to).
Let's sum it up
Installing Hive OS on your own rig is a simple process. It is very convenient to operate it. If you encounter any difficulties with Hive OS, you can write to the support chat about launching, setting up and configuring the system.
And finally, I’ll tell you about the price. I’ll say right away that the system is paid. To be more precise, it is absolutely free for up to 3 rigs. But if you want to mine cool, you’ll have to pay, although it’s inexpensive. Agree, the developer has the right to receive payment for providing a good income opportunity. Each rig starting from 4 – 3 bucks. It turns out that for 4 rigs you will pay 12 dollars. Once again: 3 rigs are free, 4 are 12 dollars. I'm sure it's inexpensive. I believe that this price is fair for a dynamically developing system. The cost will quickly pay off. There are statistics on rigs on our website. Watch her. If it's too expensive, switch to Bitcoin. It's free. Everyone chooses their own option for mining digital currency.
PS Now you can work from a flash drive, it’s convenient and economical. You will be able to save on an SSD or hard drive, which, you see, is very nice. I hope I explained in detail every step of the work I did. I tried to clearly show and explain in print.
In our catalog you can find all the most popular miner models at current prices
Mining farm on Linux
The process of assembling a mining rig for Linux is no different from the similar process in the case of Windows. On this topic, we also have introductory material about mining farms (link to).
Standard farm includes:
- Several AMD or NVidia video cards.
- Motherboard.
- HDD.
- RAM.
- Cooling system.
- Raisers (extensions) for connecting a large number of cards.
- Power unit.
The main difference is what hashrate the farm will produce when running under one or another operating system. In Linux, the hashrate is slightly higher, which means more income.
The fact is that this OS helps to use the capabilities of hardware as efficiently as possible. Drivers are optimized to get the most out of your hardware.
PS A = automation
We recommend the easiest way - to use a standard startup application. In LXDE this is "Sessions and Launch".
- In the application window, go to the “Autorun” tab.
- Click “Add”.
- In the window that appears, indicate the application name, description (if necessary) and indicate the location of the script file.
- Save the new entry.
The utility is called via the console using the xfce4-session-settings . This option is guaranteed to launch scripts after the operating system has fully loaded.
Mining on CPU under Linux
Monero cryptocurrency is most often mined on Linux CPUs. Mining of this coin is based on the RandomX algorithm, which is resistant to ASIC mining.
To get started, you will need to install a powerful processor (current models are Intel Core i7-9700K, Intel Core i7-7600K, AMD Ryzen 5 1600X, etc.). Then select a pool (for example, Nanopool) and configure the software. Information about the progress of the process and its results will be displayed in the software.
For more details, see the article about mining on a processor (link to).
Miner installation
For mining, we will use one of the few utilities for mining coins using the Ethash algorithm called ethminer. The easiest way to download it is from GitHub:
- Download the archive: wget https://github.com/ethereum-mining/ethminer/releases/download/v0.15.0rc2/ethminer-0.15.0rc2-Linux.tar.gz
- Unpack: tar xvpzf ethminer-0.15.0rc2-Linux.tar.gz
- We copy the resulting file to /usr/bin for further ease of use, because it will be considered an installed program: cp bin/ethminer /usr/bin
- We create a script named eth.sh, which will launch the miner in the screen utility: sudo nano eth.sh
- Enter the lines: #!/bin/sh screen -A -m -d -S Miner ethminer -G stratum+tcp://wallet_number.machine_name@pool_address:connection_port
- Save the file using the keyboard shortcut CTRL + W and answer “Y”.
If necessary, you can use various connection options, example configurations of which can be found in the ethminer help using the -h flag.
Someone probably noticed that the previous article indicated that GTX 1080 cards are not very suitable for working with the algorithm and their performance was only 25.5 - 26 Mh/s, while it is possible to achieve 35.65 Mh /s using the . To install it, you need to do the following steps:
- Download the utility from GitHub: wget https://github.com/OhGodACompany/OhGodAnETHlargementPill/raw/master/OhGodAnETHlargementPill-r2
- Make the downloaded file executable: chmod +x OhGodAnETHlargementPill-r2
- Setting up autorun:
This utility can be launched via rc.local:sudo nano /etc/rc.local
- Add the following line before exit 0: /usr/bin/screen -A -m -d -S Tabletka /path_to_file Successful startup can be monitored via screen:
screen -x Tabletka .
Linux mining programs
The main functionality of mining programs for Linux is the connection between your equipment and the pool. Often, links to suitable applications are posted directly on the pool website; you can also look for advice on specialized forums. The main thing is that the software is multifunctional - it makes it possible to view detailed statistics and fully control the mining process, from hashrate to cooler rotation speed.
The most popular program is called CGMiner - suitable for mining on a processor or video card. If you use ASIC, then BFGMiner would be an ideal option. Both programs are console programs and do not have a graphical interface. This may seem difficult for beginners, so there is also a GUI option called EasyMiner.
conclusions
In this article we looked at how to mine ether on Ubuntu, in our time, if you have a good video card, then this is quite a profitable activity. I hope this information was useful to you.
Related posts:
- Installing Ubuntu 18.04
April 29, 2018
- Installing Kubuntu 18.04
June 25, 2018
- Installing Unity on Ubuntu 20.04
August 17, 2018
- Setting up Ubuntu Server after installation
January 16, 2019