Trezor T is the flagship model from the popular Czech manufacturer SatoshiLabs for the production of hardware wallets for cryptocurrencies. The main difference from the previous Trezor One model is the presence of a color Touch-Screen display, an SD port and an increased number of supported coins. In addition to this, there are a number of other distinctive features, which I will discuss below.
Support the project
If you found this article useful, you can support us with a donation.
Packaging and equipment
Package
The new product comes in an elegant rectangular box, which is wrapped in plastic film. It is worth noting that in mid-18 the packaging was updated, replacing the embossed Trezor text with one printed in black.
Front side
back side
Users of the One model will immediately notice the completely updated packaging design. The logo is printed on the front surface, and the reverse side contains information about supported cryptocurrencies and capabilities.
A few months after sales, Satoshi Labs updated the packaging, where the white embossed Trezor name was replaced with a black printed one. You can read more about this here.
Box with window in the shape of a device
The lid closes with a magnet
Pulling out the white backing, we see the inner packaging in matte black. Through a small window you can see the device itself and the inscription on the side - “The safe place for your coins”, which literally translates as “A safe place for your coins”. The lid is fixed with a magnet on the front side and can be opened without damaging the packaging.
When the lid is open, you can see a short activation guide. The device itself is located on the left and is mounted on a magnetic holder. The magnet will not cause any damage to the device. The components are located on the right in a black box.
Front part
Reverse part
Micro SD input
USB-C input
The seal must fit tightly to the body on both sides. If, upon unpacking, gaps are found between the film and the housing, you should contact the manufacturer or supplier.
Trezor T fits comfortably in your hand and its weight of 15g does not interfere with holding it for a long time when making transactions. Its size is 64x39x10mm, which is slightly larger than its younger brother due to the color touch screen with a resolution of 240x240 pixels. The engraved Trezor inscription can be felt above the display.
On the right side there is an input for microSD cards, which, according to the developers, will allow you to install firmware via an SD card, store an encrypted password and encrypt personal files using one of the wallet’s private keys.
Equipment
USB-c cable, backup card, stickers and quick start guide
A 50cm long USB-C cable and other accessories are contained in a black box. It also contains a Getting Started quick guide, two backup cards and branded stickers.
The magnetic holder, which is located under the device, has double-sided tape on the back. This allows you to stick it to any surface and use it as a docking station at your workplace.
The adhesive tape on the magnetic holder is very durable and difficult to detach from the surface. Think in advance where you will attach it.
Interface logs
In the interface footer next to the settings there is a Show Log link that displays useful information:
- connected node,
- extended public keys (XPUB),
- interface and hardware wallet settings.
This information will be useful if for some reason one Trezor wallet functions perfectly on a PC, but the other does not. Logs are the only place where you can see all the device settings in one window. The logs will also be useful when contacting technical support.
Setting up Trezor Model T
Never use a device with pre-installed firmware and a mnemonic phrase.
The first connection must be made according to the instructions on the top cover of the box or the Getting Started guide. After connecting the device to the PC, the display will display a Welcome message and an invitation to visit trezor.io/start
Page trezor.io/start
Select the Trezor T model on the page and continue setting up.
Installing Trezor Bridge
The Trezor Bridge driver is software that establishes interaction between the hardware wallet and the web interface. Depending on your operating system, you will be offered the appropriate distribution (Windows, macOS, Linux). After installing it, you will automatically be redirected to the firmware download page.
Driver download window
Satoshi Labs will soon stop using Trezor Bridge. For example, the beta version of the web interface uses a protocol that does not require additional programs.
Device firmware
As soon as the interface detects that Trezor T is connected, you will be automatically prompted to install the firmware.
The new Trezor T comes without firmware
The firmware installation process has two purposes:
- Security – to ensure that no one has used the device before;
- Relevance – so that the user uses the latest capabilities of the device.
The firmware is verified for authenticity every time it is launched. If a non-original version is detected, a corresponding warning will appear on the screen. Follow the instructions on the display to install.
Greetings
Firmware download
Loading complete
Trezor.io/start
Create a new or import an old wallet
Now we can create a new wallet or restore an existing one. The latter can be done to import any BIP39 compliant mnemonic phrase. For example, you can restore keys from a previous Trezor One model to Trezor T. Or import mnemonics from another Ledger Nano S or Keepkey wallet. If you have doubts about a previously used mnemonic phrase, I strongly recommend using a new phrase with a new device.
The recovery procedure will be discussed in the Security section. In the meantime, let’s move on to creation – Create new.
Create and restore a wallet
Once created, the wallet will be ready to use within a few seconds, but first you need to complete the installation process.
A message is displayed on the display of the device and PC that a backup is needed. Need backup.
The message Your TREZOR is not backed up indicates that the setup has not been completed. Under no circumstances should you use your wallet without completing this process.
Buy Trezor T wallet
16,490
. Buy
Backup
We've reached a key point! Backup is the process of recording a 12-word phrase. This is a mnemonic phrase (Seed), which will be useful to us in case of loss or damage to the device. With it, you can restore all your cryptocurrency assets to a new Trezor T device, or other hot or hardware wallets that support the BIP39 proposal.
Backup message on the start page
A mnemonic phrase is a random number consisting of 128 bits (12 words). The number is used to generate all private keys supported by cryptocurrencies. Phrases are displayed only once. Never make an electronic copy or photograph. Write them down on paper and store them in a place away from fire, water and strangers. And so that your loved ones can find it if something happens to you. If an attacker finds out these 12 words, then he will be able to irrevocably withdraw all the money from the wallet
Click on the “Create backup in 3 minutes” button. Then we agree with the recommendations that I have already mentioned.
Need a backup
Confirmation of actions
First 4 words
Confirm actions
The device generates a unique phrase of 12 words, which is displayed on three screens. It can be written down on special cards that are included in the kit or on other paper media.
An example of writing with a special pen
I note that the cards for writing words are made of special waterproof paper. I advise you to use a waterproof pen to reduce the potential risks of losing mnemonics.
Advanced devices for storing private information are considered the ideal storage method. They are made of a special steel alloy - Billfodl, Cryptosteel. You can purchase them in our online store.
The next step will ask the hardware wallet to enter two randomly selected words from our phrase. Thus, it is checked whether we have written them down correctly.
last page
Checking the seventh word
Entering a word
All is ready
I have always been pleasantly surprised at how convenient it is to enter phrases in the T9 layout using only nine letter cells. The thing is that after entering two or three letters, the word is determined automatically and all you have to do is select the one you need. If phrases are entered incorrectly at this stage, the wallet will go back a step and display everything again.
Backup complete
After successfully confirming the two words of the mnemonic, a notification will be displayed that we have successfully completed this important configuration step.
Give the wallet a name
Now the activation completion indicator shows us 65%. You need to name the device. The maximum name length is 16 letters. Only Latin letters can be used.
Default name
We write the name and confirm the actions
Ready
The name will be displayed in the web interface and on the device display. It allows you to identify Trezor if you are using several T models at the same time.
Installation Pin code
A PIN code is needed to protect assets from unauthorized access. A secure Pin ensures that only the owner can make transactions. Its maximum length is nine digits.
Consent to enable PIN code
Enter the value
Confirm
Ready
Please note that the cells with digit values change when you enter your PIN code. This prevents an outside observer from remembering what value you set.
Completing the installation
I recommend not skipping this step and be sure to subscribe to news from the manufacturer so as not to miss important news regarding security and upcoming updates.
Don't forget to subscribe to our blog and social networks - Vkontakte and Facebook. We notify you about important updates in your native Russian language.
Connection and initial setup process
There are four options by which TREZOR communicates with wallets:
- Bridge (web bridge).
- Chrome extension.
- Manager for Android.
- via Python tools.
To create a secure bridge, you need to install a piece of software called TREZOR Bridge, which can be downloaded from https://wallet.trezor.io.
An alternative to the TREZOR bridge is the TREZOR Chrome extension. It can be used across platforms, not just Chrome-based browsers.
You can also configure TREZOR using a dedicated Android manager, which can be found on Google Play.
The last binding option is only suitable for advanced users who are familiar with the command line and Python. The source code is stored on the GitHub repository.
Since TREZOR comes without firmware (to always install the latest version when setting up), the first thing you will be asked to do is install the firmware. Simply confirm the installation and follow the on-screen instructions.
Once the update is successful, reboot your TREZOR and you will be greeted by a welcome page where you can select the desired action:
- create a new wallet;
- restore wallet.
Just click the "Create New" button.
How to use Trezor T
The wallet connects to a PC on which Trezor Bridge is installed via a USB cable. Other cables may cause connection problems, as can some USB ports.
Device is blocked
Entering a PIN code
Device is unlocked
When connected to a PC, the wallet is always in a locked state if the Pin code protection is set. After unlocking, you need to go to trezor.io/start and select a model.
Receiving cryptocurrency
Select a coin from the list located above the device name. Bitcoin is selected by default. Go to the “Receive” section. For security reasons, the public address is not displayed in full. To see the full address, check it with the value on the display. This is a useful phishing prevention. Click on the “Show full address” button and check it with what is on the display.
Some data is hidden
Checking values on PC
With address on display
Confirm actions
If the values on the PC and the device do not match, then the computer is most likely infected with malware. Remember that Trezor always shows genuine information.
You can check the address as many times as you like through the button in the shape of a human eye.
After verifying the address, it will be completely displayed on the PC
You can now receive funds to this address. For convenience, you can send not only a string in the form of letters and numbers that begin with “3” - this is a special format for Bitcoin addresses. You can also send it as a QR code. I prefer to read the QR code on my smartphone and forward it to the sender. This way I completely avoid potential input errors.
It is not recommended to manually type or retype the address. Use copy-paste and QR code.
List of addresses. One was used and the other was not
After the first arrival at the first address, the second one will be offered for use. This is done in order to maintain anonymity. Nobody prohibits using the same address multiple times, but in this case it will be possible to track all completed transactions using it. I recommend always using a new one with every new transaction.
View transactions
The transaction section is displayed by default at startup. It shows the movement of selected crypto assets. Incoming transactions are highlighted in green and outgoing transactions in red. When you hover over an amount, its fiat currency equivalent is displayed. There is a transaction schedule, the total balance and the cost of cryptocurrency on the market. For detailed analysis, it is possible to download the entire payment history into a CSV table.
Labels provide additional information
When you activate Labels, you will be able to give names to accounts, addresses, and descriptions of transactions. The search bar indexes them and allows you to search for payments or receipts using keywords.
Sending cryptocurrency
The Send tab allows you to send cryptocurrency. There are several fields to fill out:
- Address – enter the recipient's address here. That is, to whom we want to transfer funds. This address may also belong to an exchange, exchanger or other organization.
- Comment – This field is only available when the label feature is enabled. The comment will appear in transactions opposite the recipient's address.
- Amount – enter the number of coins to be sent here. The vertical arrow allows you to send the entire amount in the account. The right field displays the fiat currency equivalent. Optionally, you can enter the amount in both cryptocurrency and fiat money.
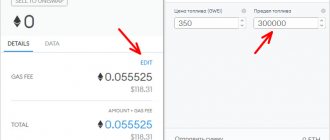
- Commission (Fee) is the commission that will go to the mining pool that confirmed the block. We have five options available from low to high. The size of the commission determines the speed of transaction approval. In some cases, you can manually set the commission by selecting the “other” option.
SatoshiLabs does not charge additional fees for transactions.
If you filled out all the fields correctly, all you have to do is click on the “Send” button. The next steps concern confirming actions on the hardware wallet.
Confirmation popup
We check the sending amount
We agree with the commission
The data will be displayed in Transactions
It is important to understand that all spending actions are accompanied by physical actions on the hardware wallet. That is, without physical confirmation on the device, it will not be possible to spend funds. This is the main protection of the hardware method of storing cryptocurrency - no one except the owner of the device will be able to spend the funds.
In the lower right area there are special payment conditions, which I talked about in the full Trezor wallet review. These parameters allow you to make deferred payments, sign a transaction without broadcasting it to the network, and send arbitrary code to the blockchain.
Special shipping conditions
More details about each of the conditions can be found on our YouTube channel.
Add OP_Return -
Add blocking time -
Sign without sending -
To send to multiple recipients, you can use the “Add recipient” option. To clear everyone, select “Remove all recipients”.
“Import from CSV” allows you to automate actions through CSV tables. Each transaction must contain the following data, separated by commas - address, amount, currency. Examples:
3AEQDtXgT4sNwHZHpRejzjB4BpR7aHN9iG,0.31337,BTC
1Hs1pKYW9qZwY2DfSPFGVDKCqCJSDUqYfA,0.1,USD
If the first column of the table is presented in the form of headings, do not forget to check the “first row – heading” checkbox.
Making payments
Once you have initialized your TREZOR, your wallet is ready to use. You should now see a screen like this:
Using the secret phrase from the recovery sheet, you can register as many accounts in the device as you need. You can bind an unlimited number of public keys of your wallets to them.
When you click Account #1, you will see a blank Transactions tab. It's time to transfer your bitcoins to safe storage in TREZOR.
Select the "Receive" tab to receive your first Bitcoin address, which looks like a long string of numbers and letters. If you will be transferring bitcoins from a mobile wallet, simply scan the QR code shown next to the address.
When the payment arrives in your wallet, you will see a green incoming button opposite the transaction.
First the transaction will be o. She can remain in this status for up to 15 minutes. When it is confirmed by the miners, the inscription will change to the date and time the transaction was completed.
To make your payments, go to your TREZOR account page and click “Submit”. You will see a payment page in which you will need to fill in the following fields:
- the destination address for your transaction;
- type of coin;
- payment amount;
- set a commission.
You can monitor the progress of your outgoing transactions from the Transactions window, all outgoing transactions will be marked in red.
Exchange
At the end of 2022, a new Exchange section appeared in the trezor.io interface, where you can quickly exchange cryptocurrency without leaving your personal account.
The exchange works as follows:
- You should select an account with a positive balance
- Select a currency from the drop-down list
- The account to receive will be determined automatically
- Click on the continue button
- Check values on device and PC
- Enter amount
Next, you need to select one of the verified exchangers and continue.
I have written the full detailed exchange process here.
Please note that not all currencies are supported in this operation.
Changing the Blockchain Browser
By default, the Trezor interface uses its own blockchain explorers - btc1.trezor.io, bch1.trezor.io, zec1.trezor.io and so on. This means that when clicking on the transaction time, the user will be taken to these browsers.
But what if you need to view transactions in another browser, for example, in the popular blockcypher.com?
In the web interface settings - Wallet settings, in the browser URL field, enter the browser address (https://live.blockcypher.com/btc) and save the changes. Clicking on the transaction time will open the blockcypher.com browser page.
Sign and certify
This feature allows you to sign a text message using one of the user's addresses. This way, any outside observer can verify that the message is signed by the owner of the address.
Section to sign and certify
To sign a message, you must first enter the message itself. The maximum length can be 255 characters. Next, enter the address and sign it using the Sign button. As a result, a signature will be generated that matches the public address and message. Now all that remains is to send the message, address and signature to any person for authentication.
A detailed overview of this feature has been demonstrated in the following video.
How is a random number generated for a mnemonic phrase?
To generate a mnemonic phrase, two devices are used. One of them is a hardware wallet with a random number generator built into the microcontroller, and the second is a hash function built into the operating system.
Both devices generate a 256-bit number. For this, a 256-bit hash of the SHA-2 function is used. Next, both values are combined and hashed. The resulting 256 bits are the random number that will be used to create the mnemonic phrase.
Next, another 8 bits (checksum) are added to this number to make the output 264 bits, which are divided into blocks of 11 bits. Every 11 bits will correspond to a word in the dictionary. And if you raise 2 to the 11th power, you get the number 2048, which corresponds to the number of words in the BIP39 dictionary.
Interface Beta.Trezor.io
In addition to the regular version of the interface, there is also a beta version that allows you to use advanced functionality. Usually, all new features become available in it and only after a while are introduced into the regular version. For example, at the time of writing, the beta wallet is available to work with the Ethereum and Ethereum Classic cryptocurrencies. The regular version does not yet have this feature.
It is worth considering that the beta version collects information about errors and user interactions with certain features. All this allows you to introduce new features into a regular interface with minimal errors.
Users' personal data - balances and transactions - are not used by Satoshi Labs.
To enter the beta version, you need to enter the prefix beta- in the address field
https://beta-wallet.trezor.io
In this version, the “Buy” tab is also available, which contains recommended services for purchasing certain coins. Unfortunately, in Russia there is no opportunity to purchase cryptocurrency through them.
What cryptocurrencies does TREZOR support?
The list of tokens that can be stored on a wallet is periodically expanded; as of December 2022, the following coins can be stored in TREZOR:
| Bitcoin (BTC) | TREZOR Wallet |
| Litecoin (LTC) | TREZOR Wallet |
| DASH | TREZOR Wallet |
| Zcash (ZEC) | TREZOR Wallet |
| Bitcoin Cash/Bcash (BCH) | TREZOR Wallet |
| Bitcoin Gold (BTG) | TREZOR Wallet |
| Ethereum (ETH) | MyEtherWallet |
| Ethereum Classic (ETC) | MyEtherWallet |
| ERC-20 Tokens | MyEtherWallet |
| Expanse (EXP) | MyEtherWallet |
| UBIQ (UBQ) | MyEtherWallet |
| NEM (XEM) | NEM Nano Wallet |
Opposite each cryptocurrency in the table above, there is an interface in which you can carry out operations with the token and a link to instructions on how to use this interface with the TREZOR wallet.
Trezor T settings
Basic settings
To access the settings, just click on the name. Here you can change your name and PIN code. Display the extended keys (XPUB) that correspond to each account. These are the keys with which you can expand all the child public keys used to receive funds. As a rule, they are used by developers and third-party applications to detail all transactions that have been and will be within the account perimeter.
Compromising the extended key (XPUB) will allow an attacker to see the entire history of past and future transactions of this account. However, he will not be able to steal or spend cryptocurrency.
Home screen
This tab allows you to personalize your device by uploading a color screensaver or even a photo. The photo size must be 144 by 144 pixels.
Advanced Settings
The advanced settings section allows you to see the current firmware number, enable passphrase protection, disable Pin, check the recovery phrase and wipe the device. I will talk about all these possibilities in the security section.
Web interface settings.
Here you can select the fiat currency in which transactions and balance will be displayed. In addition, you can set the address of the full network nodes to which the interface connects to receive data from the blockchain. This feature is especially useful during forks and integrations.
Labeling.
Using Dropbox cloud storage, you can enable labels that allow you to name addresses, accounts, and comment on every expense or receipt. To enable them, you need to click on the Dropxbox icon with the text Enable labeling
Connecting the markings
Let's go to the device
Confirm actions
Marking connected
Label information is stored in cloud storage and encrypted with one of Trezor T’s private keys.
Rotate Screen
Trezor T allows you to rotate the screen 90, 180 and 270 degrees. This is done using the gesture familiar to smartphone users: swiping in the right direction.
0°
90°
180°
270°
Transaction inputs and outputs
When spending coins, you can display which inputs and outputs will be used "onshore". To do this, click on the Show transaction details link.
Then the following data will be displayed:
- Finalfee – commission size in satoshi/byte ratio;
- Size – transaction size in bytes;
- Fee – commission amount, which is calculated as FinalFeexSize. In this example, this is 37 x 167 = 6,179 satoshi – the cost of the transaction;
- Inputs – transaction identification number and input sequence number, which is set after the colon;
- Outputs – outputs indicating the recipient’s address and change.
Thus, the user will be able to understand in advance what amount he will “shine” to the recipient, and take actions in advance to maintain his pseudo-confidentiality.
Compatibility
OS
Trezor T is compatible with Windows, Linux, Mac, Android operating systems.
Android smartphones must be compatible with the On the go (OTG) connection type. The native Trezor Manager App allows you to make both basic and advanced settings.
What cryptocurrencies does it support?
As of today, the trezor.io/coins page says that Model T supports 1011 coins. True, I counted about 60 coins with their own blockchain, and the remaining assets belong to ERC-20 tokens that operate on the Ethereum network.
Save trezor.io/coins to stay updated on supported cryptocurrencies.
An important feature of Trezor T is that not all coins are directly supported by the original trezor.io interface. Many coins have an interface created by third-party developers. For example, to work with ADA you need to integrate Trezor T with the Adalite client. XEM has a third-party development, Nano Wallet. Tezos integrates through SimpleStaking and so on. At the same time, asset security is ensured in the same way as in the original interface.
Non-original applications
There are many integrations of the device with other programs. For example, you can connect your hardware wallet directly to the Bitstamp exchange or hot wallets Electrum, Copay, Mycelium. The full list of applications can be viewed on the official wiki page of the manufacturer https://wiki.trezor.io/Apps
Main advantages of Trezor wallet
- The main advantage of a cold hardware wallet is that all private keys are stored remotely from the Internet. It is not afraid of any computer viruses or hacker attacks, because it does not have an operating system. Even if you connect it to an infected computer, your digital savings will not become vulnerable, since the USB cable that comes with the kit is only capable of limited operations.
- The Trezor hardware wallet works in both online and offline modes. Digital coins have no physical representation, they are not stored directly in the device itself, but it is possible to perform any actions with them only if you have the gadget. Confirmation of transactions is carried out by simply pressing the Trezor button.
- The crypto wallet implements two-factor authentication, which protects your account from unauthorized access. In addition to your username and passwords, you will enter a secret PIN that your Trezor will generate. Please note that the secret code is also generated offline. Starting with firmware 1.4.0, wallets implement the new U2F (Universal Second Factor) protocol specification.
- TREZOR supports most ERC-20 tokens and is compatible with many wallet software applications.
- And one more important function: the ability to restore access to your savings through a secret 24-digit phrase that the device creates when you first start it.
Documentation and support
There is no complete manual in Russian; there are only short step-by-step instructions in English. I note that detailed information about frequently asked questions and other operating topics can be found on the manufacturer’s official wiki at https://wiki.trezor.io. This is a convenient resource for finding information that covers almost all questions about working with the device. However, all articles in this documentation are currently available in English only.
If necessary, you can contact the manufacturer via the contact form. Typically a response is received within 24 hours.
If it is important for the buyer:
- Support in Russian;
- Efficiency;
- The opportunity to come and communicate personally with a specialist;
- Simplified return or exchange procedure.
Then you should contact official local resellers in the buyer’s country. For example, our company Cryptonist.ru is the official dealer of Trezor in the Russian Federation.
You can view the list of official resellers in the “Resellers” section – https://trezor.io/resellers
The support team will never ask you for a PIN code or mnemonic phrase. If you see such offers, then know that they are scammers!
Buy Trezor T wallet
16,490
. Buy
Trezor from the inside
The contents of the sent hardware wallet are shown in the figure below:
In addition to the device itself, the kit includes two cables of different lengths, a bunch of stickers, and a blank form for code words (the so-called “recovery seed”).
Inside the case there is a board with a black-and-white OLED display with a resolution of 128x64 pixels located on it, as well as various elements, among which the central place is occupied by a 120 MHz ARM processor of the Cortex M3 family.
To implement user feedback, two control buttons are provided. Additional information on the internal structure of the wallet can be found on the official website, in the documentation section. https://doc.satoshilabs.com/trezor-tech/hardware.html.
Safety
Entering a PIN code
The pin code protects the user's assets from unauthorized use if it is lost or stolen. Thanks to the relatively large touch screen, input is now carried out entirely through the device, so that no malicious programs can read it on the computer. In addition, the values on the screen change every time a new entry is made, which means that it is impossible for an outside observer to understand what the owner of the device is entering.
For each incorrect PIN code entered, the time for the next entry increases exponentially. After 16 incorrect attempts, the device will be reset.
Pin must be entered each time you connect. However, if the user wants to access his account on trusted PCs even without a connected Trezor T. To do this, select the “Remember device” option when disconnecting the device. As a result, the wallet remains open, and only when transactions are made, Trezor T must be reconnected to the PC.
Passphrase
The T model allows you to enable advanced security using the passphrase encryption feature. It creates a new wallet structure with unique private and public key pairs based on a master mnemonic phrase. Each wallet will be hidden behind a specific phrase. By default, a wallet without a phrase has a value of zero. It follows that there is no right or wrong passphrase. The user will always end up in one of the possible wallets.
If the user forgets the passphrase, it is equivalent to losing the mnemonic phrase. If you have not fully understood this function, then I do not recommend using it.
The passphrase can be enabled in advanced settings. To do this, you will need to confirm the actions on the device and reconnect it to the PC.
Enabling a passphrase
Selecting input mode on device or PC
Entering a phrase on PC
Entering a phrase on the device
Entering a phrase can be done in two ways on a PC or via the touch screen. In the latter option, you can switch between numbers, special characters, uppercase and lowercase letters. The latter method is more preferable, since even on a hacked PC, an attacker will not be able to find out what phrase is being entered.
Entering a complex and long phrase may take some time, but it greatly improves security.
Wallet recovery
The Trezor T uses a mnemonic phrase that is 12 words long, while the One model uses 24 words. According to Satoshi Labs, the new product does not require a long phrase, since all important operations, including recovery, checking mnemonics and entering a passphrase, are performed through the touch screen. Therefore, Trezor T always generates a phrase consisting of 12 words.
During the recovery process, you can use phrases from other hardware and hot wallets that are BIP39 compatible.
Selecting phrase length
Enter the first word
Complete recovery
Thanks to the touch screen, this procedure will take no more than 3-4 minutes. After the 12th word, a new structure with all private and public keys will be generated and the device will be ready for use.
Like the younger One model, Trezor T is completely open source. This means that anyone can view both the software and the firmware of the hardware wallet itself. Link – https://github.com/trezor/trezor-core
If the owner of the device doubts the integrity of Satoshi Labs, then he will be able to hire a specialist to study the code and make sure that the wallet is safe.
Entering a PIN code
To set a PIN that will protect your wallet, you need to come up with any combination of 4 numbers, but entering a PIN for Trezor has one important feature that is sometimes unclear to new users.
The numbers are entered on the computer, but the matrix that you will see on the PC screen has no numbers, only empty squares. You can see the location of the numbers on the gadget’s screen, and only by using them together can you create a PIN code.
When selecting positions that correspond to the numbers shown on the Trezor display, you will have to enter the PIN code twice, and the location of the numbers will be different each time. These measures are provided specifically to ensure that information entering the computer cannot be intercepted and used for unlawful purposes.
Emergencies
Trezor T stolen?
With 12 words, you can recover all your crypto assets on the new Trezor T or any other cryptocurrency wallet that supports the BIP39 proposal.
Forgot your PIN code?
Disconnect the device from the PC. We begin to swipe the screen and at the same time connect the wallet to the PC. The message Bootloader should appear on the wallet display. Next, go to the wallet.trezor.io page and in the Reset to factory settings section, click the red Reset device button.
After which we proceed to the wallet recovery process, which was described above.
Forgot your passphrase?
If you forget your passphrase, this is tantamount to losing your funds. There are two options:
- Remember her
- Sort through
The last option is possible when contacting third parties, however, you should take into account all the risks and carefully select a person for this type of work. Repeating a phrase will make sense if you remember at least 80-90% of it.
Forgot your mnemonic phrase?
I would divide this case into two:
- Lost mnemonics with access to the wallet
- Losing mnemonics without access to the wallet
In the first case, you will need to transfer all funds to an exchange or temporary wallet. Clean the device and register a new one. Transfer everything back.
The second case is tantamount to loss of funds. The only thing that can be done is to try brute force, but only if 80-90% of the mnemonics are known.
Trezor.io website unavailable?
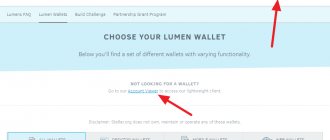
If the user is temporarily unable to get to the trezor.io page, then you can use third-party interfaces:
Bitcoin – Electrum
Ethereum – Myetherwallet, Mycrypto, Metamask
Bitcoin Cash – Electron cash
Litecoin – Electrum-LTC
Dash – Dash Electron
Bitcoin Gold – ElectrumG
Has Trezor ceased to exist?
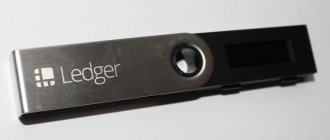
In this case, you should buy a hardware wallet of another brand, Ledger Nano S, Keepkey, CoolWalletS and gain access to the coins by importing a mnemonic phrase.
Is it possible to restore a wallet?
If you accidentally forgot your PIN, you can reset it by clearing your TREZOR through the device's advanced settings and follow these steps:
- Connect TREZOR to your computer and go to the TREZOR-wallet application. You should see a page like this with the TREZOR recovery button:
- Press the TREZOR recovery button.
- Enter the name of your device (if you assigned one).
- Look at your recovery card to see how many words you have.
- Check the "Additional password encryption" checkbox if TREZOR had a passphrase and click "Continue".
- Set a new PIN for the updated device.
- After that, you can follow the instructions displayed on the device screen and carefully enter the words from your recovery card.
- When you successfully finish entering your passphrase, you will be asked to enter your PIN again. You will then be able to see all your accounts as they were before.
About the manufacturer Satoshi Labs
The manufacturer of Trezor One and T hardware wallets is Satoshi Labs. It was founded in 2013 in Prague and is responsible for several popular blockchain projects:
- Slush pool is the world's first mining pool, named after Marek Palatinus, one of the founders of Satoshi Labs.
- CoinMap is a map showing places that accept Bitcoin around the world.
- Production of hardware wallets.
I think that every Trezor user is pleased to know that the founders of Satoshi Labs, Marek Palatinus and Pavol Rusnak, were co-authors of many proposals to improve Bitcoin: BIP39, 43, 44. Today, these proposals have been accepted by many cryptocurrency wallets and are industry standards.
Conclusion and our opinion about the gadget
The impression from the device was positive. The Trezor hardware wallet is recommended for those who are concerned about the security of their funds stored in Bitcoin or supported altcoins. Moreover, the wallet is precisely an additional protection implemented by the built-in Cortex M3 microcontroller. To ensure protection, official implementations of BIP39 (for working with keywords), as well as BIP32 and BIP44 are used.
Historically, TREZOR Wallet is one of the favorite gadgets of digital currency owners. The company producing these devices has been on the market for quite a long time and does everything possible to satisfy the needs of customers, optimizing the product and making it the safest.
This hardware wallet costs around $150, which is slightly higher than devices made by Ledger's competitors. However, the security of the device, user-friendly interface and other features are worth it. In addition, this is not such a high price to pay for the safety of the user’s financial assets.
Of the subjective disadvantages, we can only note a relatively small number of supported altcoins. In our opinion, now that the number of available coins on CoinMarketCap has exceeded 1300, support for more cryptocurrencies is needed. not all of them belong to the ERC20 standard (all tokens on the Ethereum blockchain are supported by the wallet through MyEtherWallet).
If we compare the hardware wallets of two leading manufacturers trezor or ledger, which device is better, we should note:
- The Ledger Nano S case is equipped with a protective metal plate, while the Trezor case is entirely plastic.
- The Ledger wallet supports some cryptocurrencies that are not listed on trezor.
- Ledger devices allow you to trade on the EtherDelta trading platform - directly from the device, without sending funds to an exchange deposit.
- The Ledger Nano S hardware wallet has two controllers for generating private keys, which, according to the developers, will provide a higher level of protection.