How to start mining on your home PC using a simple program. We will analyze in detail the entire service and the program itself, and prepare the computer for mining on a video card.
Mining cryptocurrency on your home PC is perhaps the biggest dream; you simply get money for the fact that your computer works. Of course, the complexity of mining is growing, and a few years ago you could earn substantial sums on your home PC, but the cost of Bitcoin and other cryptocurrencies was different.
Now it’s more difficult to mine coins, but you can still make your computer or laptop generate income .
Instructions
Follow the steps below and start mining in just 15 minutes.
- Go to the website and download the miner for PC;
- While the miner is downloading, we create an account there;
- Install the miner, enter your email and password, press START!
Every day you will receive bitcoins that you can:
- Withdraw directly to qiwi, webmoney or bank card;
- Withdraw to a crypto wallet for storage;
- Transfer to an exchange for cryptocurrency trading.
Generator bots
Bots are designed to work on cryptocurrency faucets, participate in trading, and play games. There are several current bot programs:
- Bitcoin generator. Daily payments are 250,000 satoshi. This is a bot in English. To use it, you need to register on the website https://bitcoingenerator.com.ru/. The Bitcoin wallet is registered in the system. You can earn up to 1 Bitcoin for free. However, the program charges a large commission for withdrawals.
- MoonBitcoin. This program works online. You should visit the site more often, otherwise profits begin to fall. To use the program, you need to register on the website https://moonbit.co.in/. The withdrawal reaches 51 satoshi in 5 minutes. Withdrawals are made at any convenient time.
- The software can generate between 0.2 and 0.5 Bitcoins per day. The generator can be downloaded at https://www.btc4gen.com/.
Speaking about bots, we wanted to talk about several interesting new products. For example, about bots that generate portraits of people. Such technologies are developing at a tremendous pace and have already achieved results that are almost indistinguishable from real photos.
How much can you earn?
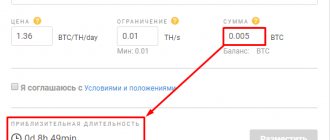
Probably the most important question is how much you can earn by mining on your computer. This is easy to find out; when you start, the miner will calculate everything and show the amount you can count on.
See the profitability table for different video cards here.
Here is my screenshot of my computer with a 2014 video card. As you can see, there is no need to make any additional movements.
If your computer or laptop is really bad, look towards cloud mining!
Which video card to choose - performance on different algorithms
Knowing how to make money on a video card, the future miner faces a difficult choice between one or another video adapter, which must be purchased for a homemade farm.
We wrote more about choosing the optimal GPU adapter model here; be sure to read the material before making a purchasing decision. Here we have selected the best options, taking into account the cost-benefit ratio. For ease of perception, we present the information in the form of a table.
Table of performance of video cards in mining using different algorithms:
| Model video cards | Hashrate ZEC | ETC/ETC hashrate | Consumed energy | Efficiency ZCash (Sol/w) | Efficiency Ethash (MHS/W) |
| GTX 1080 Ti | 620 Sol | 35MH/s | 250 W | 2.48 | 0.140 |
| GTX 1080 | 475 Sol | 28 MH/s | 180 W | 2.63 | 0.153 |
| RX 580 | 280 Sol | 26MH/s | 185 W | 1.51 | 0.140 |
| RX 570 | 260 Sol | 25MH/s | 150 W | 1.73 | 0.166 |
| GTX 1070 | 435 Sol | 27 MH/s | 150W | 2.90 | 0.190 |
| GTX 1060 | 282 Sol | 20MH/s | 120 W | 2.35 | 0/150 |
| RX 480 | 300 Sol | 29 MH/s | 150 W | 2.00 | 0.190 |
| RX 470 | 250 Sol | 24MH/s | 120 W | 2.08 | 0.200 |
| RX 460 | 110 Sol | 11MH/s | 75 W | 1.47 | 0.146 |
| RX 560 | 120 Sol | 12MH/s | 90 W | 1.33 | 0.133 |
| RX 550 | 70 Sol | 10MH/s | 65 W | 1.08 | 0.153 |
| R7 370 | 150 Sol | — | 190 W | 0.78 | ? |
| R7 360 | 155 Sol | — | 100 W | 1.00 | ? |
| GTX 1050 Ti | 155 Sol | 13MH/s | 75 W | 2.06 | 0.173 |
| GTX 1050 | 135 Sol | — | 60 W | 2.25 | ? |
The models shown in the table pay for themselves much faster than their analogues and, judging by the reviews of experts, are the best choice for mining in 2022. For example, GTX 1070/1060 and RX 480/470 will pay for themselves in 5-6 months. Also, do not forget that mining cryptocurrency is becoming more and more difficult every day, but its value is constantly growing, which allows you to maintain the necessary balance, attracting new people to mining.
The most popular solutions for cryptocurrency mining are those from the red camp - AMD. This is due to the design features of video cards, which is why users primarily buy solutions such as Radeon RX 470 and higher. However, today the gap in mining power for video adapters from Nvidia is not colossal, so popular models such as the GTX 1060 and higher are selling like hot cakes.
By the way, there is a conspiracy theory about increased interest in cryptocurrency on the part of video card manufacturers, since Nvidia is preparing specialized video cards for mining called P104-100 and P106-100. These solutions differ from classic video adapters in that they do not have video outputs, are equipped with poor cooling and have a limited warranty. That is why it is still more cost-effective for an ordinary user to purchase a top-end solution in the form of the same GTX 1070, because it can always be sold to a gamer, thereby partially recouping its initial cost.
Advantages and disadvantages
First, let's talk about the pros and cons of this mining, so that it would be clear whether we should register and earn money on it. An important point is that the money earned is not displayed immediately, but after some time.
- Mining on a home PC using a program is carried out on a video card; there is, of course, the possibility of mining on a processor, but it is much lower. You can use another program for the processor.
- Easy to install , you just download the program and everything works automatically.
- A very good FAQ section - answers to almost all questions and also fast technical support. support. I wrote specifically and received an answer within a couple of hours.
- The service has a user-friendly interface, there are no complicated aspects, that is, you can easily understand it.
- You can withdraw your earnings immediately in bitcoins.
- There is no link to a bitcoin wallet, that is, even if you lose access to it, you can use another wallet.
Of the minuses, it can be noted that the income is not large (relatively, more details below). But on the other hand, you won’t make a fortune on a home computer, although you can get nice additional, passive income.
Of course, you can set up mining separately at a more professional level. But my personal opinion is that increasing profitability with such power (one video card) does not make sense compared to the complexity of the settings.
PiMP operating system designed specifically for mining (instead of Windows)
The most progressive miners can buy an image of a portable operating system for mining - PiMP (Portable Instant Mining Platform). This is a specialized and extremely easy to learn Debian clone with a graphical interface, it is recommended to install it on a portable SSD of at least 16 GB in size. Flash drives are not suitable due to the high intensity of rewrite operations, while USB-HDDs are supported, but not recommended due to their low speed.
PiMP supports Groestl, HEFTY1, JHA, Keccak, NIST5, Quark, Qubit, Scrypt, Scrypt-N, Scrypt-Jane, Skein, X11, X13 and X15 algorithms. Support for other algorithms is constantly being added to it, but only those that can be effectively mined on video cards. For a long time, PiMP supported work only with AMD GPUs (Radeon HD 7700 and higher). The latest version 2.1 added support for Nvidia GPUs (starting from the 400 series).
In PiMP everything is already pre-configured to the maximum. Shortcuts to help and technical support via IRC have been created on the desktop, and regular updates are specified in autorun. PiMP costs $30. After payment, along with the sector-by-sector image, you will receive license keys and instructions for deploying the image with free programs in a couple of clicks. To start mining, you just need to connect an SSD with PiMP to any farm and start from it.
Mining on a home PC: registration
To register, go to the website and on the main page at the very top, click the “ Registration ” button. Registration is generally easy. We enter your email, come up with a password, agree to the terms and conditions and that’s it.
After which, you will receive an email, follow the link in it to confirm your email. Then, using your login (mail) and password, log in to the site.
The best Ethereum miner for AMD video cards. Test results
TeamRedMiner once again took first place. This time he pulled away much further from his competitors, his hashrate was almost 5 percent higher than second place. It is curious that the TRM hashrate on the pool and in the miner turned out to be almost identical. This may indicate, for example, that TeamRedMiner does not take into account the commission when calculating the hashrate.
Experiment results for AMD
Second and third places with a tiny difference were taken by Phoenix and lolMiner. Note that Phoenix, as usual, showed too high a hashrate, but Effective Speed was super accurate: 214.58 MH/s.
NBMiner takes fourth place, with the gap from TeamRedMiner being almost 10 percent.
It is more convenient to test miners in practice on the 2Miners mining pool. On it, users can choose from 18 cryptocurrencies.
Mining on a home PC: program
Now you can move on to the fun part, downloading and setting up the program. Literally a few steps separate us from the first money earned in passive mode.
At the very bottom of the menu (on the left), there is a link to download the mining program. Scroll down the page and follow the link.
Easy installation, just click “next” several times. There are no hidden installers or unnecessary software. There are also no additional settings during installation.
If you have an antivirus installed, then during installation of the program it can prohibit processes, just click “allow all” or “add to trusted” depending on your antivirus.
After successful installation, the mining program on your home PC will automatically launch; you need to log in to it. Enter the email address and password you used to register.
The second step, a window will appear where you will be asked to take a test. Just click “start scanning” and the program will automatically determine the parameters of your computer.
In the program, on the “settings” tab, set the necessary functionality, the one that suits you. Money is credited in the form of crypto-credits and is automatically converted into Bitcoin and rubles (in the corresponding equivalent). You can view detailed statistics on the website in the “balance” tab.
All that remains is to open a cryptocurrency wallet and start spending it!
Settings for each video card separately
For Nvidia video cards
Nvidia video cards have a closed-source BIOS; in this case, changing memory timings, like AMD, and subsequent firmware are impossible. We still have the opportunity to change several indicators that affect mining characteristics.
Take into account! Each video card has a unique processor crystal, a unique ASIC indicator (the conditional quality of the GPU crystal based on calculations of electric current losses, the higher the indicator, the higher the efficiency of the GPU, and accordingly the higher the overclocking potential), different memory manufacturers (Samsung, Hynix, Elpida) - due With this, there are no universal settings; you need to independently select the settings for each card!
Also, the optimal settings may vary depending on the cryptocurrency and the method of mining it.
Sequencing:
- We measure stock performance in cryptocurrency and mining method;
- We carry out gradual overclocking, checking the efficiency step by step;
- Once we find the maximum performance at the highest efficiency, we record the values for the video card and move on to the next card.
It is optimal to change the two parameters Core Clock (overclocking on the chip) and Memory Clock (overclocking on the memory).
If overclocked, the video card may become unstable and consume significantly more energy. It is necessary to select the optimal ratio of these indicators. First of all, we must measure the current consumption of the video card and its performance, then we need to gradually increase overclocking by testing the indicators. For example, by raising the chip overclock to +200 and the memory to +800, we can achieve good video card efficiency and get a 20/25% performance increase compared to stock settings.
To overclock video cards from Nvidia, in the case of Gigabyte, you can use their proprietary Xtreme Gaming Engine or MSI Afterburner utility.
Important! After the reboot, you must also download the overclocking utility and load the video card profiles, otherwise the video cards will operate at stock frequencies.
Optimal overclocking ratios for video cards will be given in separate articles after setting up and launching the farm.
For AMD video cards
We save the original/native BIOS
First of all! We create a folder in which we save the original BIOS of each video card, enter the series or number of the video card in the file name so as not to confuse it, you can also additionally sign each video card with a marker, for example, 001, 002, 003, etc. And also use it in the file name this marking.
Video card firmware
You make all modifications to the BIOS at your own peril and risk, under your own full responsibility!
Be sure to save the original version before any manipulations with the BIOS. To work with bioses, we need the AtiFlash utility.
Important! If the video card has Elpida memory, then you need a version of the program that works with this memory!
Procedure
- We measure the readings of the video card in stock values with the stock BIOS.
- We modify the BIOS, measure the readings of the video card with the modified BIOS.
- We overclock the video card, selecting the optimal memory frequency, find the optimal overclocking value, and measure the video card readings at the overclocking stages.
- We select the optimal core frequency (lowering the value) to reduce consumption at the most efficient hashrate.
- Downvolt gradually reducing power, first limiting power to the core, and then to memory.
A priority:
- System stability – the system should not crash or freeze.
- Energy consumption should not come at the expense of hashrate.
- Hashrate should be optimal, with minimal consumption.
Working with AtiFlash
You can work with the program in two modes, from the program shell or from the command line.
If you work from the shell, then AtiFlash does not display more than three video cards. In this case, I recommend modifying the BIOS on each video card separately, or using the command line if you know exactly what you are doing. Working with AtiFlash from the shell
- The Save button saves the original or current BIOS.
- The Load Image button loads the BIOS file.
- The Program button modifies the loaded BIOS.
The main interface of the AtiFlash program
After clicking the Program button, wait until the program completes the work; after successful completion, a message indicating the success of the process will appear.
Notification about a successfully completed process
Working with AtiFlash from the command line
“atiflash.exe -h”
Displays available commands.
Command line AtiFlash.exe
Let's look at the work using commands as an example:
AtiFlash command line - example of entering commands
“cd C:\atiflash_274”
We change the current directory for working with the program, for example, the folder in the root of drive C.
“atiflash.exe -i”
Displays information on installed video cards in the system
“atiflash.exe -s 0 backup.rom”
- atiflash.exe - the ATIFlash file we are accessing.
- -s — “Save” key indicating the save operation.
- 0 is the number zero. The serial number of the video card whose BIOS will be saved.
- backup.rom is the name of the firmware file that we are saving.
“atiflash.exe -p -f 0 Mod_001.rom”
- atiflash.exe - the ATIFlash file we are accessing.
- -p - “program” key indicating the flashing operation.
- 0 is the number zero. Serial number of the video card whose BIOS will be flashed.
- -f - “force” key that excludes checking the card ID if a “non-native” BIOS is being installed.
- bios.rom is the firmware file that we use to flash our card.
Note:
- The command line must be run with administrator rights;
- The firmware file “bios.rom” must be located in the same folder as the AtiFlash program;
- After flashing the firmware, you need to reboot the system.
Working with Polaris BIOS Editor
So, there are two ways to change the BIOS, do it yourself or download it from the Internet.
What you need to pay attention to if you download the BIOS from the Internet.
- Open the downloaded BIOS in the Polaris BIOS Editor program and copy the field values from the ROM into a separate file: VendorID, DeviceID, Sub ID, Sub VendorID, Firmware Signature.
- Then we open the stock BIOS of the video card and check these values, they must match completely, if these values differ, then you CANNOT flash this BIOS, otherwise you will get a brick from the video card!
Polaris BIOS Editor main interface
We check the installed memory (Samsung, Hynix, Elpida), and adjust the timings based on the installed memory. You can determine the memory manufacturer using the GPU-Z utility.
Instructions for saving the original BIOS of the video card
From the same utility you can quickly save the original BIOS of the video card.
If the video card has Samsung memory, then copy the timings from field 1750 to field 2000. If the memory is Hynix, then copy from 1500 or 1625 and copy to the others, 1750, 2000, etc.
If the video card has Elpida memory, then the timing frequencies will not be readable, they are not in ascending order. For this memory you must use PolarisBiosEditor for ELPIDA.
Procedure for modifying the BIOS:
- We save two copies of the original BIOS using the ATIFlash program, the first copy for safety, the second for working with it.
- Open a second copy of the original BIOS using PolarisBiosEditor, “Load” button.
- We check the memory manufacturer.
- Modifying memory timings.
- We save the modified BIOS as a separate file.
- Next, we patch the video card with the saved BIOS using ATIFlash.
After modifying the BIOS, a message about an unsigned device will be displayed, in this case there are two solutions:
In drivers versions no higher than 16.11.5, there is no driver signature verification. There is no need to do any manipulations.
If you install the latest version of drivers, you can sign them using a special patch “AMD/ATI Pixel Clock Patcher”.
AMDATI Pixel Clock Patcher program interface
How to increase mining profitability
As mentioned earlier, for large incomes, you need powerful equipment, but for a simple computer, this option is suitable.
What does profitability depend on and how to increase it? Here I have given a short educational program on the main points. To find out more, you can visit the FAQ page on the site itself:
- The main power and ability to mine new crypto coins, of course, depends on the video card. The best option is a video card with 3 GB of video memory.
- Leave your computer running at full power when you are not using it, for example at night.
- Do not disable the program itself; if you need the power of your computer, just pause the program.
- Video card drivers can also affect performance. Read more detailed instructions on the website in the FAQ section - Which drivers should I install?
- For Nvidia video cards, install Windoes 10 Anniversary Update? especially important for new cards.
- If you understand what you are doing, then try overclocking your video card. Everything here is individual and will need to be tested in real time.
This is all! Next time this process will take a maximum of half a minute!
Be sure to leave feedback in the comments below so that other people can understand whether to install the program or not!
The best Ethereum miner for Nvidia video cards. Test results
Gminer took first place with a minimal margin. Right behind him is a T-rex. We would like to note that these miners were the absolute winners of the last test. This time they overtook everyone again, only now Gminer became the first.
Experiment results for Nvidia
Do miners show their hashrate honestly? We think it's fair. 285 MH/s in the miner window and 282 MH/s on the pool, the difference of a few percent is caused by the miner's commission.
Miner developer fees are charged as follows: the program mines for a short time to the developer’s wallet. Typically, once every hour for just under one minute, a miner mines for the developer.
Third place goes to the only open-source miner Ethminer. As you can see, the miner has no commission, so the hashrate on the pool and in the miner matched almost perfectly, the difference was 0.01 percent. However, as you can see, you shouldn’t think that a free open-source miner will bring you more money because it doesn’t feed the developers. If you choose Gminer or T-rex, your reward will be higher.
The fourth place was taken by test newcomer lolMiner. It is worth noting that lolMiner released its Nvidia miner just a few months ago, and has already surpassed the most popular miner at the moment, Phoenix, in terms of performance.
Video cards
The ranking is completed by Phoenix and NBMiner. What’s strange is that both of them had a much higher hashrate in the miner’s window than in reality. As for Phoenix, we have already determined during past tests that you cannot focus on its hashrate, you can only look at the so-called effective speed. In this experiment, the Effective Speed was 276.86 MH/s, which is very similar to the truth and is confirmed by the number of balls on the bullet. Phoenix has three hashrate displays: speed, Average speed (5 min) and Effective speed.
In our opinion, you can only focus on Effective speed! Be careful.
Phoenix hashrate
Example from the miner log:
- Eth speed: 284.577 MH/s
- Eth: Average speed (5 min): 284.557 MH/s
- Eth: Effective speed: 276.86 MH/s; at pool: 276.83 MH/s
Unfortunately, during the experiment, the hashrate in the NBMiner program turned out to be higher than in the pool. Surprisingly, the hashrate in the program was higher than that of all other miners! We checked the log, there were no rejected balls - stale or reject.
We conclude: Phoenix and NBMiner inflate the hashrate, but this will not bring you profit.