Since its inception in 2011, Litecoin has remained in second place behind Bitcoin and has been called the “silver of the Bitcoin world.”
This guide will show you how to start mining Litecoin or other Scrypt coins using the Innosilicon A6+ LTCMaster as an example.
A Brief Overview of Litecoin Mining
Here's a quick step-by-step guide on how to mine Litecoin:
- Connect the Litecoin miner to your computer
- Set up the miner
- Join the Litecoin mining pool
- Start mining Litecoin!
We know this sounds extremely simple, but this is how Litecoin is mined in a nutshell. If you want a detailed explanation, keep reading!
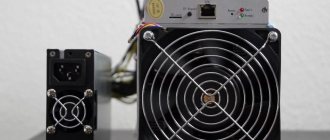
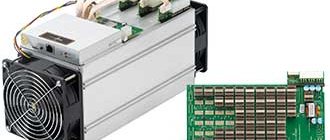
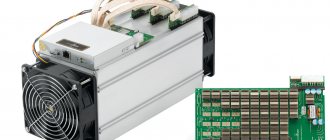
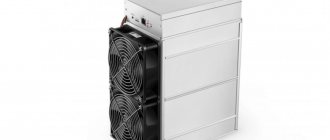
Innosilicon A6+ LTCMaster
In this tutorial we will be using the Innosilicon A6+ LTCMaster, a very powerful ASIC miner that uses the Scrypt algorithm for LTC mining.
ASIC stands for Application Specific Integrated Circuit and this means that these devices are made for the sole purpose of mining a specific coin, making them very efficient.
This is why you cannot mine Litecoin on video cards!
In our opinion, cheap ASIC miners have an advantage: if and when cryptocurrency prices skyrocket, the profitability of cheaper miners will skyrocket. This way, within one bull market cycle, you will quickly get ROI.
Receipt
Before sending the device, the place and time of delivery of the miner were previously agreed upon with the RusMiner manager. Communication took place via email and Viber. It should be noted that the company representative was always in touch and answered all my questions quickly enough. As a result, delivery was agreed upon by the transport company.
There are no complaints about the delivery and packaging of the goods. After calling the courier, the parcel was delivered to me safe and sound.
The ASIC was packed in bubble wrap and covered with “fragile cargo” tape. The only peculiarity is that the courier does not lift the parcel to the floor, so I had to go down to the car to get it. But these are minor things, although the miner is quite heavy.
Connecting and setting up ASIC
Step 1 - Unpack and Connect
- All 8 PCI-e slots (2 on each of the 4 hash cards and 1 on the controller)
- Ethernet cable (from A6+ to your router)
- Power supply cord
Once the power cord is connected, the miner should turn on automatically.
Plug one end of the Ethernet cable into the router and the other end into the connector shown in the following figure.
There are two buttons here:
- IP SET button: Press and hold for more than 5 seconds to restore the IP to 192.168.1.254.
- RESET button: Your miner will reboot if you press it. However, this will not restore your settings to default.
Step 2 - Login to the miner interface
By default, the miner uses a static IP to access the miner's management web page.
Enter 192.168.1.254 into the browser, then press “Enter” to enter the ASIC management web page (Google Chrome is best).
Can't access the miner's console?
This may be due to the fact that the ASIC IP addresses and the router IP address have different network settings. There are two ways to fix this:
- Change the router's IP address to 192.168.1.1, then try again.
- Don't want to change your router's network settings? Do it like below:
Connect the miner and computer using a network cable. Open Windows System Control Panel, go to Network and Internet
- Network and Internet - adapter settings, select "Ethernet" right click to view properties.
Select IP version 4 (TCP/IPv4) and click Properties.
Then change the miner's IP address to ensure that the miner and router share the same network segment. Next, connect the miner to the router, connect the PC with the router and select “Obtain an IP address automatically.” Now you can enter the IP through the browser into the management interface.
Step 3 – Set up ASIC
Enter the “Miner Configuration” page. Click "Config" in the lower right corner.
Now you need to log in.
Enter the default password "12345678", then click "Login" in the lower right corner.
Step 4 – Connect to the pool
Connect to a mining pool - this is a good way to get a constant income from ASIC.
We'll show you how to set up your A6+ with two different mining pools, depending on how you want to receive payouts (more examples in the article below).
Enter the Pool URL, Worker, Password according to the following image, then click "Save".
The miner will start mining and the tab will switch to the Miner Configuration page. It will display the modified custom setting.
To avoid IP address conflict when using 2 or more miners at the same time, you need to change the IP address. Enter the network interface shown in the following picture and change the IP address you need, then click "Save" to save it.
IP address
: If the router address is 192.168.0.1, you can change the miner's IP address to 192.168.0.# (# can be any number from 10 to 253, but each miner's # must be unique).
Netmask — Subnet mask
. Specify it according to your computer.
Getaway - Gateway
: Same here with the router address.
DNS
. It is recommended to change the DNS for the local network operator near the miner's location.
Once the above information is entered, click “Save” in the lower right corner.
Log in to the “Miner Status” page to check the status of the mining pool configuration and the performance of the A6 LTCMaster ASIC.
Select the "Administration" tab under the "System" tab, then you can change your password. Then click "Save Password" to save your new password.
Note. Since a factory reset does not reset the password to the default password, you must write down a new password.
If you forget your password, you can only recover it through support.
Step 5 – Update ASIC firmware
Select the "Upgrade" tab in the "System" section, select the firmware you want to install, click the "Upgrade" button to start the upgrade.
The update is successful when you see the progress bar reach 100%.
Note: Do not turn off the miner while the firmware is being updated. When the progress bar reaches 100%, the update is done and it will reboot itself. Then use "Ctrl + F5" to refresh.
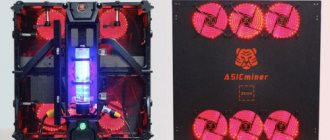
Appearance
At first acquaintance, it is quite difficult to distinguish Scrypt B2 from a regular system unit. The device itself is apparently assembled in a computer case slightly modified at the factory, and uses a standard power supply, which makes it even more similar to a computer.
Suspicions are dispelled only after examining the body. It has only two USB inputs (of which only one is used), an Ethernet port and a power button.
Under the hood of the Scrypt B2 there are four computing boards with huge aluminum heatsinks on each side. The thickness of the passive cooling strips is 3-4 cm, and they cover the boards almost completely.
There is also an active cooling system in the case. Its role is played by two powerful and, accordingly, quite loud coolers, blowing air through the entire case.
ProHashing - for mining multiple coins
ProHashing's greatest strength is that they automatically mine the most profitable coins for each supported algorithm (e.g. Scrypt, SHA-256, X11 and Equihash).
Additionally, you get paid in the coin you choose, no matter what coin you mine.
With the ProHashing system, you will likely earn more Litecoin than simply mining Litecoin on another pool. This way, you will be spared all the calculations when searching for the most profitable pools.
This system also allows you to receive payments in coins that you believe have a higher likelihood of increasing in value in the future.
So, with ProHashing, you don't have to put all your eggs in one basket.
Connecting to ProHashing
When you enter the ASIC setup, go to the "Miner Configuration" page and enter the following:
- URL
: prohashing.com:3333 - WORKER:
Enter your ProHashing account username here - PASSWORD
: n=Worker, a=Algorithm
To specify which coins you want to receive, click “Settings” and then “Payout Ratios”. Make sure you have a wallet address for each coin you want to receive.
Example
:
URL
: prohashing.com:3333
WORKER
: Techman34
PASSWORD
: n=myL3, a=scrypt
What to look for when choosing ASICs?
- Power consumption.
ASICS are energy-intensive equipment that consumes large amounts of electricity. If each device consumes up to 1.3 kW per hour, then it will not be possible to keep more than one at home, since the network will not support it. - Payback.
Depends on the hashrate or hash calculation speed and electricity consumption. The average payback for an ASIC is about six months, if you do not take into account the cost of paying for electricity. Taking into account electricity bills, the payback period can double or more. For this reason, many miners are looking for ways to connect to a “free” outlet, bypassing the meter. - Manufacturer.
In terms of price/quality ratio, Chinese manufacturers, in particular Bitmain, are the leaders. In addition, the delivery of ASICs from China to the CIS countries has already been started. It will be easier to buy the required ASIC, if only because there are suppliers who have established the legal import of mining devices at a very reasonable price. So, let's look at the most popular ASIC models that work on different algorithms.
NiceHash
For the second pool we are going to use NiceHash and receive money in Bitcoin.
An important strategy is to use multiple pools. Thus, the likelihood of both pools being turned off at the same time (and also of your ASIC being idle and losing money) is much less.
Setting up NiceHash
- Go to the NiceHash ASIC page.
- At the bottom, in the drop-down menu “SELECT ALGORI.
- In the “SELECT LOCATION” section, select your region or the one closest to you.
- Click the "Generate Address" button.
- The URL should look something like this: stratum+tcp://scrypt.eu.nicehash.com:3333
- Copy the URL and paste it into the second pool in the “Configuration” tab of ASIC.
Example:
- URL
: stratum+tcp://scrypt.eu.nicehash.com:3333 - WORKER
: 3HHG3zpxP4AmbKDR9iRy1c2bqAb4WKhNwm.mya6 - PASSWORD
: x
Note.
For WORKER, use the Bitcoin address you want to transfer BTC to, and worker is any name with a (.) sign in between, as in the example.
For the third and last pool URL we will use the Nicehash USA server:
- URL
: stratum+tcp://scrypt.usa.nicehash.com:3333 - WORKER
: 3HHG3zpxP4AmbKDR9iRy1c2bqAb4WKhNwm.myL3 - PASSWORD
: x
Click "Save and Apply" in the bottom right corner of the "Miner Configuration" tab and you'll be ready to start mining on your A6+!
Risks of mining on ASIC
Unlike graphics cards, which take advantage of the capabilities of PC gaming hardware, ASIC hardware was designed exclusively for mining.
Many miners fear that powerful ASICs could lead to the creation of large centralized mining farms and potentially even launch a 51% attack.
Because of this, there is some risk associated with purchasing ASIC miners in the long term. Since ASICs are only useful if they are compatible with the coin they are mining, coin developers can change the algorithm to render ASICs useless.
For example, Bitmain X3 was designed to mine Monero and was very profitable for a while. However, eventually the Monero development team did a hard fork and ASICs were no longer compatible with it.
However, many ASICs can be quite profitable in the long term. Coin developers for Bitcoin, Dash, Sia, and many others allow ASIC miners to mine coins.
Device Features
Despite the standard size case, Scrypt B2 weighs much more than a regular computer unit - 18.5 kg.
The first thing that attracts attention during operation of the device is the rather high noise level, as well as the attractive lighting produced by the red and green LEDs on the computing boards. In this way, Scrypt B2 resembles a modder's gaming case.
After reading the specifications, one is surprised by the enormous computing power of Scrypt B2. This fact is directly related to the narrow specialization of the device. Since the ASIC is designed exclusively for calculating hashes using the scrypt algorithm, it copes with its task extremely efficiently.
For example, the top-end Radeon R9 290x has a performance of 0.9 MHS (Megahashes per second) at a cost of $700. Scrypt B2 performs calculations at a speed of 31 MHS at a cost of $3000. In other words, one ASIC is similar to the performance of thirty-four Radeon R9 290x with a total cost of $23.8 thousand. This does not take into account the cost of motherboards, RAM, processors, and power supplies required to connect such a number of video cards. And if you consider that thirty-four video cards will use 10 kW/h of electricity (about 300 Wh from one video card) compared to 1 kW/h for an ASIC, it becomes clear how much less efficient they are for mining.
As for the possibility of overclocking the device, this can be achieved using a firmware update, and, apparently, both from a software and hardware point of view, Scrypt B2 has some groundwork.
Firstly, the Raspberry Pi does not have the latest version of cgminer installed (3.11), and in recent updates, with the help of optimized libraries, it has become possible, albeit only by a few percent, to increase the speed of calculations.
As for overclocking by increasing the operating frequencies of boards, here too Scrypt B2 most likely has some potential if the developer works in this direction. At least there were no problems with overheating during testing of the device. The laser thermometer displayed 30-40 (very rarely 45 degrees) when pointed at aluminum radiators, and the air near them was cooler than near the power supply.
Due to such a modest heating of the boards, there was even a lack of automatic adjustment of the cooler speed, which constantly operates in maximum mode, regardless of the load. There is no reduction in speed even in passive mode, when Scrypt B2 is only connected to the outlet, but does not perform any calculations. The coolers turn on at full power immediately after pressing the power button.
FAQ
How long does it take to mine Litecoin?
As of 2022, 64,733,818 Litecoins have been mined, and 84,000,000 coins are planned for mining.
Is mining Litecoin profitable?
Yes. If you have the right setup (i.e. low electricity costs and a cool environment), it will still be profitable to mine Litecoin. To find out if you can mine LTC profitably, use the Litecoin mining calculator.
How long will it take to mine 1 Litecoin?
Using A6++ with a difficulty factor of 13,667,659.27727, it will take you 45 days to mine 1 Litecoin.