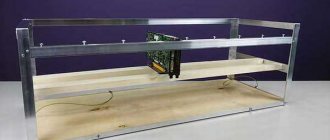
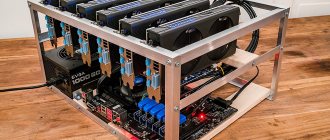
Even beginners in mining understand that several video cards simply cannot fit into one case, so special designs are used to create a farm. It is physically impossible to place 4-5 video cards on the motherboard, so special extension cords are used to organize a rig (farm). A mining riser is an integral part of the farm, without which no rig will be able to function correctly.
There are many nuances, features and types of risers that you need to know. Without this, it is unlikely that it will be possible to properly organize a mining farm, think through cooling and power supply, and ensure that video cards are protected from damage. In this article we will look at everything related to risers, their types, the advantages of some models and proper connection.
What is a riser for?
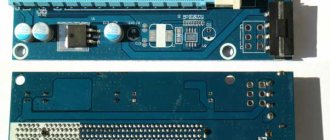
The very concept of riser, which comes from the English word rise (growth, increase, etc.), is used to refer to special adapters. They are a PCI-E bus extender, which is necessary to connect a large number of video cards to the motherboard. Obviously, you won't be able to connect video cards directly. Firstly, due to the thickness of the devices, secondly, due to high heat generation, and thirdly, due to the risk of short circuit. The riser design includes a board and connector for a video card, as well as an extended cable or USB 3.0 cable.
It is immediately necessary to dispel two main myths about risers:
- Depending on the chosen model, the mining speed may increase or decrease.
- It’s better to make risers yourself and save money.
Let's start with the definition of speed. A riser is not a device that can affect the hashrate in mining. It provides an extended connection between the video card and the motherboard. That is, this is solely a matter of technical organization. If someone promises you “special” devices that will increase mining speed, know that this is a charlatan or an incompetent person.
The second myth about saving, unfortunately, often “afflicts” budget mining. Some enthusiasts try to assemble risers themselves, others take the cheapest models. All this most often leads to two outcomes: the video card burns out or a short circuit occurs on the board. In both cases, the miner will suffer serious financial losses. It is also worth considering that problems mainly arise with the board. In the case of inexpensive models, we are usually talking about poor soldering.
Stabilizers on risers
To power the video card, two constant voltage sources are required: 3.3 12 volts. The small number of wires in the cable does not make it possible to conduct 3.3 volts from the motherboard. The designers solved the problem simply: they installed a stabilizer on the riser board, which converts the 5 volts supplied to it into 3.3.
This solution somewhat reduces the reliability of the system. If the stabilizer breaks down, the power to the video card will either disappear completely, or it will receive an increased voltage of 5 volts. Theoretically, this will not cause the GPU to break, but it will stop working correctly.
Standard stabilizers have an upper input voltage limit of 12 or 18 volts. Some miners take advantage of this by supplying them with 12 instead of 5 volts. Such a non-standard inclusion overloads the stabilizer, and if it breaks down, it can lead to damage to the video card.
Types of models
Now let's move on to the main thing - what risers can be and which types are considered more reliable for mining. Initially, all models are divided by connection type into two categories:
- with a flat train;
- with a USB 3.0 cable.
Models with a train usually cost less and are considered inferior, regardless of whether they are made manually or using special equipment. The main reason for their unpopularity is instability. They fail more often and can damage mining equipment. In addition, risers with a cable length of more than 40 cm are considered useless due to unstable operation. It is also worth considering that combining more than three stub risers is highly undesirable; this can pose a direct threat to your mining farm.
Risers with USB 3.0 are much more stable, although their price is usually higher than that of daisy chain ones. Moreover, this connection allows you to remove the video card from the motherboard at a distance of up to a meter. There is a stabilizer on the boards of such devices, although it has no real benefit and is more likely a marketing rather than a real advantage.
It is especially worth highlighting the presence of power connectors on the risers. Usually it is 4 pin (Molex) or 15 pin (SATA). According to reviews, tests and the opinion of professional miners, the choice should only be made towards Molex connectors (even if you need adapters), since in this case SATA is not designed for such loads.
What does it cost us to build our own PCI-E riser?
A long time ago I assembled a mini-computer for myself. But here's the thing - 3D modeling and let's be honest - banal toys made this box think a lot, and made me nervous. But you can’t just take and connect a video card to it - there is a PCI-E X4 slot, but there is no space in the case. And it won’t be able to provide food (if we don’t talk about really budget plugs). What solutions to this problem are on the market, why they did not suit me and what happened in the end, I will try to describe in this article. Please, under the cut, who is not afraid of a large number of pictures
!
Prologue
To connect a video card, a 4-lane PCI-E riser with additional power was required with the ability to control it if the power supply was separate. So, the usual daisy chain ones, which are painfully familiar to many thanks to the mining of a riser with a USB cable as an interface, immediately disappear.
Mass products with mass quality
But what more or less satisfies my needs can be found on the Internet:
- PE4C V4.1 - first of all, the board installed in the slot clearly did not fit into my PC in terms of dimensions. And the HDMI cables themselves are quite rigid, and there are also 2 of them! And the price of ~$140 seemed not entirely humane to me.
- EXP GDC - there was a version for the pci-e x4 slot, but it also had an inhumane price, 2 HDMI cables already encountered before. Now I can’t even find a picture of it - it was extremely rarely sold outside of China. But for the pci-e x4 slot the board is even larger than that of the PE4C
M2 version. And for a regular PCI-E slot it seems to have sunk into oblivion
- The riser from ADT-Link was not presented at the time of my throwing. And even now there is not a lot of information on them. But it seemed wildly strange to me to vary the price of the device so much depending on the length of the cable.
Having not found a suitable solution for myself, I had to choose from two options - hammer it in or do it myself. It’s clear that for the first option the article could end here, but I’ll probably continue.
Design
After talking in various communities dedicated to this topic, it was decided to make the riser universal, and not just for yourself - so that it can be connected to a laptop (via Mini Pci-E, M2 or even MXM) and to a computer in an x16 slot without being limited to only 4 data lines !
Here is the list of requirements that I set for myself:
- Power supply is only 12v. 3.3v is received on the riser itself using a dc-dc converter.
- Power management regardless of the type of power supply used (controlled ATX or regular 12v power supply)
- Connecting various adapters via detachable cables of the same type (without soldering).
- Divide the x16 interface into 4 groups. Thus, for interface x1-x4 – 1 cable, x8 – 2 cables and 4 cables for x16.
- A situation I sometimes observed, when a video card connected to a laptop via EXP GDC was powered by a laptop power supply at 19v (there is a connector - you need to plug it in), prompted me to add an indication of the input voltage within the permissible limits: 12v ± 5%.
Implementation
Your wishes have been described, you’ve accumulated enough courage - it’s time to make them come true! A riser is essentially an extension cord. And the cable is its main part. As such, varieties of LVDS cables were used - the so-called micro coaxial cable assembly. They are often used to connect display matrices of various devices.
Naked cable 18+
30 cores and only 2mm in diameter
Although it is extremely difficult to find them on open sale, I managed to find a manufacturer in China who is ready to produce such cables in any quantity (even 1 piece), of any length and with a suitable connector.
When I was done with choosing an interface cable, I could finally start designing the riser board circuit and selecting components. Ultimately, the developed boards were ordered, components were purchased, and everything was put together:
Top of the board
Bottom of board
- 8pin power connector (15A maximum current), combined with a power-on signal (for ATX power supplies)
- Circuit for indicating the supply voltage within acceptable limits (+12v ±5%) on the window comparator. Green LED – voltage is normal, red – out of acceptable limits
- Power management – mosfet in case of using a power source without control and sending a PS ON signal. The control signal is the 3.3v power supply on the host
- Step down DC\DC to get 3.3v
- Cooler connector
- LVDS connectors for connecting interface cables
- PCI-E x16 slot
- Protection against short circuit and overvoltage - fuse and TVS diode.
- Connecting additional power to the video card
On the other side of the cable there is an adapter board for the end device slot:
A significant disadvantage of this solution (as well as its analogues) is that you cannot quickly connect/disconnect the riser without having to disassemble the laptop/computer. And the connectors themselves are not intended for external use and have low mechanical strength and low service life. Therefore, I additionally made this adapter with more reliable connectors (the cable itself with such connectors cannot be made right away... for reasonable money):
Similar connectors were used in docking stations for smartphones, tablets and other devices.
Connection using 2 cables, and these adapters connect them
Testing
All components on the boards are soldered, cables are connected - it's time to cross your fingers and test!
The photo shows a prototype and has differences from the final version.
Since we connected it with 2 interface cables, we got PCI-E x8.
When passing various tests, there were no problems and the video card worked stably under load, and the bus frequency increased (gen3)
For testing, we managed to get a laptop with an M2 Key M slot with NVME support - MSI GE62 6QD. But for the prototype, an adapter with M+B keys was made for greater versatility, so it is possible to use only 2 lines out of 4 available:
Since this was a prototype, using electrical tape and moving dc/dc to a separate board is quite appropriate
Running a laptop with EGPU. The power supply starts automatically when you turn on the laptop
Due to the presence of an integrated and discrete video card in the laptop, I had to tinker with installing drivers
Working under load
Unfortunately, these pieces of hardware were at my disposal for a very short time and I did not have the opportunity to conduct more detailed testing after receiving the final version of the riser. So we had to be content with only this hardware:
- MP Asus Q87T
- CPU Core I3 4150T
- RAM 2*4GB Crucial DDR3L SO-DIMM PC-12800
- Wi-Fi / BT module Intel Dual Band Wireless-AC 7260
- SSD mSATA 120GB Crucial M500
- HDD 2.5` Seagate Momentus 500GB
- MSI RX 560 4Gb
What was it really all about?
Of course, the configuration is far from productive and it was not possible to get a significant advantage from connecting via the x4 bus instead of the x1 in various tests. Often it all came down to weak hardware.
Difference within the margin of error
Games like MOBA (WOT, for example) showed indifference to the bus on this configuration - if there is enough video memory, there is no need to load data in closed small locations.
But in online games with an open world, especially in places where there are large concentrations of players, the difference is quite noticeable. Here are 3 FPS measurements in the game Black Desert:
| Metering | min | avg | max |
| pci-e x4 gen1 ≈ pci-e x1 gen3 | |||
| 1 | 5 | 28 | 51 |
| 2 | 5 | 29 | 49 |
| 3 | 5 | 29 | 51 |
| pci-e x4 gen3 | |||
| 1 | 7 | 31 | 56 |
| 2 | 6 | 30 | 51 |
| 3 | 7 | 31 | 53 |
Plans and results
Although the project was started as a universal one and not only for oneself, it did not find much popularity.
I didn't find it at all. However, I got what I wanted and invaluable experience and knowledge. As they say, a negative result is also a result! I’m also often asked why I didn’t try to implement support for the now fashionable Thunderbolt3 interface. The problem is that this interface will require licensing from Intel. And they won’t just give you any documentation for the controllers. There is even a narrow circle of developers of Thunderbolt3 solutions under the patronage of the same Intel. Naturally, I was not accepted there.
Although there were rumors that this interface would be open and accessible to everyone, at the moment these are just rumors and the standard remains closed. But I would love to try to develop the project in this direction.
There were quite a few questions about the connection option instead of MXM video cards. There were plans for such an option, but I had to abandon it for two reasons - the funds for R&D came to an end and I had nothing to test it on.
In general, I will be very glad to hear comments and suggestions from Khabar residents. Thank you for your attention!
PS
Since this is generally my first experience in developing an electronic device, I had to turn to people more experienced in this regard for help, so I want to say a big thank you to NordicEnergy and Paging for their advice and answers to my (sometimes stupid) questions!
Project files
How to choose the right board
The choice of mining board today is made by its color. This is the simplest way to distinguish risers, although this is what some manufacturers use for marketing purposes.
Let's consider each type separately.
Greens
The only representative of low-profile risers. It is considered the cheapest and worst option in mining. Green ones are distinguished by poor-quality soldering. Most often they cause equipment malfunctions. It has a 4 pin Floppy connector, which has been missing for farms for a long time.
Black
One of the most popular and sought after options among miners. Most often they are equipped with Fortune Semiconductor or Diodes stabilizers. Features a manual latch.
Blue
Almost a complete analogue of black. The only difference is that these models have stabilizers from another manufacturer, and there is also no latch.
Blue
The model is almost identical to the blue and cyan ones, but with different stabilizers and different wiring (does not provide any advantage, since the differences are not used). Manual latch.
All models with USB 3.0 are full-profile and also have a crossover. Some models may have additional power supply. In order not to get confused by colors, which is often manipulated by manufacturers, it is worth familiarizing yourself with the main models of devices. In this case, you can understand which riser is in front of you by the markings.
| Version | Power interface | Power indicator |
| 006 | 4 pin (Molex) | Absent |
| 006C | 6 pin (Video) | Absent |
| 007S | 15 pin (SATA) | Absent |
| 008S | Has all three types | Present |
From this we can draw a simple conclusion - 008S is considered the best choice for mining, as it is the most universal. Although any device will perform its task, the only difference is in convenience, safety and technical organization. Any versions (003, 005 and others) are a typical marketing ploy designed to confuse miners.
The evolution of the development of risers for mining. Which USB riser to choose for cryptocurrency mining.
Information about the material Published: 04/10/2019, 04:56
With the advent of cryptocurrency mining on video cards, the first crypto enthusiasts had to solve many technical and software problems, one of such problems was the use of the maximum number of video cards on one computer platform or rig. Because In 2010, there were no special motherboards for mining yet, so the maximum number of video cards installed on one motherboard rarely exceeded 2 units. Those. the number of installed video cards directly depended on the number of PCI-Express x16 slots on the motherboard. In addition, due to the proximity of video cards to each other and the operation of mining rigs 24/7, there was a real problem with cooling the video cards. It was at this time that advice began to appear on specialized forums on increasing the distance between video cards using a special PCI-Express X16 connector extension, which had to be soldered from connectors and cables yourself. This device was later called Riser PCI-Express 16X - 16X.
The thick cables of such risers were extremely inconvenient and unreliable in places where wires and connectors were soldered.
They were literally almost immediately replaced by a more elegant version of a daisy chain riser called Riser PCI-express 1X-16X, which made it possible to use not only full-size PCI express connectors on motherboards, but also connectors with one transmission line instead of 16 - PCI-Express X1.
The appearance of such a riser solved several problems at once. This is an increase in the video cards installed on the motherboard from 2-3 to 5-7. The second is a more convenient thin cable, which was easier to bend and was a little more reliable in the soldering areas.
With the increase in the number of video cards installed on one system, another problem has arisen: the length of the cable risers is insufficient to separate 5-7 video cards at a sufficient distance at once. The end cards in such systems were often connected through two risers connected to each other, but in most cases such a combination did not work stably due to the greater number of connections and increased electromagnetic interference on long unshielded wires.
A large number of video cards on one motherboard gave rise to another problem. This is increased power consumption along the 12V line on motherboards, which were not prepared for such a development of events, and the first miners were faced with massive burnout of electrical tracks on motherboards and melting of connectors.
This is how cable risers with additional power connectors appeared, which were initially installed by enterprising Chinese or miners independently modified such risers if they planned to use rigs with a large number of GPUs. Using this technical solution, the 12V load for video cards went directly to the video card from the power supply, bypassing the motherboard.
To date, all loop risers have remained in history, because... They have been replaced by modern USB risers, which are more reliable, convenient and have long cables, but at the same time a higher price. If you can completely refuse to buy a 1X-16X cable riser, then a full-fledged 16X-16X cable riser can still be useful if the mining rig is also used as a gaming computer, where it is necessary to use all 16 PCI-Express transmission lines.
The main advantage of USB Riser is convenience, i.e. a long connecting wire with 2 USB connectors no less than 60cm in length instead of 30cm for a cable riser, allows you to place video cards in a much larger space, which first of all makes it possible to assemble rigs for 10 or more video cards, plus you can provide the necessary air gap between video cards for their better cooling. In addition, USB risers are much more reliable and protect video cards from voltage surges when power supplies are not operating correctly.
USB risers can be found in 9 different versions. Of these, two groups can be distinguished, these are risers from versions 1 to 5 and the second group from versions 6 to 9 of USB risers.
A distinctive feature of the risers of the first group is the minimal use of electronic components (voltage stabilizer from 12 V to 3.3 V and capacitors), as well as the use of Molex connectors (4 pins in a row) for additional power supply. But you may also find risers with Sata or Floppy connectors. The main differences between versions 1 to 5 are the use of different voltage stabilizers.
USB Riser Ver 002 (Molex additional power connector)
USB Riser Ver 003 (Molex connector, voltage regulator G1084)
USB Riser Ver 004
USB Riser Ver 005
The second group of risers is distinguished by the use of 6-pin PCIE additional power connectors, which is much more reliable. The use of not only an analog stabilizer, but also a voltage regulator, due to which there are several times more electrical components on such a riser, also protects video cards from poor quality power supply.
USB riser Ver 006c Buy on Aliexpress
USB Riser Ver 007 Buy on Aliexpress
USB Riser Ver 008 (three connectors at once: Sata, Molex and PCIE) Buy on Aliexpress
USB Riser Ver 009 (added 12V and 3.3V power bus status LEDs) Buy on Aliexpress
The optimal choice for purchase would be a USB riser from the second group and version 6 in particular, as the cheapest and time-tested option. For example, V008 USB risers came across defective batches that burned video cards along the 3.3V line. Read more in this article Defective risers and how to cure a killer riser.
It is also worth noting that under the guise of version 006 risers, old modifications of version 003 are often sold, which can be easily distinguished by the number of electronic components on the adapter’s printed circuit board.
If you decide to start mining cryptocurrencies using video cards, then purchasing USB risers is a mandatory element when creating mining rigs, without which it is simply impossible to assemble an optimal computer for mining.
You can always find a large selection of USB risers at a low price on Aliexpress, but if delivery time is more important to you than the price, then you can look for risers in the nearest computer stores and through advertisements in your city.
- Mining equipment
- For beginners
Connection and setup
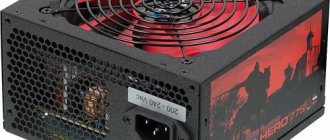
Now let's move on to the practical part and look at how to connect risers. It’s worth clarifying right away that if you use server power supplies, you need to take models with 6 Pin connectors. This eliminates the need for additional soldering and the use of special adapters.
Before direct connection, you need to check the equipment. This applies to checking power supply, contacts, etc. It is advisable to use an “unnecessary” video card for this. An important step is power distribution. The choice of power supply most often depends on the number of cards in the farm. That is, the choice will be between one server or two regular power supplies. Connect risers depending on the connectors. If Molex is used, then 2 video cards are usually connected to one power supply. In the case of not very “gluttonous” models, you can additionally connect one riser via a SATA connector.
In the case of a server power supply, it would be best to install an additional power supply (approximately 350 W) to provide power to the motherboard, hard drive, etc. Only connect video cards to the server power supply via 12-volt wires. The riser is connected via 6 Pin.
After organizing the power supply, just plug the video card into the riser. The second end of the USB cable is inserted into the PCI-E connector on the motherboard. After this, turn on the rig, the motherboard should itself detect all connected devices in the mining rig. It is important to pay attention to the following settings in the BIOS that will help improve performance:
- Disable USB 3.0 ports. and sound.
- Set PCI-E speed to Gen1 instead of automatic mode.
- CPU cooler speed – auto.
- Disable HDD SMART
The main question remains the relevance of the stabilizer on the riser. The converter turns 5v to 3.3v on the device itself. On the one hand, this simplifies the connection, on the other hand, it creates an additional link in the chain, which can be a disadvantage. In this case, when the stabilizer fails, not 3.3, but already 5v may go to the video card. Some miners use the upper voltage level and supply 12v to the stabilizers. However, when converting 12v to 3.3v, the stabilizer will work at its peak capabilities, which most often leads to its rapid failure. As a result, it may melt or damage the equipment.
Electrical Security
If you have one farm, then in principle there is no need to worry; from a household outlet you can consume no more than 16A * 220 = 3.5 kW. The difficulty that you may encounter is that all the outlets in the room may come from the same line in the circuit breaker. It is also necessary to check the circuit breaker itself in the distribution panel for the number of Amperes, since it can be knocked out from overload. For the safe use of several farms, I recommend running a separate line with a >40A circuit breaker from the main switchboard in the apartment to a separate box in the room; in this box, install a 16A circuit breaker and a separate line from the main one for each farm. Be sure to buy good truss sockets.
Also, do not forget that in houses with old wiring it is not advisable to connect more than 1.5 kW of power to existing outlets.
Important! Contact a good electrician who will advise on all issues and can install a separate line for the farms.
FAQ
Let's briefly look at the answers to the most common questions:
- Are there any real benefits from stabilizers in mining? – According to numerous miners and technical specialists, these are marketing ploys with dubious benefits.
- How many loopback risers can be connected without additional risks? - Maximum two.
- Is it necessary to check devices before starting work? – Yes, 100%. This will save you from unnecessary losses in case of malfunctions.
- Are the main and additional 12v power lines connected in the video card? - No.
- Can risers be placed on a metal surface? – No, over time the substrate may become deformed, which will lead to a short circuit.
- Will a USB 2.0 cable work? – No, it is not used in mining, it does not have enough cores to power the card.
- Which connector is preferable? – 4 pin (Molex).
Features of using adapters for additional power supply
The adapters included with most risers have a small cross-section of wires. This makes them impossible to use with powerful, high-performance video cards used for mining.
The problem lies in the SATA 15pin connector itself:
It is rated for a maximum current of 5.4 amps at 12 volts. That's 54 watts. The video card requires a power supply of 70 watts or more. Therefore, such adapters can only be used with low-power cards. It’s better to abandon them altogether and connect power from the power supply directly, eliminating adapters. Ideally, you need to solder the wires from the power supply to the connectors, or at least check the actual cross-section of the wires before connecting.
If you notice a smaller cross-section, the adapters should be replaced with ones of known quality.